LabLynx KB:ELab 7 user manual - data entry
Data Entry Overview
LabLynx enables you to manage the entry of Sample Test Parameter data and approve, re-run, or cancel these results for a batch (process group) or for non-batch samples. A Process Group, or Batch, is a single entity under which any number of sample tests may be grouped for data entry purposes. It may continue to have sample tests added to or deleted from it until results entry has been completed and approved for a given Process.
For a demonstration of this function, see:
![]() Main Data Entry] (http://files.mylablynx.com/share/eBooks/Movies/d13/d13.html)
Main Data Entry] (http://files.mylablynx.com/share/eBooks/Movies/d13/d13.html)
To Add or Edit Main Data Entry Processes
This information is categorized under the following tabs:
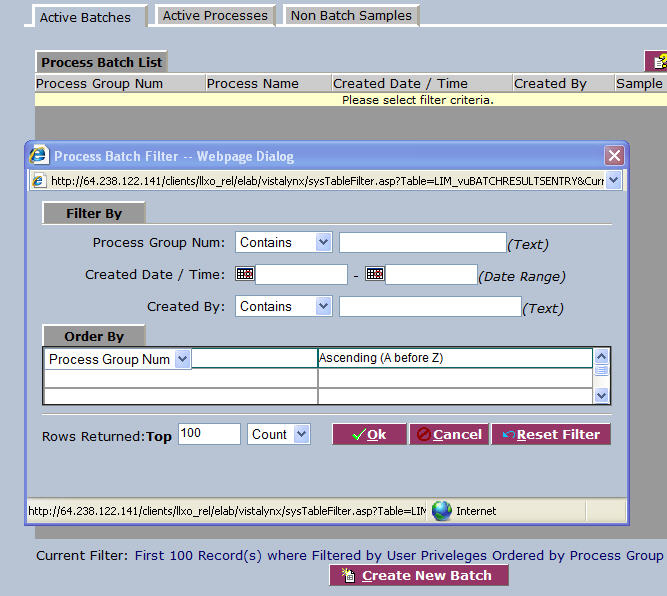
- Active Batches – A list of active Process Groups.
- Active Processes – A list of Processes that have active Process Groups.
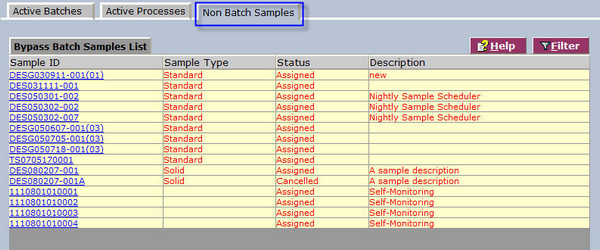
- Non Batch Samples – A screen for entering sample testing data where the Process is the system's “Bypass Batching” Process (i.e., no batch).
Active Batches Tab
The Process Batch List screen displays active Process Groups currently defined in the system. Upon navigating to the Main Data Entry screen, the user is displayed the system filter, so the list can be narrowed down. Select any desired parameters or click OK ![]() to dismiss the filter.
to dismiss the filter.
From the Process Batch List, select a Process Group Number.
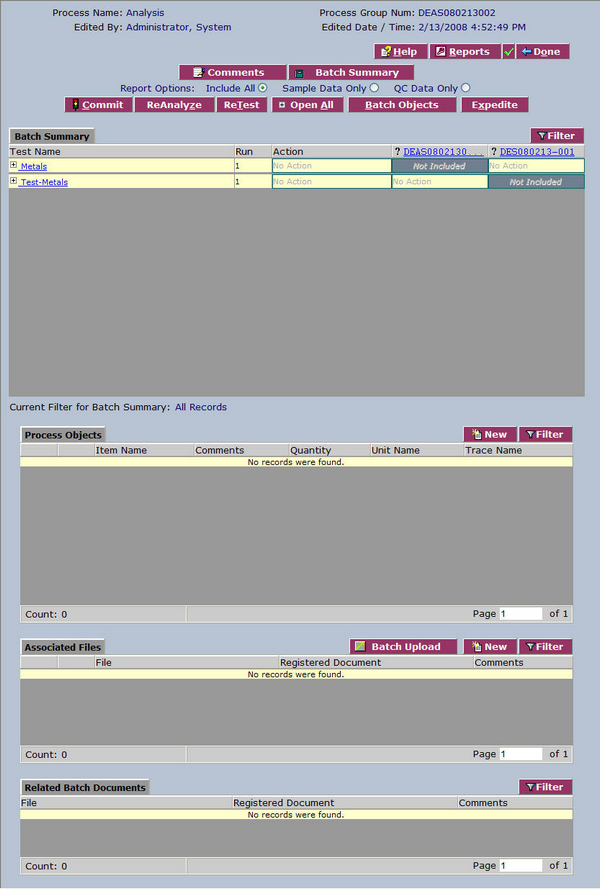
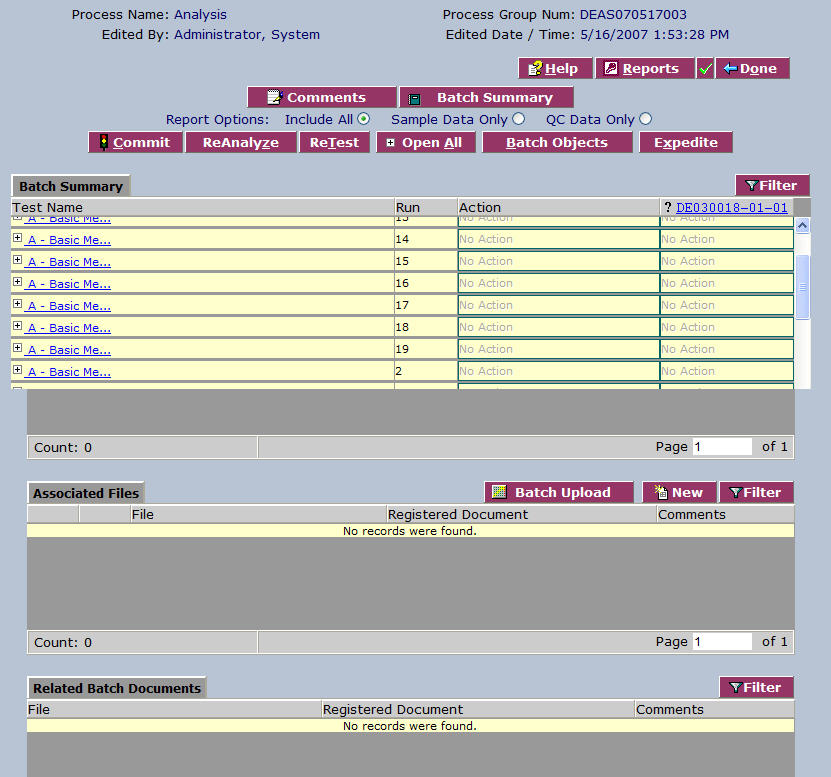
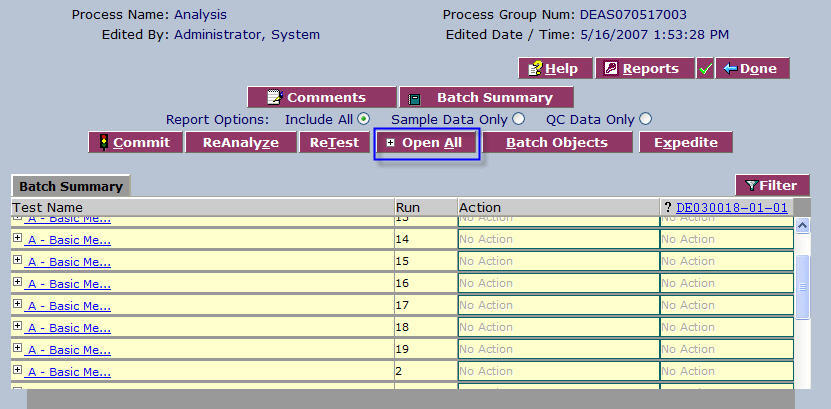
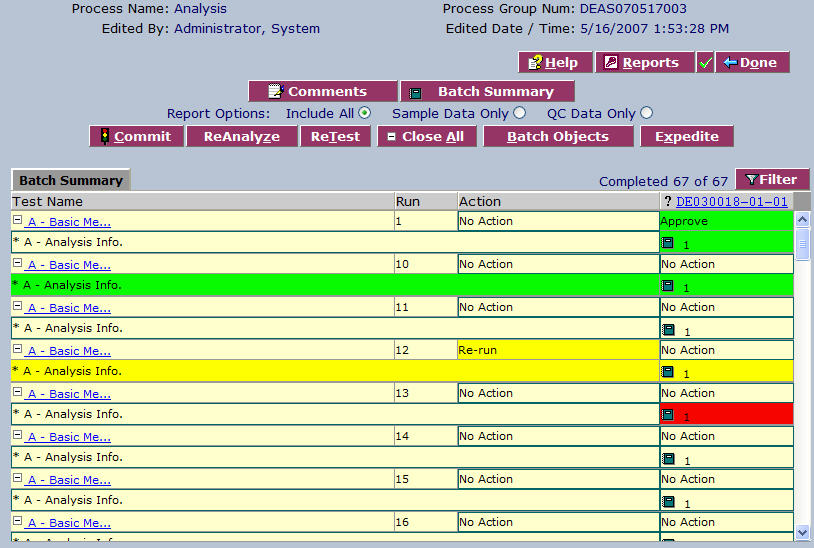
The system displays the Batch Summary screen.
From the Batch Summary screen you can enter data by the following methods:
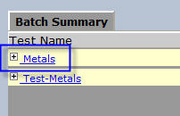
- By Test Name – Click on the Test Name, which displays all of the samples for that test.
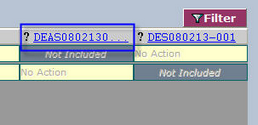
- By Sample Number – Click on the Sample Number link at the top of the columns.
To Enter Data By Test Name
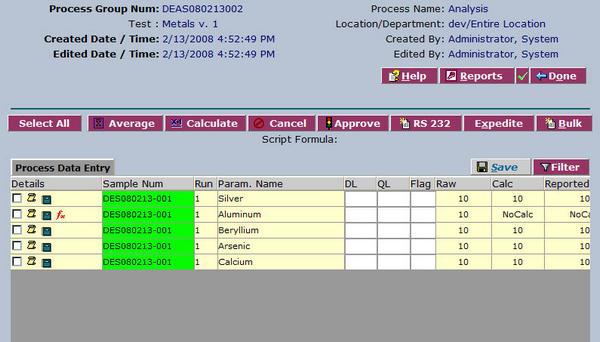
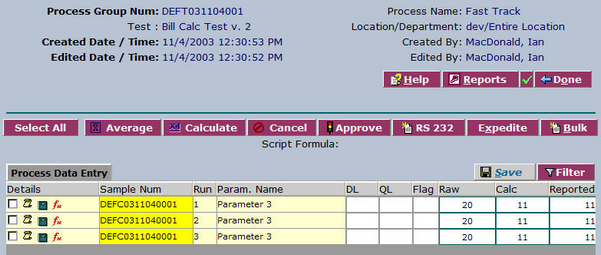
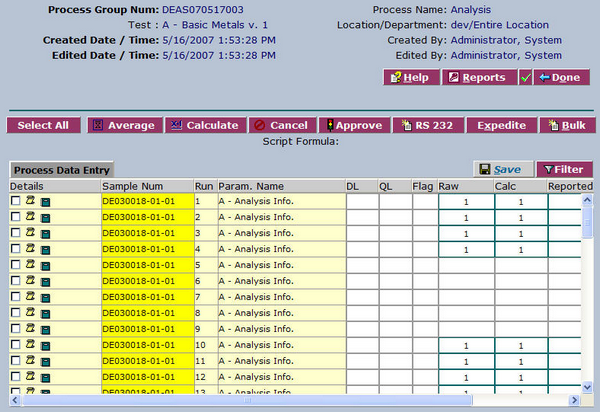
From the Batch Summary area, select a Test Name. The system displays the Process Data Entry screen. From this screen you can enter results for all samples in the batch that have been assigned to the selected test.
Complete the fields of the Process Data Entry area for the samples.
- DL - The corrected Detection Limit for recalculation.
- QL - The corrected Quantitation Limit for recalculation
- Raw - Type a raw value test result.
- Calc - If there is a calculation/formula associated with the parameter, the calculated value test result will display once the raw value has been entered and saved.
- Reported Value - The reported value test result will auto-populate once the raw value has been entered and saved, and will incorporate any rounding, significant figure and/or resolution settings made during test setup. This is the value that is by default pulled by the LIMS for the report.
- Display Order - Type the order in which to display the test results (1, 2, 3... etc.).
Select the checkbox at the beginning of a Sample Test Run parameter row if you want the system to calculate, average, approve, or cancel the results of the data entered. Click the following buttons for the action you require:
- Select All - Click to select all parameters.
- Average - Click to average all results from all selected test parameters for a given sample.
- Calculate - Click to execute the (previously assigned) calculation for the selected sample test parameters.
- Cancel - Click to cancel the results for selected parameters.
- Approve - Click to complete the data rows that you have selected. Once approved, the data are removed from this list and are advanced to the next process in the test path.
- RS232 - If configured at setup, click to activate the EDD Upload Information screen to capture information from an RS232-type connection device.
- Expedite - Click to advance the selected rows to the last process in the test path.
- Bulk - Click to allow the one-time update of all selected rows with a single entry.
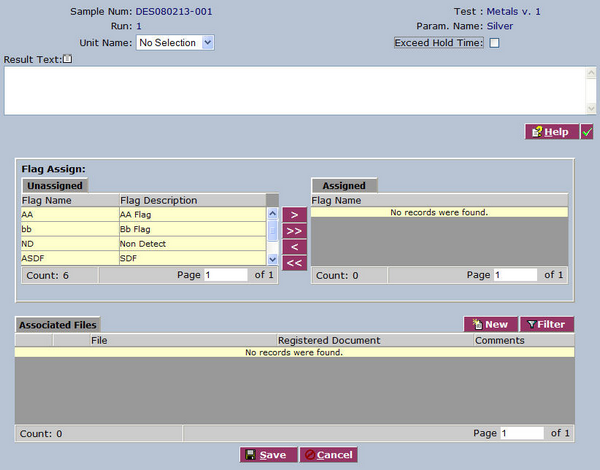
You can click the 'Golden Scroll' link ![]() next to the checkbox to add, edit, or audit additional results using the Add/Edit/Audit Additional Results window. You can assign results flags, add text, upload associated files (e.g. images) and more.
next to the checkbox to add, edit, or audit additional results using the Add/Edit/Audit Additional Results window. You can assign results flags, add text, upload associated files (e.g. images) and more.
You can click Bulk ![]() for a one-time update of all selected Test Runs.
When you are finished, click Done
for a one-time update of all selected Test Runs.
When you are finished, click Done ![]() .
.
To Enter Data By Sample Number
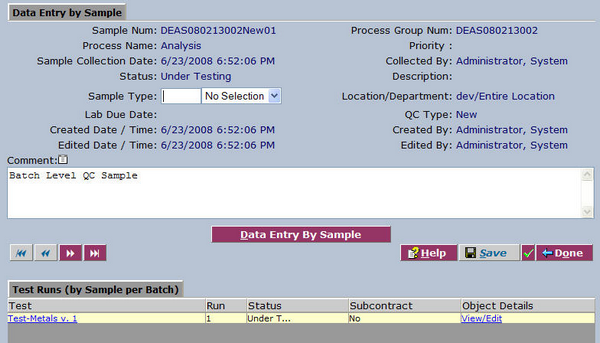
From the Batch Summary area, select a Sample Number from one of the column headers. The system displays the Data Entry by Sample screen. From this screen, you can enter test results for all tests assigned to the selected sample in the batch.
Type any details in the Comment field.
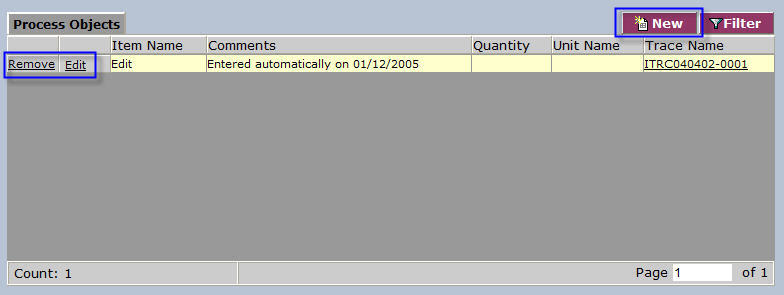
You can remove or edit a Test Run, or add a new one, by clicking the Remove, Edit or New ![]() links in the Sample Test Run Process Objects area.
links in the Sample Test Run Process Objects area.
From the Test Runs (Batch Summary) area, select a Test Name or click Data Entry By Sample.
The system displays the Process Data Entry screen.
Complete the fields of the Process Data Entry area.
- DL - The corrected Detection Limit for recalculation.
- QL - The corrected Quantitation Limit for recalculation
- Raw - Type a raw value test result.
- Calc - If there is a calculation/formula associated with the parameter, the calculated value test result will display once the raw value has been entered and saved.
- Reported Value - The reported value test result will auto-populate once the raw value has been entered and saved, and will incorporate any rounding, significant figure and/or resolution settings made during test setup. This is the value that is by default pulled by the LIMS for the report.
- Display Order - Type the order in which to display the test results (1, 2, 3... etc.).
Select the checkbox at the beginning of a Sample Test Run parameter row if you want the system to calculate, average, approve, or cancel the results of the data entered.
Click the following buttons for the action you require:
- Select All - Click to select all parameters.
- Average - Click to average all results from all selected test parameters for a given sample.
- Calculate - Click to execute the (previously assigned) calculation for the selected sample test parameters.
- Cancel - Click to cancel the results for selected parameters.
- Approve - Click to complete the data rows that you have selected. Once approved, the data are removed from this list and are advanced to the next process in the test path.
- RS232 - If configured at setup, click to activate the EDD Upload Information screen to capture information from an RS232-type connection device.
- Expedite - Click to advance the selected rows to the last process in the test path.
- Bulk - Click to allow the one-time update of all selected rows with a single entry.
You can click the 'Golden Scroll' link ![]() next to the checkbox to add, edit, or audit additional results using the Add/Edit/Audit Additional Results window. You can assign results flags, add text, upload associated files (e.g. images) and more.
next to the checkbox to add, edit, or audit additional results using the Add/Edit/Audit Additional Results window. You can assign results flags, add text, upload associated files (e.g. images) and more.
You can click Bulk ![]() for a one-time update of all selected Test Runs.
When you are finished, click Done
for a one-time update of all selected Test Runs.
When you are finished, click Done ![]() .
.
Active Processes Tab
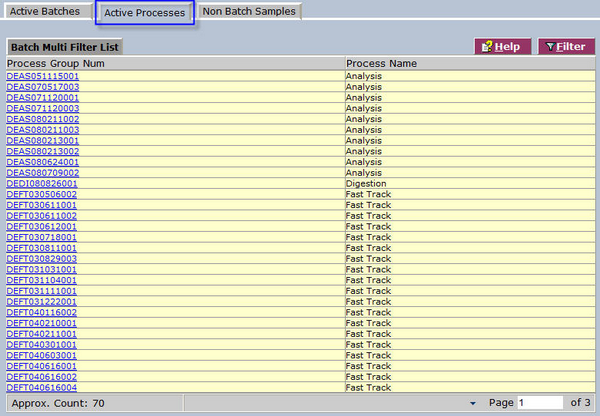
To edit Active Process details, click the Active Processes tab in the Main Data Entry screen. The system displays the Batch Multi Filter List screen.
From the Batch Multi Filter List screen, select a Process Group Number.
The system displays the Batch Summary screen.
From the Batch Summary area, select a Test Name.
The system displays the Process Data Entry screen.
Complete the fields of the Process Data Entry area.
- DL - The corrected Detection Limit for recalculation.
- QL - The corrected Quantitation Limit for recalculation
- Raw - Type a raw value test result.
- Calc - If there is a calculation/formula associated with the parameter, the calculated value test result will display once the raw value has been entered and saved.
- Reported Value - The reported value test result will auto-populate once the raw value has been entered and saved, and will incorporate any rounding, significant figure and/or resolution settings made during test setup. This is the value that is by default pulled by the LIMS for the report.
- Display Order - Type the order in which to display the test results (1, 2, 3... etc.).
Select the checkbox at the beginning of a Sample Test Run parameter row if you want the system to calculate, average, approve, or cancel the results of the data entered.
Click the following buttons for the action you require:
- Select All - Click to select all parameters.
- Average - Click to average all results from all selected test parameters for a given sample.
- Calculate - Click to execute the (previously assigned) calculation for the selected sample test parameters.
- Cancel - Click to cancel the results for selected parameters.
- Approve - Click to complete the data rows that you have selected. Once approved, the data are removed from this list and are advanced to the next process in the test path.
- RS232 - If configured at setup, click to activate the EDD Upload Information screen to capture information from an RS232-type connection device.
- Expedite - Click to advance the selected rows to the last process in the test path.
- Bulk - Click to allow the one-time update of all selected rows with a single entry.
You can click the 'Golden Scroll' link ![]() next to the checkbox to add, edit, or audit additional results using the Add/Edit/Audit Additional Results window. You can assign results flags, add text, upload associated files (e.g. images) and more.
next to the checkbox to add, edit, or audit additional results using the Add/Edit/Audit Additional Results window. You can assign results flags, add text, upload associated files (e.g. images) and more.
You can click Bulk ![]() for a one-time update of all selected Test Runs.
When you are finished, click Done
for a one-time update of all selected Test Runs.
When you are finished, click Done ![]() .
.
Non Batch Samples Tab
To edit Non Batch Samples details, click the Non Batch Samples tab in the Main Data Entry screen. The system displays the Bypass Batch Samples List screen.
From the Bypass Batch Samples List screen, select a Sample ID.
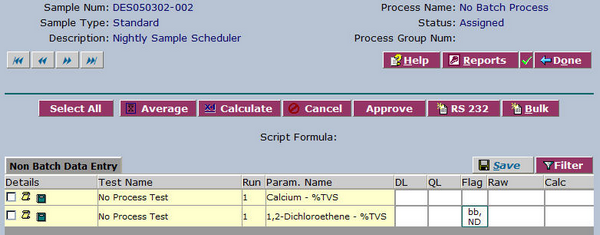
The system displays the Non Batch Data Entry screen.
Complete the fields of the Non Batch Data Entry area.
- DL - The corrected Detection Limit for recalculation.
- QL - The corrected Quantitation Limit for recalculation
- Raw - Type a raw value test result.
- Calc - If there is a calculation/formula associated with the parameter, the calculated value test result will display once the raw value has been entered and saved.
- Reported Value - The reported value test result will auto-populate once the raw value has been entered and saved, and will incorporate any rounding, significant figure and/or resolution settings made during test setup. This is the value that is by default pulled by the LIMS for the report.
- Display Order - Type the order in which to display the test results (1, 2, 3... etc.).
Select the checkbox at the beginning of a Sample Test Run parameter row if you want the system to calculate, average, approve, or cancel the results of the data entered.
Click the following buttons for the action you require:
- Select All - Click to select all parameters.
- Average - Click to average all results from all selected test parameters for a given sample.
- Calculate - Click to execute the (previously assigned) calculation for the selected sample test parameters.
- Cancel - Click to cancel the results for selected parameters.
- Approve - Click to complete the data rows that you have selected. Once approved, the data are removed from this list and are advanced to the next process in the test path.
- RS232 - If configured at setup, click to activate the EDD Upload Information screen to capture information from an RS232-type connection device.
- Expedite - Click to advance the selected rows to the last process in the test path.
- Bulk - Click to allow the one-time update of all selected rows with a single entry.
You can click the 'Golden Scroll' link ![]() next to the checkbox to add, edit, or audit additional results using the Add/Edit/Audit Additional Results window. You can assign results flags, add text, upload associated files (e.g. images) and more.
next to the checkbox to add, edit, or audit additional results using the Add/Edit/Audit Additional Results window. You can assign results flags, add text, upload associated files (e.g. images) and more.
You can click Bulk ![]() for a one-time update of all selected Test Runs.
When you are finished, click Done
for a one-time update of all selected Test Runs.
When you are finished, click Done ![]() .
.
To View Results
Once you have entered results, you can approve those results directly in the Main Data Entry section from the Results screen, or when you have clicked Done ![]() , from the Batch Summary screen.
, from the Batch Summary screen.
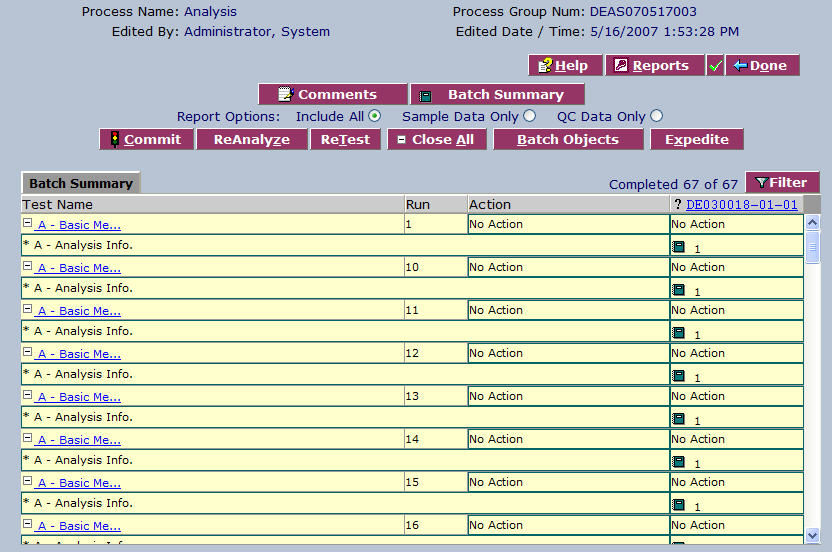
From the Batch Summary screen, click the Open All ![]() button to display all testing results.
button to display all testing results.
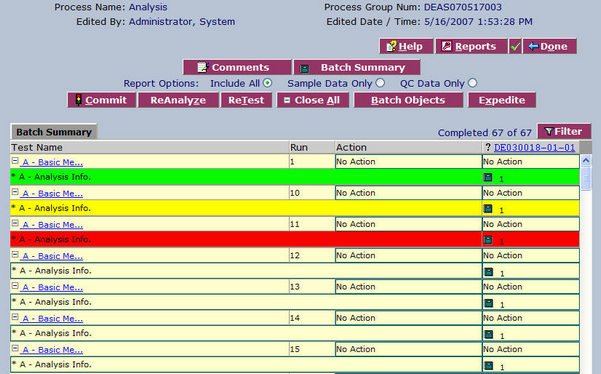
The actions of approving, re-running, or cancellation are done by color-coding results cells according to number of clicks (one - approve, two re-test, three - cancel). You can do this in four ways:
- Selecting the Sample – All results for the sample are selected and color-coded.
- Selecting the Test – All testing results for that test are selected and color-coded.
- Selecting the Test Parameter – All testing results for that specific test parameter are selected and color-coded.
- Selecting the Specific Results – The specific result cell is selected and color-coded.
To Commit Batch Sample Data
From the Batch Summary screen in Main Data Entry, select any of the Data Sample Actions. The system changes the color and status of the action based on how many times you click the result.
- Green Cell (one click) – Results are approved and are now complete for the specific process. They are advanced to the next process for the assigned test path.
- Amber Cell (two clicks) – Results remain in the current active state, but an additional run is added to this process batch for capture of additional data.
- Red Cell (three clicks) – Results are canceled. They will no longer process further.
