Difference between revisions of "LabLynx KB:Application management"
Shawndouglas (talk | contribs) (Created article.) |
Shawndouglas (talk | contribs) m (Added numbers.) |
||
| Line 22: | Line 22: | ||
<br /> | <br /> | ||
From the '''Application List''', select an application name or click '''New'''. The system will display the '''Application Information''' screen: | 1. From the '''Application List''', select an application name or click '''New'''. The system will display the '''Application Information''' screen: | ||
[[File:LLXLIMS_Application-02.png]] | [[File:LLXLIMS_Application-02.png]] | ||
<br /> | <br /> | ||
Complete the fields of the '''Application Information''' area. Fields in bold are required. The various fields are explained below: | 2. Complete the fields of the '''Application Information''' area. Fields in bold are required. The various fields are explained below: | ||
{| style="text-align: left; width: 775px; border-spacing: 0px; border: 1px solid black;" | {| style="text-align: left; width: 775px; border-spacing: 0px; border: 1px solid black;" | ||
| Line 50: | Line 50: | ||
<br /> | <br /> | ||
Click the '''Show Designations''' button to assign active designation limits: | 3. Click the '''Show Designations''' button to assign active designation limits: | ||
[[File:LLXLIMS_Application-03.png]] | [[File:LLXLIMS_Application-03.png]] | ||
<br /> | <br /> | ||
In the '''Assign Active Designation Limits''' area, select groups to assign/unassign. The various buttons are explained below: | 4. In the '''Assign Active Designation Limits''' area, select groups to assign/unassign. The various buttons are explained below: | ||
{| style="text-align: left; width: 775px; border-spacing: 0px; border: 1px solid black;" | {| style="text-align: left; width: 775px; border-spacing: 0px; border: 1px solid black;" | ||
| Line 75: | Line 75: | ||
<br /> | <br /> | ||
Click the '''Show Contacts''' button to assign contacts: | 5. Click the '''Show Contacts''' button to assign contacts: | ||
[[File:LLXLIMS_Application-04.png]] | [[File:LLXLIMS_Application-04.png]] | ||
<br /> | <br /> | ||
In the '''Assign Contacts''' area, select contacts to assign/unassign. The various buttons are explained below: | 6. In the '''Assign Contacts''' area, select contacts to assign/unassign. The various buttons are explained below: | ||
{| style="text-align: left; width: 775px; border-spacing: 0px; border: 1px solid black;" | {| style="text-align: left; width: 775px; border-spacing: 0px; border: 1px solid black;" | ||
| Line 100: | Line 100: | ||
<br /> | <br /> | ||
When you are finished, click '''Save''' and then '''Done'''. | 7. When you are finished, click '''Save''' and then '''Done'''. | ||
<br /> | <br /> | ||
Latest revision as of 00:05, 14 October 2011
|
|
This is an article specific to the Category:LabLynx knowledge base. Its context outside of LabLynx, Inc may not be apparent, thus why it appears inside the LabLynx KB namespace. |
Introduction
LabLynx enables you to add and edit application information. This includes application, designation, and contact data.
System administrators use LabLynx ELab to manage applications, including:
- application information
- contacts
- designations
Adding or editing applications
The Application List screen displays application information currently defined in the system:
1. From the Application List, select an application name or click New. The system will display the Application Information screen:
2. Complete the fields of the Application Information area. Fields in bold are required. The various fields are explained below:
| Field | Description |
|---|---|
| Application Name | This is the user-defined value for the application name. |
| Start Date | Click the calendar icon to select a date. |
| End Date | Click the calendar icon to select a date. |
| Published | This is a flag that determines whether or not to publish the application. |
| Active | This is a flag used by the system in order to determine whether or not to make this application available for use. |
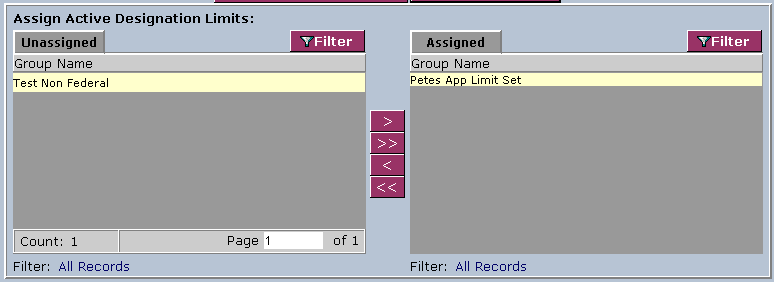
3. Click the Show Designations button to assign active designation limits:
4. In the Assign Active Designation Limits area, select groups to assign/unassign. The various buttons are explained below:
| Button | Description |
|---|---|
| Add | Adds the selected group(s) to the assigned list. |
| All | Adds all groups to the assigned list. |
| Remove | Removes the selected group(s) from the assigned list. |
| Clear | Removes all groups from the assigned list. |
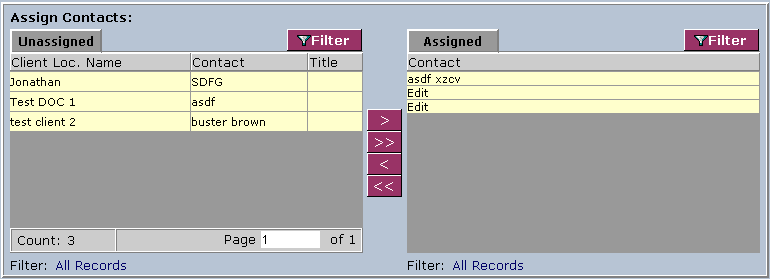
5. Click the Show Contacts button to assign contacts:
6. In the Assign Contacts area, select contacts to assign/unassign. The various buttons are explained below:
| Button | Description |
|---|---|
| Add | Adds the selected contact(s) to the assigned list. |
| All | Adds all contacts to the assigned list. |
| Remove | Removes the selected contact(s) from the assigned list. |
| Clear | Removes all contacts from the assigned list. |
7. When you are finished, click Save and then Done.


