LabLynx KB:Sample receiving
|
|
This is an article specific to the Category:LabLynx knowledge base. Its context outside of LabLynx, Inc may not be apparent, thus why it appears inside the LabLynx KB namespace. |
Introduction
LabLynx enables you to add and edit sample receiving information. You can edit specific information for collection data, sample point data, disposal data, comments, test assignments, and applications. You can also reprint labels.
System Administrators use LabLynx ELab to manage sample receiving information, including:
- sample details
- collection data
- sample point data
- disposal data
- comments
- test assignments
- sample applications
- reprinting labels
- PIMS sample fractions
Adding or editing sample information
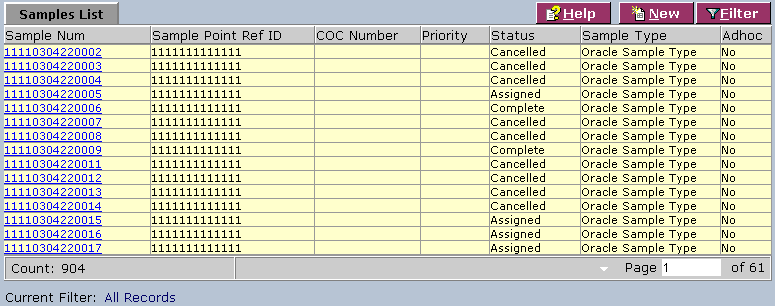
The Samples List screen displays sample information currently defined in the system:
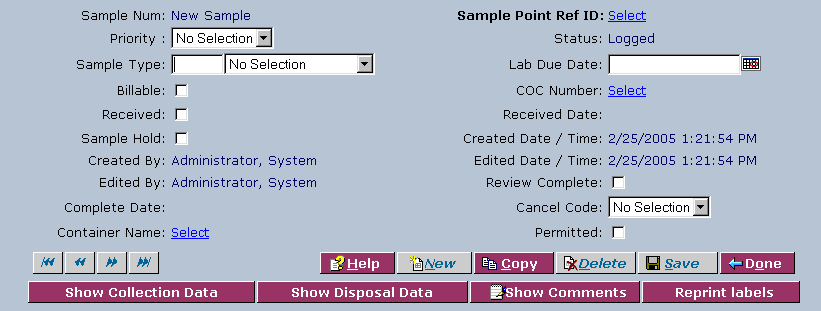
1. From the Samples List, select a sample number or click New:
Note: Some buttons pictured will not appear for new records.
2. Complete the fields in the top area. Fields in bold are required. The various fields are explained below:
| Field | Description |
|---|---|
| Sample Point Ref ID | Click the link to open the Sample Pt. Ref Lookup screen and select a record from the Sample Pt. Ref List. |
| Priority | Select a priority from the drop-down list. |
| Sample Type | Select the type from the drop-down list. Type the first letter(s) of the type in the field to the left for faster selection from the drop-down list. |
| Lab Due Date | Click the calendar icon to select a date. |
| Billable | Select the check box to make the sample billable. |
| COC Number | Click the link to open the Chain of Custody Lookup screen and select a COC number from the Chain of Custody List. |
| Received | Select the check box if the sample has been received. |
| Sample Hold | Select the check box if there is a hold on the sample. |
| Review Complete | Select the check box if the review is complete. |
| Cancel Hold | Select from the drop-down list. |
| Container Name | Click the link to open the Container Lookup screen and select a container name from the Container List. |
| Permitted | Select the check box if the sample is from a permitted sample point. |
3. When you are finished, click Save and then Done.
Collection data
Click the Show Collection Data button to edit collection information. The system will display the Collection Data area:
1. Complete the fields of the Collection Data area. Fields in bold are required. The various fields are explained below:
| Field | Description |
|---|---|
| Sample Collection Date | Click the calendar icon to select a date. Type a time in minutes and seconds. |
| Sample Collection End Date | Click the calendar icon to select a date. Type a time in minutes and seconds. |
| Collection Method Type | Click the link to select a collection method type from the Collection Method Types List on the Collection Method Types Lookup screen. |
| Collection Method Name | Click the link to select a collection method name from the Collection Methods List on the Collection Methods Lookup screen. |
| Collected By | Click the link to select the person who collected the sample from the Collected By List on the Collected By Lookup screen. |
| Sampling Container | Click the link to select a sampling container from the Sampling Container List on the Sampling Container Lookup screen. |
| Sample Volume | Type the volume. |
| Unit Name | Select the name from the drop-down list. |
| Sample Depth | Type the sample depth. |
| Sample pH | Type the sample pH. |
| Sample Temp | Type the sample temperature. |
| Preservative Name | Select the preservative name from the drop-down list. Type the first letter(s) of the name in the field to the left for faster selection from the drop-down list. |
2. When you are finished, click Save and then Done.
Sample point data
Click the Show Sam Pt. Data button to view sample point information. The system will display the Sample Point Data area:
1. Click New.
2. Complete the fields. Fields in bold are required. The various fields are explained below:
| Field | Description |
|---|---|
| Sample Point Ref ID | Click the link to open the Sample Pt. Ref Lookup screen and select a record from the Sample Pt. Ref List. |
| Priority | Select a priority from the drop-down list. |
| Sample Type | Select the type from the drop-down list. Type the first letter(s) of the type in the field to the left for faster selection from the drop-down list. |
| Lab Due Date | Click the calendar icon to select a date. |
| Billable | Select the check box to make the sample billable. |
| COC Number | Click the link to open the Chain of Custody Lookup screen and select a COC number from the Chain of Custody List. |
| Received | Select the check box if the sample has been received. |
| Sample Hold | Select the check box if there is a hold on the sample. |
| Review Complete | Select the check box if the review is complete. |
| Cancel Hold | Select from the drop-down list. |
| Container Name | Click the link to open the Container Lookup screen and select a container name from the Container List. |
| Permitted | Select the check box if the sample is from a permitted sample point. |
Disposal data
Click the Show Disposal Data button to edit disposal data information. The system will display the Disposal Data screen:
1. Complete the fields of the Disposal Data screen. Fields in bold are required. The various fields are explained below:
| Field | Description |
|---|---|
| Proposed Disposal DT | Click the calendar icon to select a date. |
| Actual Sample Disposal DT | Click the calendar icon to select a date. |
| Disposal Type Name | Select the disposal type. |
2. When you are finished, click Save and then Done.
Comments
Click the Show Comments button to add or edit comments information. The system will display the Comments screen:
1. Complete the fields of the Comments screen. The various fields are explained below:
| Field | Description |
|---|---|
| Hazardous Waste Comment | Type a comment. |
| Description | Type a description. |
| Final Rpt. Comment | Type a comment. |
| Sample Disposal Comments | Type comments. |
| Comment | Type a comment. |
2. When you are finished, click Save and then Done.
Test assignments
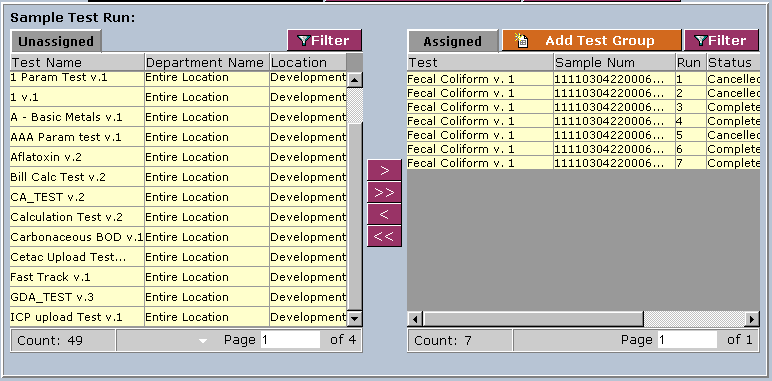
Click the Show Test Assignment button to edit test assignment information. The system will display the Sample Test Run area:
1. In the Sample Test Run area, select tests to assign or unassign. The various buttons are explained below:
| Button | Description |
|---|---|
| Add | Adds the selected test to the assigned list. |
| All | Adds all tests to the assigned list. |
| Remove | Removes the selected test from the assigned list. |
| Clear | Removes all tests from the assigned list. |
2. When you are finished, click Save and then Done.
Sample applications
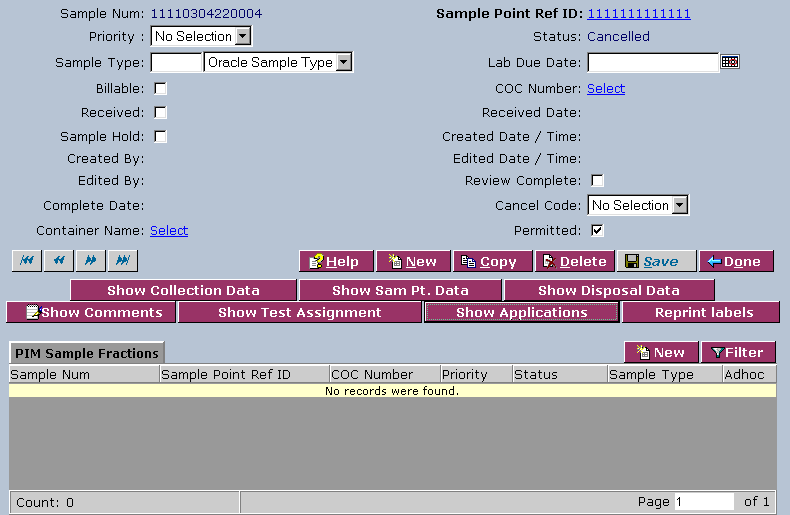
Click the Show Applications button to edit applications information. The system will display the Sample Applications area:
1. Select an application from the new drop-down list:
2. To add more applications to the list, repeat step two.
3. To remove applications from the list, click Remove.
4. When you are finished, click Save and then Done.
Reprinting labels
Click the Reprint Labels button to select a job name to be printed in the Add/Edit Add Job to Queue Web page dialog.
PIM sample fractions
At the bottom of the main Sample Number screen, in the PIM Sample Fractions area, select a sample number or click New:
1. Refer to the sample point data section for further help.
2. When you are finished, click Save and then Done.


