LabLynx KB:LIMS user manual - 23.0 instrument management
|
|
This is an article specific to the Category:LabLynx knowledge base. Its context outside of LabLynx, Inc may not be apparent, thus why it appears inside the LabLynx KB namespace. |
Introduction
LabLynx enables you to add and edit LIMS equipment and instrument information. Equipment and instrument maintenance allows users to:
- define any laboratory instrument or other type of equipment used for testing
- assign those instruments to process groups
- define the instrument upload and download capabilities
- define maintenance schedules and maintenance history for these items
LabLynx can also assign a system trace ID to the equipment or instrument for tracking purposes.
System Administrators use LabLynx ELab to manage equipment and instrument information, including:
- instrument details
- instrument custom fields
- instrument maintenance schedule
- instrument maintenance history
- instrument test assignment
- instrument parameters
Adding or editing an instrument
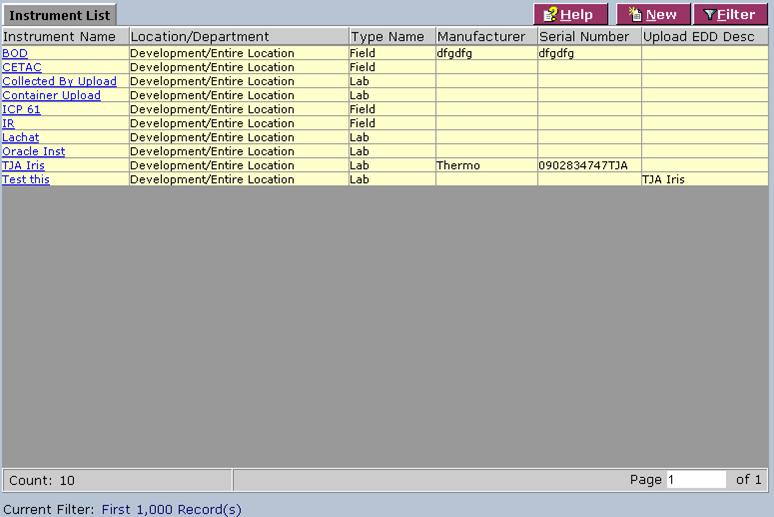
The Instrument List screen displays instrument information currently defined in the system:
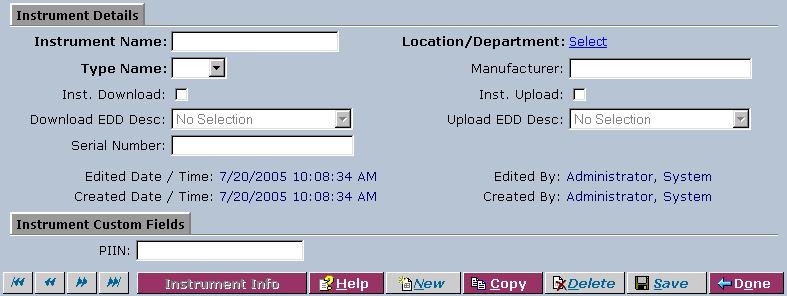
1. From the Instrument List, select an instrument or click New. The system will display the Instrument Detail screen:
2. Complete the fields of the Instrument Details screen. Fields in bold are required. The various fields are explained below:
| Field | Description |
|---|---|
| Instrument Name | Enter the instrument name. |
| Location/Department | Click the link to select a location from the Labs Lookup List. |
| Type Name | Select the type of instrument from the drop-down list. |
| Manufacturer | Type the name of the manufacturer of the instrument. |
| Inst. Download | Select the check box to indicate that the instrument can generate file downloads. |
| Inst. Upload | Select the check box to indicate that the instrument is capable of accepting file uploads for run lists. |
| Download EDD Desc. | Select a description from the drop-down list. This option is only available if Inst. Download has been checked. |
| Upload EDD Desc. | Select a description from the drop-down list. This option is only available if Inst. Upload has been checked. |
| Serial Number | Type the serial number of the instrument. |
3. Complete the fields of the Instrument Custom Fields area. The various fields are explained below:
| Field | Description |
|---|---|
| PIIN | Type the PIIN of the instrument. |
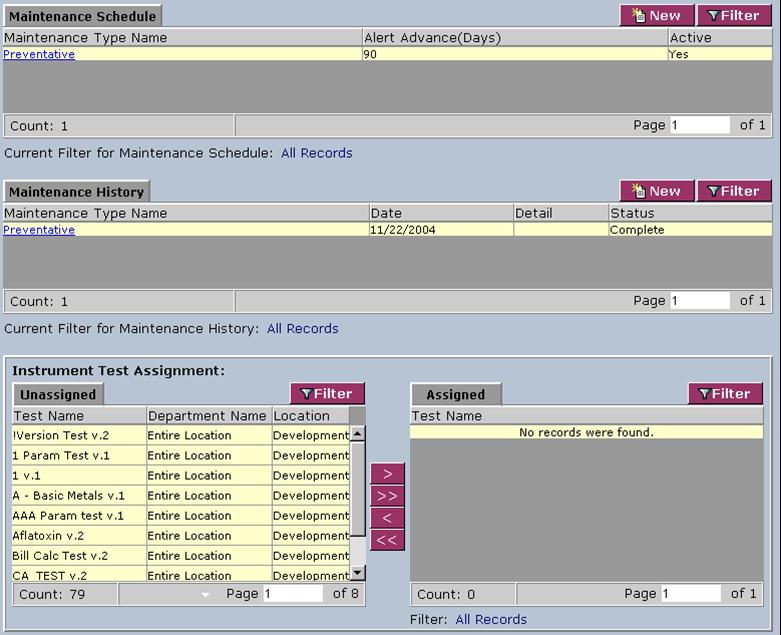
4. When you are finished, click Save. The system displays the Maintenance Schedule, Maintenance History, and Instrument Test Assignment areas:
Adding or editing an instrument maintenance schedule
1. From the Maintenance Schedule area on the Instrument Details screen, select a maintenance type name or click New. The system will display the Maintenance Schedule screen:
2. Complete the fields of the Maintenance Schedule screen. Fields in bold are required. The various fields are explained below:
| Field | Description |
|---|---|
| Schedule Description | Click the link to select a description from the schedule lookup list. |
| Maintenance Type Name | Select the name of the type of maintenance from the drop-down list. |
| Assigned To | Assign a user to the maintenance schedule by selecting a name from the drop-down list. |
| Alert To | Select a user that will also receive the advance alert for this maintenance from the drop-down list. |
| Alert Advance (Days) | Type the number of days advance notice that the maintenance requires. |
| Active | Select the check box to indicate that the maintenance schedule is active. |
3. When you are finished, click Save and then Done.
Adding or editing an instrument maintenance history
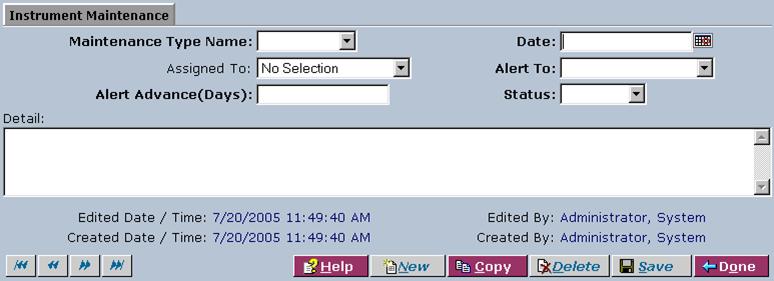
1. From the Maintenance History area on the Instrument Details screen, select a maintenance type name or click New. The system will display the Instrument Maintenance screen:
2. Complete the fields of the Instrument Maintenance screen. Fields in bold are required. The various fields are explained below:
| Field | Description |
|---|---|
| Maintenance Type Name | Select the type of maintenance being defined from the drop-down list. |
| Date | Type the date or click the calendar to select the date on which the maintenance will take place. |
| Assigned To | Assign a user to the maintenance schedule by selecting a name from the drop-down list. |
| Alert To | Select a user that will also receive the advance alert for this maintenance from the drop-down list. |
| Alert Advance (Days) | Type the number of days advance notice that the maintenance requires. |
| Status | Select a status for the maintenance from the drop-down list. |
| Detail | Type any additional comments for the maintenance. |
3. When you are finished, click Save and then Done.
Assigning a test for an instrument
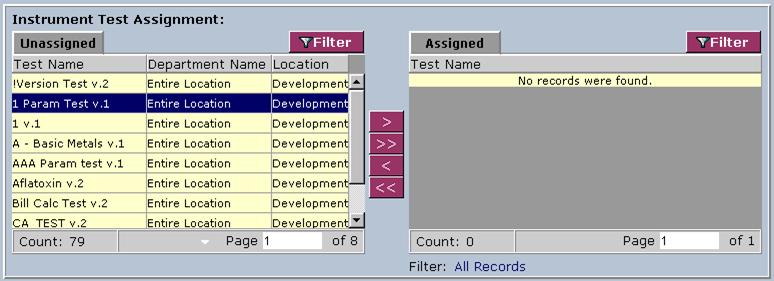
1. From the Instrument Test Assignment area on the Instrument Details screen, select a test from the Unassigned list:
2. Click the > button to assign one or more selected test(s) to the instrument, or the >> button to assign all tests to the instrument.
3. To remove a test from an instrument, use the < button for one or more tests or the << button for all tests.
Adding or editing an instrument parameter
If you have indicated that an instrument can generate file downloads, you may define the relationship between a LIMS master parameter name and the instrument's naming convention for that parameter.
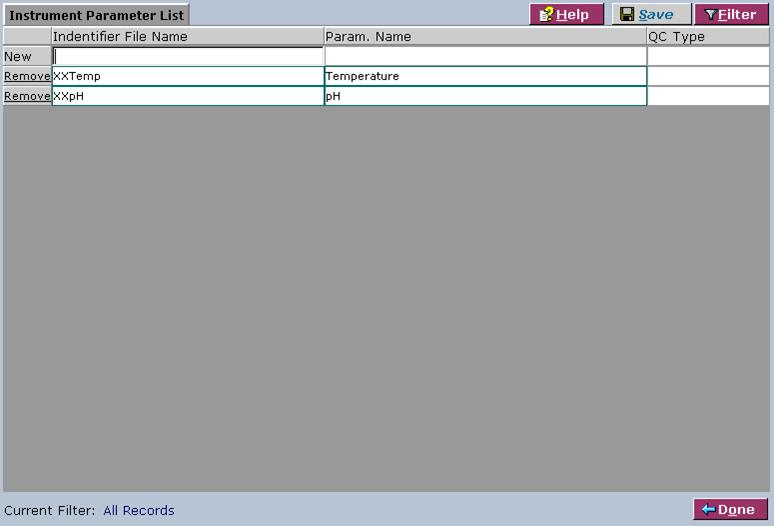
1. On the Instrument Detail screen, click the Instrument Info button. The system will display the Instrument Parameter List screen:
2. Complete the fields of the Instrument Parameter List screen. The various fields are explained below:
| Field | Description |
|---|---|
| Identifier File Name | Type the parameter identifier's file name. |
| Param. Name | Type the parameter name. |
| QC Type | Type the quality control type. |
3. To remove a parameter, click the corresponding Remove link.
4. When you are finished, click Save and then Done.
