LabLynx KB:SysAdmin - 5.1 LIMS system setup
|
|
This is an article specific to the Category:LabLynx knowledge base. Its context outside of LabLynx, Inc may not be apparent, thus why it appears inside the LabLynx KB namespace. |
LIMS system setup
The testing that a laboratory performs is highly dependent on the workflow, standard operating procedures, and business practices that are adhered to. Because of this, LabLynx designed the LIMS test set-up area to be highly configurable in order to meet the requirements of small, medium, and large laboratory facilities. This document continues to discuss setup of the LIMS system, addressing the concepts of paths, contract labs, and sample types.
Path management
A path is a compilation of previously defined processes, with a specific order assignment made to each process. By grouping together the necessary processes and specifying their respective execution orders, the user is creating the workflow pattern and list of system users capable of performing process grouping functions. Once path definition has been completed, each path may be assigned to one or many tests.
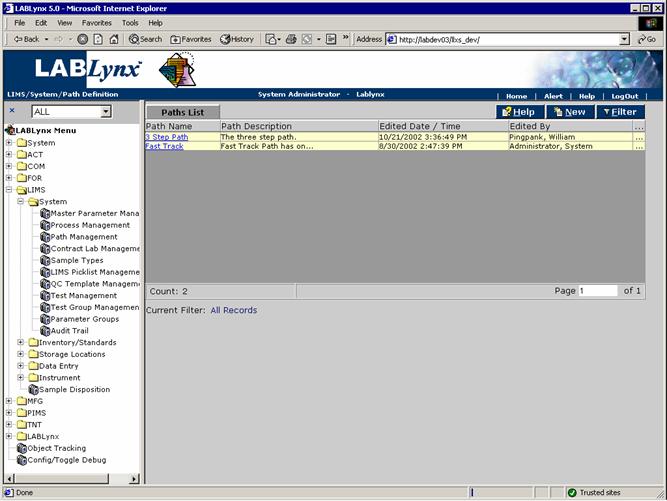
Paths may consist of numerous processes if the laboratory wishes to track significant detail, user access privileges, or simply a single process for a more straight forward application. The Paths List includes the path name, description, and edit information for the paths listed in the system:
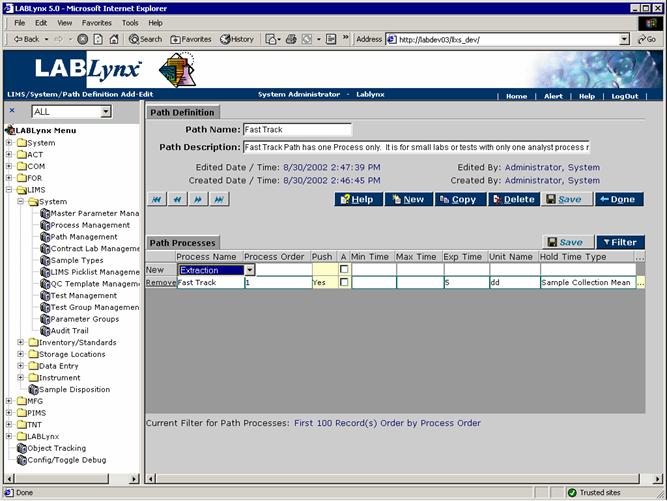
The user may edit an existing record simply by clicking the URL of the desired record in the Paths List. The user may also create a new record in this list by selecting the New button, which will redirect to the Path Definition screen:
From this screen, the user defines many aspects of the path. Fields in bold are required. The various fields are explained below:
| Field | Description |
|---|---|
| Path | This is the user-selected value from the list of existing paths in the system. |
| Path Name | This is the user-defined value for the name of the path. |
| Path Description | This is the user-defined description for the path. |
| Process ID | This is the system-generated database ID from the process table. |
| Process Order | This is the order in which the processes are to be completed. |
| Alt User | This is a bit flag that tells the system that the user that entered the data for the process can not approve the data. When selected, this mandates that a user other than the user responsible for the data entry must "push" or review the results and move them to their next respective path process. |
| Min Time | This is the minimum amount of time (in minutes) the process should take. |
| Max Time | This is the maximum amount of time (in minutes) the process should take |
| Exp Time | This is the amount of time (in minutes) before the sample will not be able to used in this process. (The hold time) |
| Exp Base Date/Time | This is the actual time that the sample will leave its hold status. |
| Edited Date / Time | This is the date and time of the last edit. |
| Edited By | This is the system user who last edited the entity. |
| Created Date / Time | This is the date and time of creation for this item. |
| Created By | This is the system user who created this item. |
Contract lab management
A contractor laboratory is a defined facility that the laboratory in which the system is installed sub-contracts work to. Contract labs are used to assign to existing tests in the system in either of two areas: the test definition itself or the sample receiving area, where a sample test may be subcontracted simply by assigning a subcontractor to the existing test. The main concept is that the lab can track any and all subcontracted tests through the system.
For example, a lab that routinely receives samples for a test it doesn't perform, but it wishes to include the results from their subcontractor on the final report of results. The contract lab feature allows this functionality.
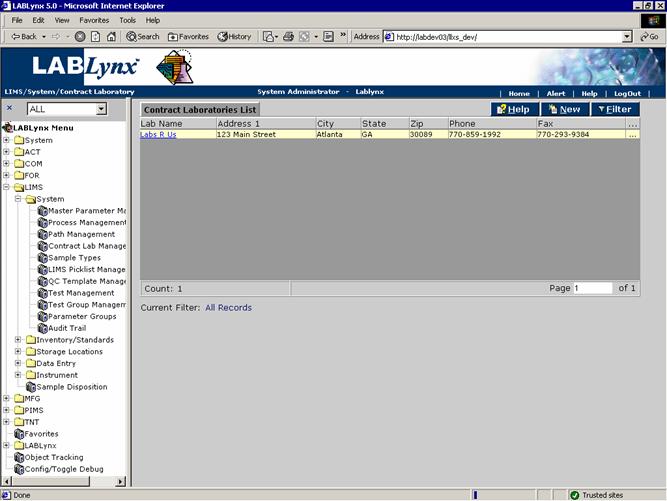
The Contract Laboratories List shows currently defined subcontractors for the entire system. The list includes the contractor name and demographic information. To the far right on the screen notice the column … indicating that additional information exists for the values. When selected the system will prompt a dialogue box with the contents of the contract lab's specific attributes:
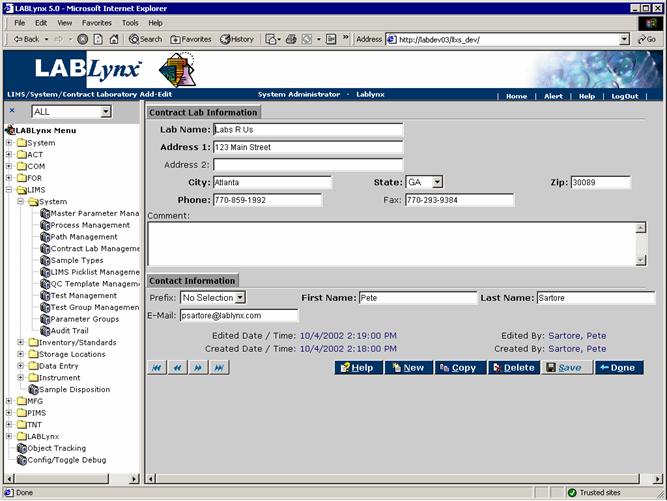
The user may edit an existing record simply by clicking the URL of the desired record in the Contract Laboratories List. The User may also create a new record in this list by selecting the New button, which will redirect to the Contract Lab Information screen:
From this screen, the user defines many aspects of the contract lab. Fields in bold are required. The various fields are explained below:
| Field | Description |
|---|---|
| Lab Name | This is the name of the subcontracted laboratory. |
| Address 1 | This is the primary address of the subcontracted laboratory. |
| Address 2 | This is the secondary address line for the subcontracted laboratory. |
| City | This is city of the subcontracted laboratory. |
| State | This is a drop-down box of states. Choose the state for the subcontracted laboratory. |
| Zip | This is the zip code for the subcontracted laboratory. |
| Phone | This is the primary phone number for the subcontracted laboratory. |
| Fax | This is the primary fax number for the subcontracted laboratory. |
| Comment | This is an area to enter additional pertinent details for the subcontracted laboratory. |
| Prefix | This is the prefix of the primary contact for the subcontracted laboratory. |
| First Name | This is the given name of the primary contact for the subcontracted laboratory. |
| Last Name | This is the surname of the primary contact for the subcontracted laboratory. |
| This is the primary e-mail address for the subcontracted laboratory's primary contact. | |
| Edited Date / Time | This is the date and time of the last edit. |
| Edited By | This is the system user who last edited the entity. |
| Created Date / Time | This is the date and time of creation for this item. |
| Created By | This is the system user who created this item. |
Note: Edits to an existing contract lab may be made, however, this should be done with extreme caution as the system links previously analyzed sample results that were subcontracted via an ID. The ID may not change, but if a user edits the record and changes the name or demographic information, previously assigned sample results will reflect the changes.
Sample type management
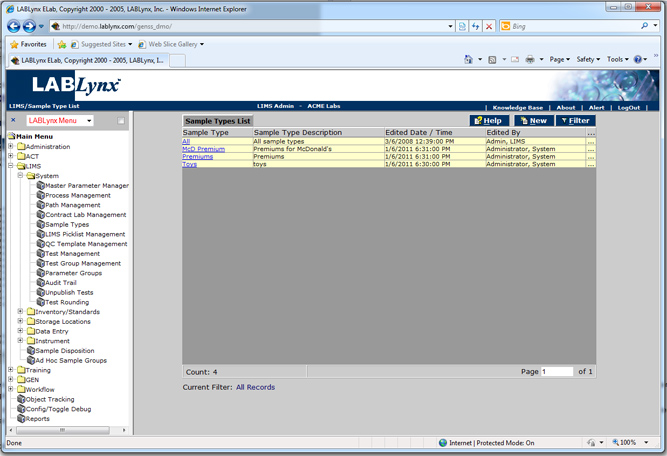
This picklist driven selection list is designed to simplify assignment of tests to samples in the receiving area. Sample types are assigned to a test during the test set up. Sample types are also used in querying for management reports to show all of the tests run on a certain sample type or how many samples of a certain type have been received or analyzed.
The Sample Types List includes the sample name, description, and edit information for the samples listed in the system:
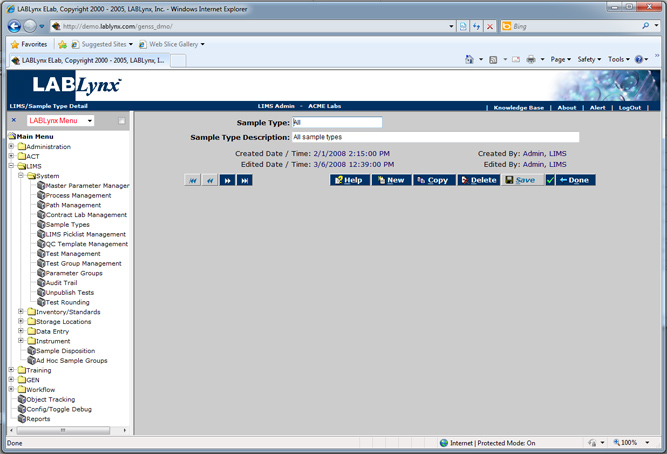
The user may edit an existing record simply by clicking the URL of the desired record in the Sample Types List. The user may also create a new record in this list by selecting the New button, which will redirect to the Sample Type Detail screen:
From this screen, the user defines many aspects of the sample type. Fields in bold are required. The various fields are explained below:
| Field | Description |
|---|---|
| SAMPLETYPEID | This is a user-defined value for the purposes of referencing the appropriate methodology. (Not shown above) |
| Sample Type | This is the user-defined value for the sample type. |
| Sample Type Description | This is the user-defined description for the sample type. |
| Edited Date / Time | This is the date and time of the last edit. |
| Edited By | This is the system user who last edited the entity. |
| Created Date / Time | This is the date and time of creation for this item. |
| Created By | This is the system user who created this item. |
