LabLynx KB:LIMS user manual - 19.0 main data entry management
|
|
This is an article specific to the Category:LabLynx knowledge base. Its context outside of LabLynx, Inc may not be apparent, thus why it appears inside the LabLynx KB namespace. |
Introduction
LabLynx enables you to manage the entry of sample test parameter data and approve, re-run, or cancel these results for a respective batch. A process group or batch is a single entity under which one or many sample tests may be grouped for data entry purposes. A process group may have sample tests added to or deleted from it, up until results entry has been completed and approved for the respective process.
System Administrators use LabLynx ELab to manage data entry and evaluation.
Adding or editing a main data entry process
The information contained in the Main Data Entry section is divided into the three following area:
- Active Batches – a list of active process groups
- Active Processes – a list of processes that have active process groups
- Non Batch Samples – a screen for entering sample testing data, through the bypass batching process
Active batches tab
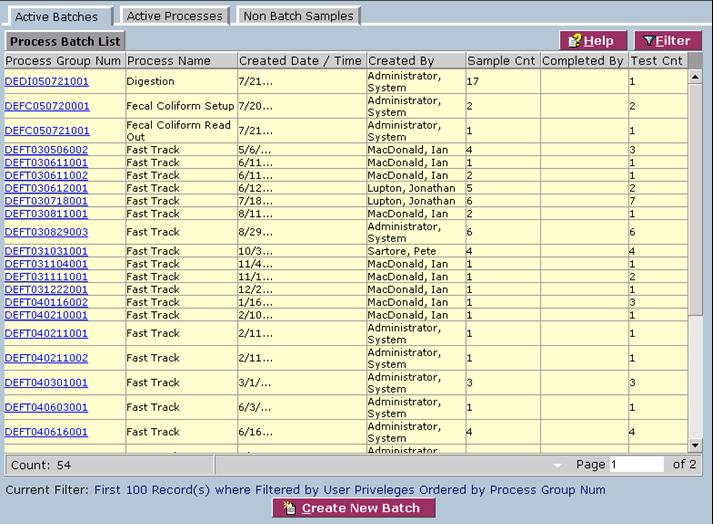
The Process Batch List screen displays active process groups currently defined in the system:
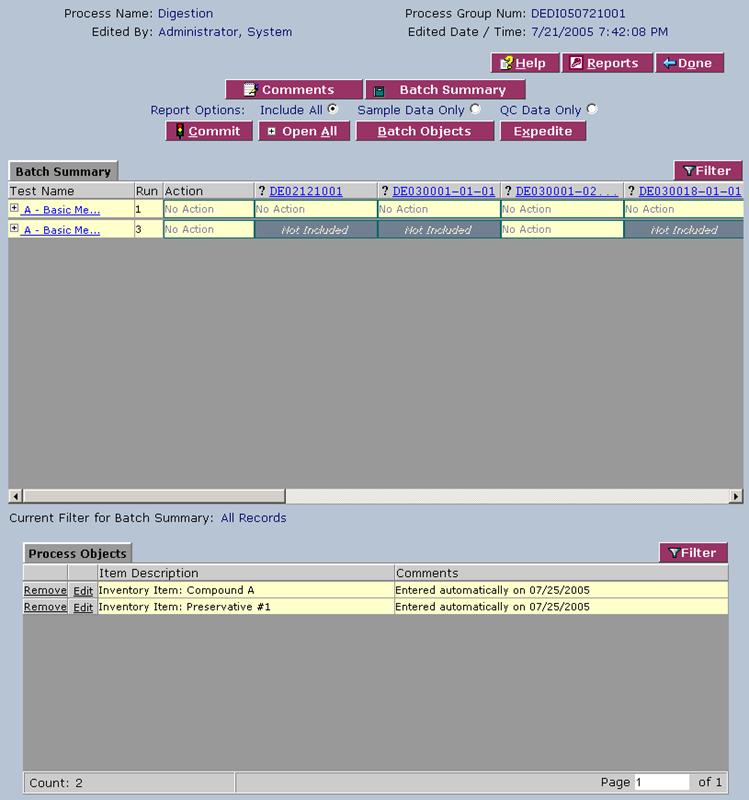
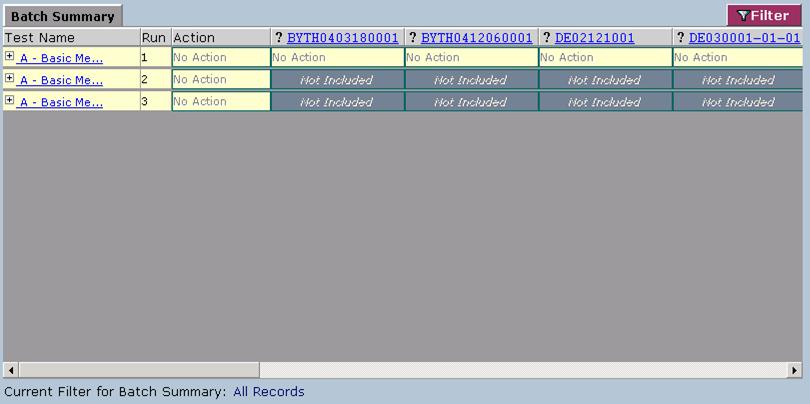
1. From the Process Batch List, select a process group number. The system displays the Batch Summary screen:
From the Batch Summary screen you can enter data by the following methods:
- By test name – clicking on the test name, which displays all of the samples for that test
- By sample number – clicking on the sample number link at the top of the columns
Entering data by test name
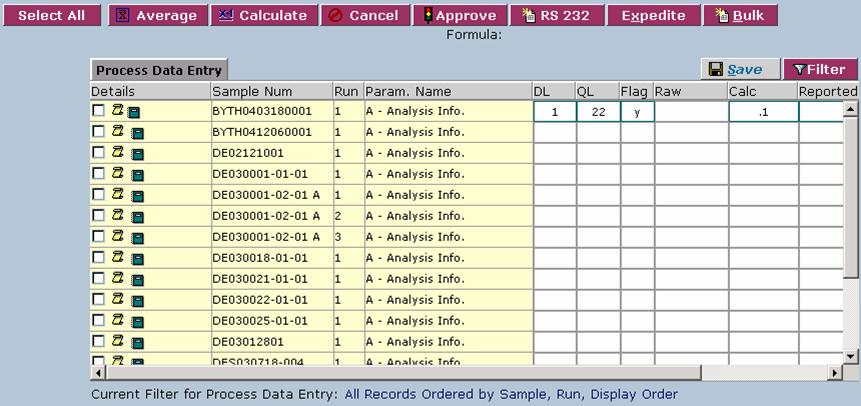
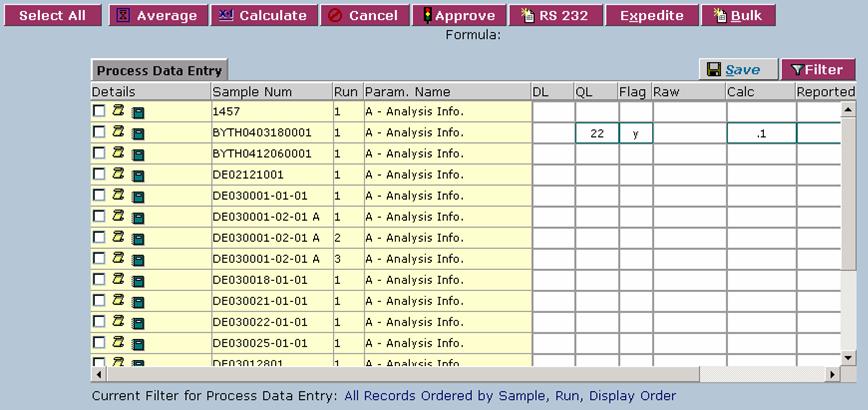
1. From the Batch Summary area, select a test name. The system displays the Process Data Entry screen. From this screen you can enter results for all samples in the batch that have been assigned to the selected test.
2. Complete the fields of the Process Data Entry area. The various fields are explained below:
| Field | Description |
|---|---|
| DL | This is the corrected detection limit for recalculation. |
| QL | This is the corrected quantitation limit for recalculation. |
| Raw | Type a raw value test result. |
| Calc | Type a calculation value test result. |
| Reported Value | Type a reported value test result. |
| Display Order | Type the order in which to display the test results. |
3. Click Save.
4. By selecting the check box at the beginning of a sample test run parameter and pressing certain buttons at the top, the system will calculate, average, approve, or cancel the results of the data entered. The top buttons are explained below:
| Button | Description |
|---|---|
| Select All | Click to automatically select all parameters. (Changes to DeSelect All afterwards, which deselects all parameters.) |
| Average | Click to average all results from all selected sample test parameters. |
| Calculate | Click to execute the previously assigned calculation for the selected sample test parameters. |
| Cancel | Click to cancel the results for selected parameters. |
| Approve | Click to complete the data rows that you have selected. Once approved, the data is removed from this list and is advanced to the next process in the test path. |
| RS232 | Click to activate the EDD Upload Information screen to capture information from an RS232 device. |
| Expedite | Click to advance the selected rows to the last process in the test path. |
| Bulk | Click to allow the one-time update of all selected test runs with a single entry. |
5. You may click the image of the golden scroll next to the check box to add, edit, or audit additional results using the Add/Edit Audit Additional Results window.
6. When you are finished, click Done.
Entering data by sample number
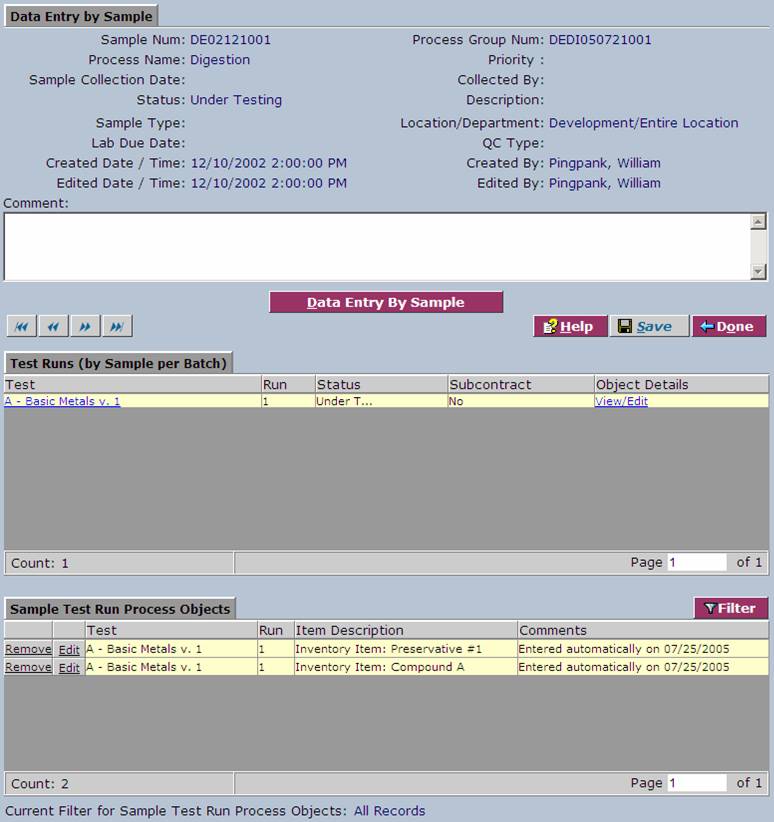
From the Batch Summary area, select a sample number from one of the column headers. The system displays the Data Entry by Sample screen. From this screen, you can enter test results for all tests assigned to the selected sample in the batch.
1. Type any details in the Comment field.
2. You may remove or edit a test run by clicking the Remove or Edit links in the Sample Test Run Process Objects area towards the bottom.
3. From the Test Runs area, select a test name or click Data Entry By Sample. The system displays the Process Data Entry screen. Instructions continue as normal from step two of the "Entering data by test name" section.
Active processes tab
1. To enter or edit active process details, click the Active Processes tab. The system will display the Batch Multi Filter List screen:
2. From the Batch Multi Filter List screen, select a process group number. The system will display the Batch Summary screen:
3. From the Batch Summary area, select a test name. The system will display the Process Data Entry screen:
4. Complete the fields of the Process Data Entry area. The various fields are explained below:
| Field | Description |
|---|---|
| DL | This is the corrected detection limit for recalculation. |
| QL | This is the corrected quantitation limit for recalculation. |
| Raw | Type a raw value test result. |
| Calc | Type a calculation value test result. |
| Reported Value | Type a reported value test result. |
| Display Order | Type the order in which to display the test results. |
5. Click Save.
6. By selecting the check box at the beginning of a sample test run parameter and pressing certain buttons at the top, the system will calculate, average, approve, or cancel the results of the data entered. The top buttons are explained below:
| Button | Description |
|---|---|
| Select All | Click to automatically select all parameters. (Changes to DeSelect All afterwards, which deselects all parameters.) |
| Average | Click to average all results from all selected sample test parameters. |
| Calculate | Click to execute the previously assigned calculation for the selected sample test parameters. |
| Cancel | Click to cancel the results for selected parameters. |
| Approve | Click to complete the data rows that you have selected. Once approved, the data is removed from this list and is advanced to the next process in the test path. |
| RS232 | Click to activate the EDD Upload Information screen to capture information from an RS232 device. |
| Expedite | Click to advance the selected rows to the last process in the test path. |
| Bulk | Click to allow the one-time update of all selected test runs with a single entry. |
7. You may click the image of the golden scroll next to the check box to add, edit, or audit additional results using the Add/Edit Audit Additional Results window.
8. When you are finished, click Done.
Non batch samples tab
1. To edit non-batch samples details, click the Non Batch Samples tab. The system displays the Bypass Batch Samples List screen:
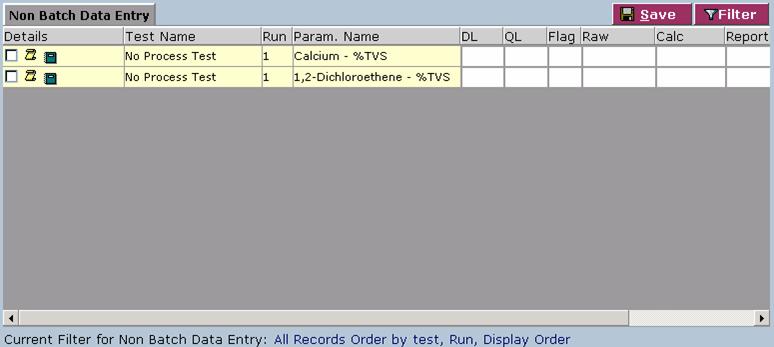
2. From the Bypass Batch Samples List screen, select a sample ID. The system displays the Non Batch Data Entry screen:
3. Complete the fields of the Non Batch Data Entry screen. Fields in bold are required. The various fields are explained below:
| Field | Description |
|---|---|
| DL | This is the corrected detection limit for recalculation. |
| QL | This is the corrected quantitation limit for recalculation. |
| Raw | Type a raw value test result. |
| Calc | Type a calculation value test result. |
| Reported Value | Type a reported value test result. |
| Display Order | Type the order in which to display the test results. |
4. Click Save.
6. By selecting the check box at the beginning of a sample test run parameter and pressing certain buttons at the top, the system will calculate, average, approve, or cancel the results of the data entered. The top buttons are explained below:
| Button | Description |
|---|---|
| Select All | Click to automatically select all parameters. (Changes to DeSelect All afterwards, which deselects all parameters.) |
| Average | Click to average all results from all selected sample test parameters. |
| Calculate | Click to execute the previously assigned calculation for the selected sample test parameters. |
| Cancel | Click to cancel the results for selected parameters. |
| Approve | Click to complete the data rows that you have selected. Once approved, the data is removed from this list and is advanced to the next process in the test path. |
| RS232 | Click to activate the EDD Upload Information screen to capture information from an RS232 device. |
| Expedite | Click to advance the selected rows to the last process in the test path. |
| Bulk | Click to allow the one-time update of all selected test runs with a single entry. |
7. You may click the image of the golden scroll next to the check box to add, edit, or audit additional results using the Add/Edit Audit Additional Results window.
8. When you are finished, click Done.
Viewing results
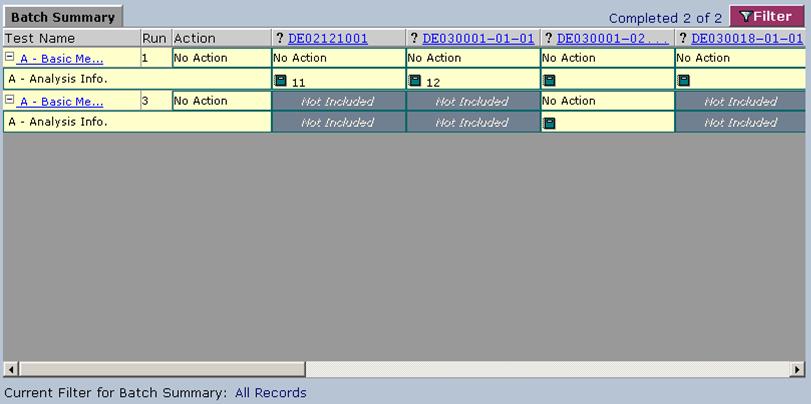
Once you have entered results, you can approve those results directly from the Results screen, or when you have clicked Done, from the Batch Summary screen:
From the Batch Summary screen, click the Open All button to display all testing results. The actions of approving, re-running, or cancellation are done by color coding results cells. You can do this in four ways:
- Selecting the sample – All results for the sample are selected and color coded.
- Selecting the test – All testing results for that test are selected and color coded.
- Selecting the test parameter – All testing results for that specific test parameter are selected and color coded.
- Selecting the specific results – The specific result cell is selected and color coded.
Committing batch sample data
1. From the Batch Summary screen, select any of the data sample actions. The system changes the color and status of the action.
- Green cell – Results are approved and are now complete for the specific process. They are advanced to the next process for the assigned test path.
- Amber cell – Results remain in the current active state, but an additional run is added to this process batch to capture additional data.
- Red cell – Results are canceled. They will no longer process further.
2. When you have finished, click Commit.
Adding batch sample comments
1. From the Batch Summary screen, select any of the data sample actions.
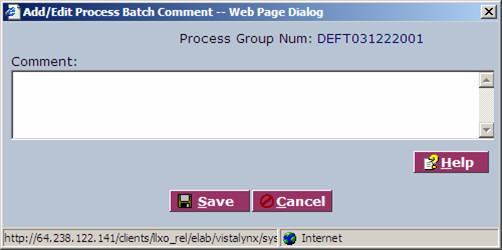
2. Click the Comments button. The system will display the Add/Edit Process Batch Comment Web page dialog:
3. Enter any details in the Comment field.
4. Click Save.
Expediting batch sample data
1. From the Batch Summary screen, click Open All. The system will display the expanded Batch Summary area.
2. Click any of the data sample actions three times. The system will display the action in red.
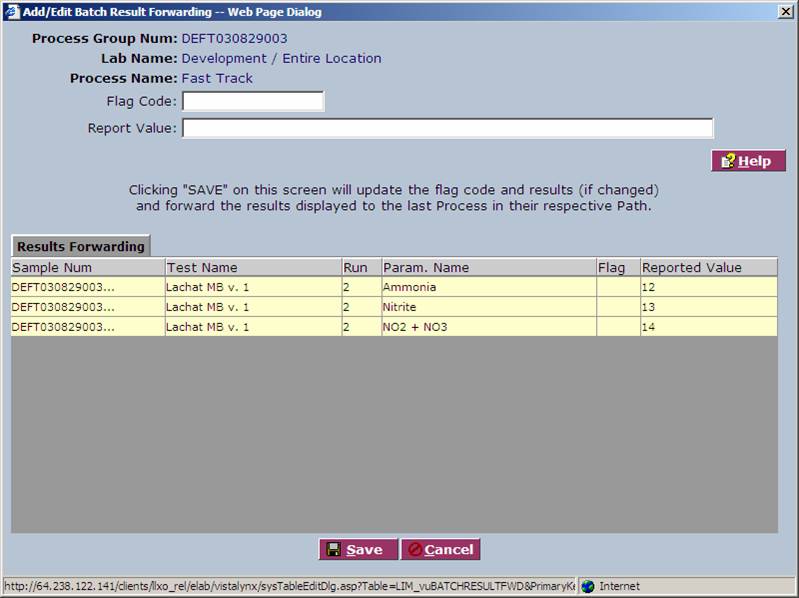
3. Click Expedite. The system displays the Add/Edit Batch Result Forwarding window:
4. Complete the fields of the Add/Edit Batch Result Forwarding window. The various fields are explained below:
| Field | Description |
|---|---|
| Flag Code | Type the flag code. |
| Report Value | Type the reported value. |
5. Click Save.
