LabLynx KB:LabLynx MDA system installation and maintenance manual
|
|
This is an article specific to the Category:LabLynx knowledge base. Its context outside of LabLynx, Inc may not be apparent, thus why it appears inside the LabLynx KB namespace. |
Introduction
iServerManager consists of the user interface to install and upgrade iServer Web applications. Before running an upgrade with iServerManager, please make a full backup of your database and/or Web files. The next section lists the system requirements for each application. Afterwards you'll find instructions for setting up the Web application for the first time. The fourth section explains how to run iServerManager to perform upgrades, and the final section explains where to get upgrades. The user running the upgrades should be knowledgeable of database and ASP Web applications.
System requirements and settings
The following components have specific system requirements and settings that are necessary for installing or upgrading the iServer Web application:
- Web server
- Windows 2000 (Service Pack 4 or higher) or Windows 2003
- MDAC 2.6 or higher
- Database server
- Microsoft SQL Server 2000
- Client Web browser
- Microsoft Internet Explorer 5.5 or higher
- The addition of the application's Web site to Trusted Sites (On the menu go to Tools/Internet Options… Click the Security tab. Click the Sites… button next to Trusted Sites.)
- iServer manager workstation
- Windows 2000 (Service Pack 4 or higher) or Windows 2003
Installing the application
The installation of the Web application consists of three components: DLLs, database, and Web site, all detailed below.
iServer DLL’s on the Web server
- 1. Create a folder to house the DLL files. (e.g. c:\iServer)
- 2. Extract all the files to the new iServer folder.
- 3. Move the following COM DLLs from the new iServer folder to your system32 folder (e.g. c:\winnt\system32) and register them:
- oc2das8c.dll
- oc2das8d.dll
- oc3das8c.dll
- oc3das8d.dll
- olch2x8.ocx
- olch3x8.ocx
- 4. Register the folling COM DLLs in the new iServer folder:
- arpro2.dll
- AspEmail.dll
- AspUpload.dll
- dtspkg.dll
- duzactx.dll
- exclexpt.dll
- htmlexpt.dll
- iServer3.dll
- iServer_SN.dll
- LLX_ReportEngine.dll
- LLX_S_IS.dll
- pdfexpt.dll
- rtfexpt.dll
- textexpt.dll
- tiffexpt.dll
Database
- 1. Restore the database file (the file with a .bak extension). (Note, there is a MDA database file that is a populated with MDA data, and there is an empty database called lims_empty.bak.) Use the file lims_empty.bak to set up an empty database with no data.
- 2. If the Web application user is not in the db_owner role, the application user will need to be in the db_dataread and db_datawrite roles, and the user must be granted execute permissions on all non-system stored procedures and user-defined functions. Your DBA will need to make sure these permissions are granted.
Setting up the Web application
- 1. Create a root folder to house the Web files (e.g. c:\inetpub\wwwroot\lims).
- 2. Extract the contents of ElabWeb.zip to this new folder. (After extracting, the contents of your new folder will contain the "elab" folder, default.asp, favicon.ico, and global.asa.)
- 3. Give the Internet guest account user (IUSR) full control (read, write, modify, and delete) to these folders and their contents:
- …\lims\elab\documents
- …\lims\elab\Excel
- …\lims\elab\llx_reports
- …\lims\elab\uploads
- 4. Using Internet Services Manager, create a new virtual directory on your Web site. (Accept the defaults when setting it up.) Point the virtual directory to the new Web location (e.g. c:\inetpub\wwwroot\lims).
- 5. Create a new printer. (Note, this is used by the reporting engine to format reports. It does not have to be an actual physical printer, just a setup of a printer so the reporting engine can use the drivers.) You might have one setup and can use it, but if it does not work, follow these steps:
- a. Go to Start/Settings/Printers.
- b. Click Add Printer.
- c. Click Next, select Local Printer and uncheck "Automatically detect and install my plug and play printer."
- d. Click Next, select "Use the following port," and then select File: for the port.
- e. Click Next, select HP for the manufacturer and HP LaserJet 8000 Series PCL for the printer.
- f. Use the default settings, but you do not have to print a test page.
- g. Right click the new printer, which should be named "HP LaserJet 8000 Series PCL." Be sure to name it or update the default setting for the printer name. Make sure everyone has access to this printer. Important note: share the printer as the same name (HP LaserJet 8000 Series PCL). If you are using a different printer, make sure to share it as the same name.
- 6. Open the global.asa file using a text editor (e.g. Notepad). In the Application_OnStart event procedure, set the applicable database connection information:
- strDatabase = "" 'Name of database
- strServer = "" 'Blank string if database is on the webserver, IF NOT IP address of database server
- strUser = "" 'Database user
- strPwd = "" 'Database user password
- 7. Save the file. The setup of the Web application is now complete.
Installing iServerManager
iServerManager consists of one .exe file. There is no setup required.
System upgrades
Once you have installed the Web application, you can use iServerManager to run the upgrades to the Web application (Web files and database). All upgrades to the product are packaged in a .zip file that has an “aip” extension. You will use iServerManager to open one of these files and run the upgrade. The contents of the .aip file consists of several XML and/or script files used to upgrade the product.
Contents of the .aip file
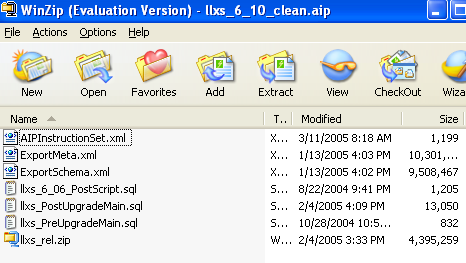
An .aip file is simply a .zip file that contains the instructions and data the iServerManager will use to update the database and/or Web files. When iServerManager runs the .aip file, it will first open the AIPInstructionFile.xml to get the list of operations it will perform. Below is an example of an .aip file:
.aip file (Opened using WinZip)
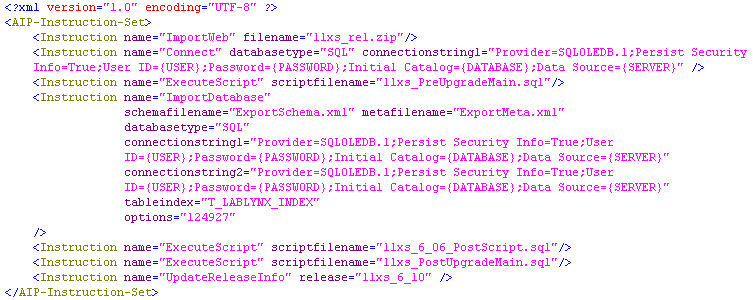
AIPInstructionFile.xml
As you can see, the AIPInstructionFile is an XML file that contains a list of instructions to perform. All files referenced in the instructions must be in the .aip file.
Below, is a description of each instruction:
- <Instruction name="ImportWeb" filename="llxs_rel.zip"/>
- This instruction will copy the Web files contained in “llxs_rel.zip” to the Web folder. It will overwrite files that are older.
- <Instruction name="Connect" databasetype="SQL" connectionstring1="Provider=SQLOLEDB.1;Persist Security Info=True;User ID={USER};Password={PASSWORD};Initial Catalog={DATABASE};Data Source={SERVER}" />
- This instruction will make the database connection to be used throughout the processing of the .aip.
- <Instruction name="ExecuteScript" scriptfilename="llxs_PreUpgradeMain.sql"/>
- This instruction will run the script in the file llxs_PreUpgradeMain.sql.
- <Instruction name="ImportDatabase" schemafilename="ExportSchema.xml" metafilename="ExportMeta.xml" databasetype="SQL" connectionstring1="Provider=SQLOLEDB.1;Persist Security Info=True;User ID={USER};Password={PASSWORD};Initial Catalog={DATABASE};Data Source={SERVER}" connectionstring2="Provider=SQLOLEDB.1;Persist Security Info=True;User ID={USER};Password={PASSWORD};Initial Catalog={DATABASE};Data Source={SERVER}" tableindex="T_LABLYNX_INDEX" options="124927"/>
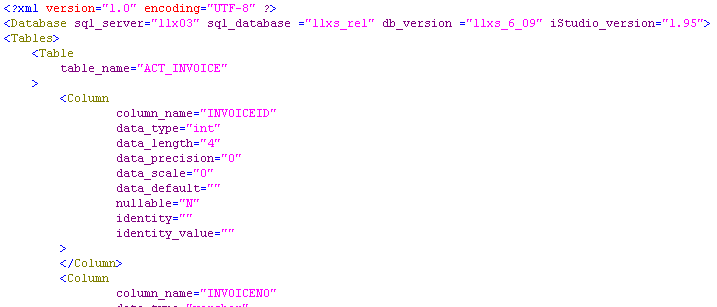
- This considerable bit of instruction will upgrade the database. It will apply the schema objects (tables, views, stored procedures, etc.) contained in ExportSchema.xml to the database. This schema file is a complete representation of the database with all the tables, views stored procedures, functions, constraints, etc. defined using XML. The iServerManager will compare the objects in the XML file to the existing objects in the database and apply the changes so that the existing database is brought to the same version of the database represented by the XML.
- The upgrade is additive for table structure changes meaning existing columns will not be dropped or downsized (e.g. int to smallint), existing columns will be upsized (e.g. varchar(20) to varchar(50)), and new columns and tables will be added. All other objects will replace existing objects or be added to the database if not there. After iServerManager processes the schema file, it will process the meta file. All metadata is contained in the XML file ExportMeta.xml. The process of updating the metadata is to replace the existing metadata in the database with the metadata contained in this file. Below are sample snapshots of each of the files (only displaying a tiny portion due to space):
- ExportSchema.xml
- ExportMeta.xml
- <Instruction name="ExecuteScript" scriptfilename="llxs_6_06_PostScript.sql"/>
- This instruction will run the script contained in llxs_6_06_PostScript.sql.
- <Instruction name="ExecuteScript" scriptfilename="llxs_PostUpgradeMain.sql"/>
- This instruction will run the script contained in llxs_PostUpgradeMain.sql.
- <Instruction name="UpdateReleaseInfo" release="llxs_6_10" />
- This instruction will mark the database as version 6.10.
Running the .aip
1. You run an .aip file using iServerManager. Open iServerManager.exe.
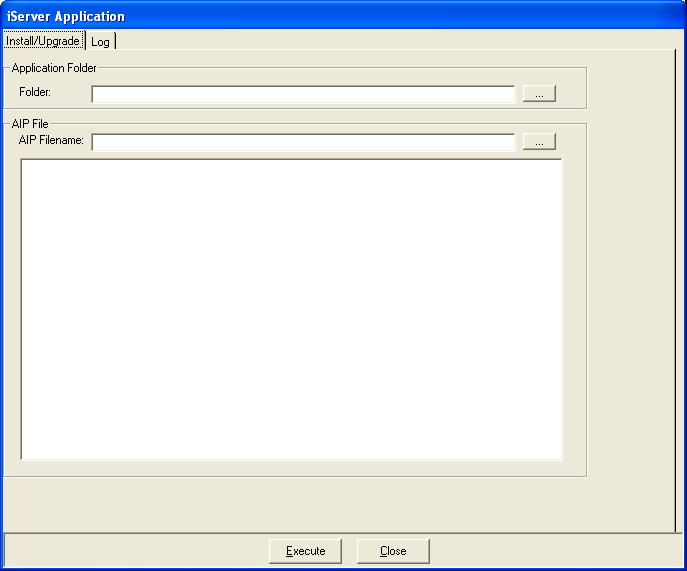
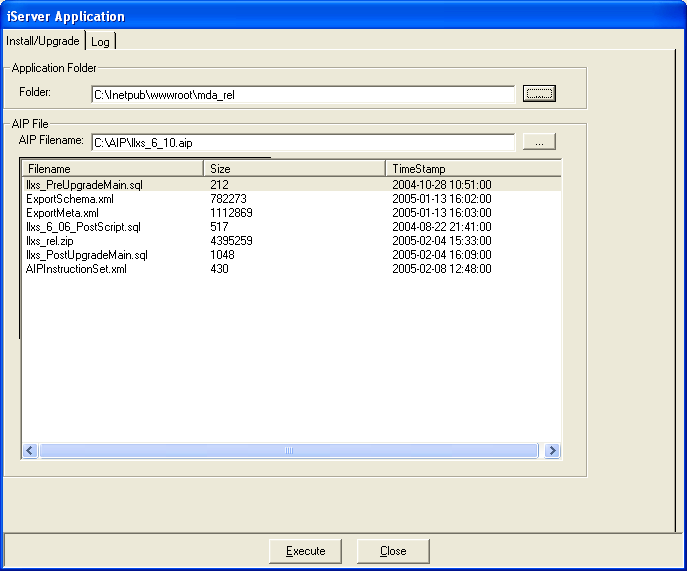
2. From the File menu click Run AIP. This should bring up the following screen:
3. If the .aip file contains Web files, you will need to browse to (or enter) the name of the Web application folder so that iServerManager knows where to copy the Web files. This is not necessary if the .aip file does not contain Web file updates. The folder will be the root folder of the Web application (e.g. D:\Inetpub\wwwroot\lims).
4. Browse for and open the .aip file.
5. Click Execute and the iServerManager should begin processing the .aip file. If that file contains database upgrades, iServerManager will prompt the user for database login information. Be sure to login as the appropriate database user (needs to be in the db_owner role). When the iServerManager has finished, it will display “Finished AIP at [Current Time]”.
Viewing the log files
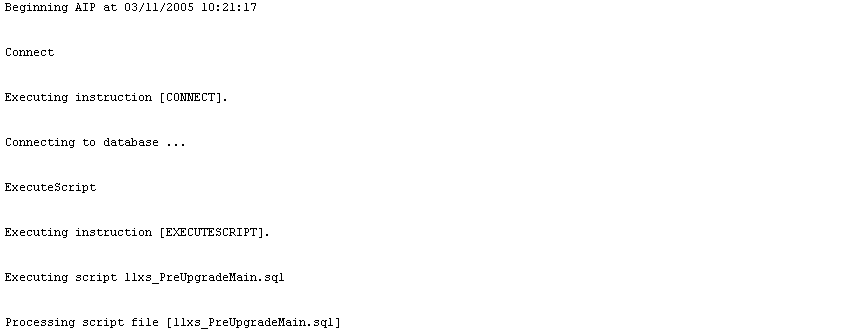
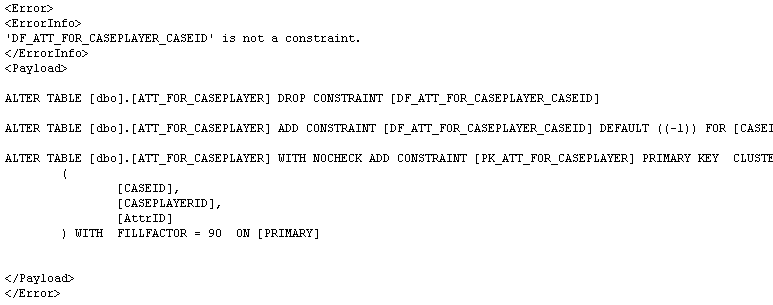
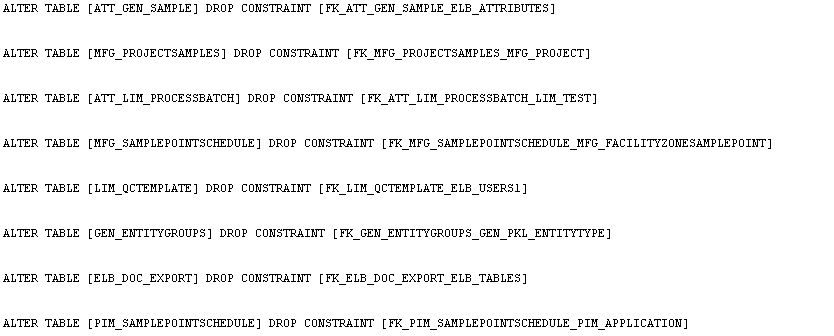
After running an .aip file, iServerManager will produce a set of three log files in the same directory as the .aip file. The naming convention for these files is [AIP Filename]_[Timestamp]_flow.log, [AIP Filename]_[Timestamp]_error.log, [AIP Filename]_[Timestamp]_sql.log. The [Timestamp] for all three files will be the same. The flow log is a high-level log of what occurred. This information is the same as what the user will see on the screen while the upgrade is running. The error log will contain detailed information about any errors that occurred during the upgrade. The SQL log will contain all SQL DDL statements that were executed. The log files can be deleted at any time. They are used to help the user diagnose problems with the upgrade. Below are sample snapshots of these files:
llxs_6_10_clean_20050311102116_flow.log
llxs_6_10_clean_20050311102116_error.log
The error file above contains the ErrorInfo which is the error message and the payload, which is the statement(s) that caused the error.
llxs_6_10_clean_20050311102116_sql.log
These are the DDL SQL statements that were executed against the database. You can use this file to verify what changes iServerManager made to the database.
Obtaining upgrades and other documents
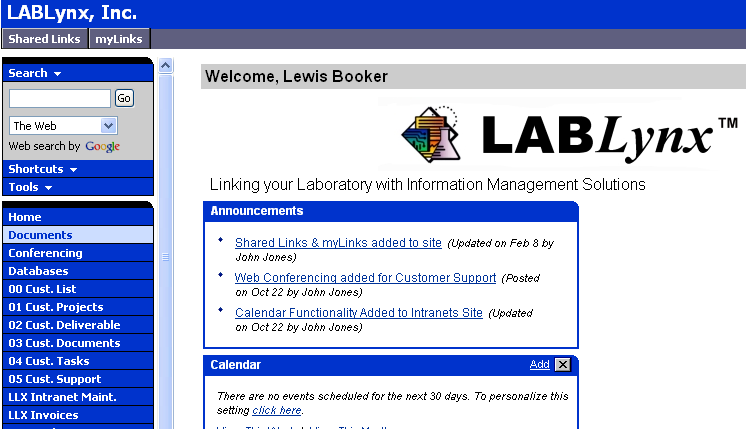
Upgrades can be downloaded from www.LabLynx.net. After logging in, you will see a menu on your left:
LabLynx software
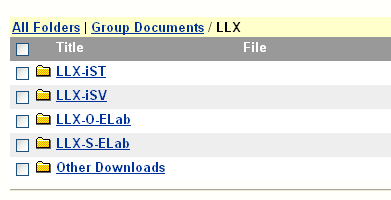
This software is not customer-specific. It includes applications (such as iServerManager) and .aip files of the Web applications for both the SQL and Oracle versions of the product. To access these downloads, click the Documents menu on the left. When you see a list of folders, click the LLX folder.
There you will see the following:
- Upgrades to the iServerManager will be placed in the LLX-iSV folder.
- Upgrades to the Web application (i.e. .aip files) for the SQL server version will be placed in the LLX-S-ELab folder.
- Upgrades to the Web application (i.e. .aip files) for the Oracle version will be placed in the LLX-O-ELab folder.
Customer-specific software
Customer-specific updates will be placed here. To access these downloads, click the Documents menu on the left. Click the appropriate customer's folder to get to the customer's specific files:
Customer-specific service packs and upgrades will be delivered as .aip files to this folder. Manual updates will be delivered here as well. The manual updates will not be packaged in an .aip file. For these types of updates, a ReadMe file will instruct the user on how to manually update the Web application.
