LabLynx KB:Limit group management
|
|
This is an article specific to the Category:LabLynx knowledge base. Its context outside of LabLynx, Inc may not be apparent, thus why it appears inside the LabLynx KB namespace. |
Introduction
LabLynx enables you to add and edit reference analyte group (limit group) information, including limit group parameter information and PIMS limit sets.
System administrators use LabLynx ELab to manage reference analyte groups information, including:
- reference analyte group details
- references
- limit group parameters
- PIMS limit sets
Adding or editing limit group information
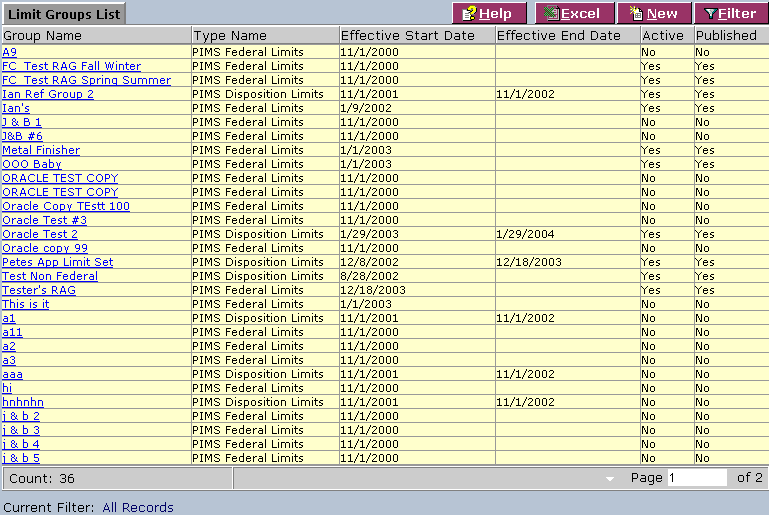
The Limit Groups List screen displays limit group information currently defined in the system:
1. From the Limit Groups List, select a group name or click New:
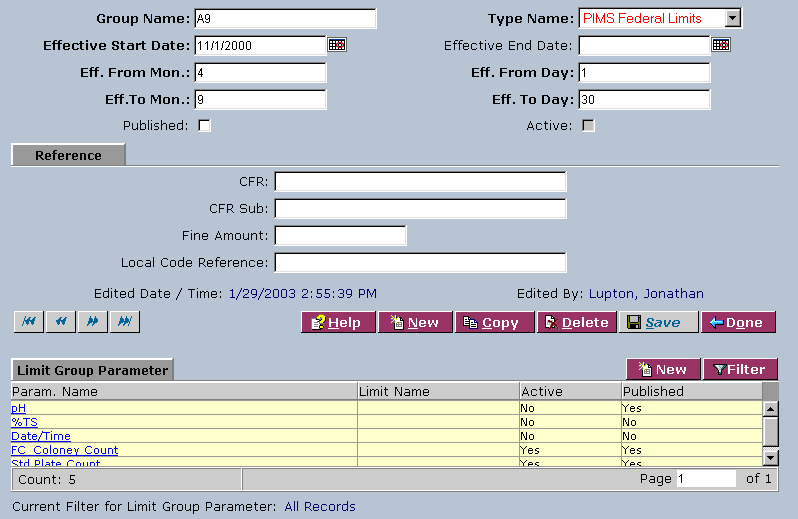
2. Complete the fields of the top area. Fields in bold are required. The various fields are explained below:
| Field | Description |
|---|---|
| Group Name | Enter the name of the group. |
| Type Name | Select from the drop-down list. |
| Effective Start Date | Click the calendar icon to select a date. |
| Effective End Date | Click the calendar icon to select a date. |
| Eff. From Mon. | Enter a month. |
| Eff. From Day | Enter a day. |
| Eff. To Mon. | Enter a month. |
| Eff. To Day | Enter a day. |
| Published | Select the check box to publish the limit group. |
| Active | Select the check box to activate the limit group. |
3. Complete the fields of the reference area. The various fields are explained below:
| Field | Description |
|---|---|
| CFR | Type the CFR. |
| CFR Sub | Type the CFR sub. |
| Fine Amount | Type the fine amount. |
| Local Code Reference | Type the local code reference. |
4. In the Limit Group Parameter area, click a parameter name or click New:
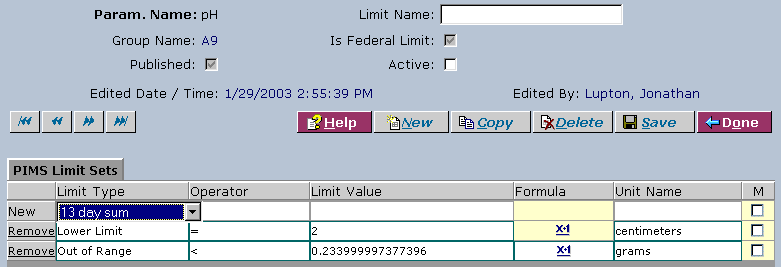
5. Complete the fields of the top area. The various fields are explained below:
| Field | Description |
|---|---|
| Limit Name | Type the limit name. |
| Is Federal Limit | Select the check box if this is a federal limit. |
| Published | Select the check box to publish the limit group parameter. |
| Active | Select the check box to activate the limit group parameter. |
6. Complete the fields of the PIMS Limit Sets area under each column. The various fields are explained below:
| Field | Description |
|---|---|
| Limit Type | Select the limit type from the drop-down list. |
| Operator | Select the operator from the drop-down list. |
| Limit Value | Enter the limit value. |
| Unit Name | Select from the drop-down list. |
| M (Mass) | Select the check box if the limits for the sample point are mass-based. |
7. To remove a limit type from the list, click the Remove link in the row you want to remove.
8. When you are finished, click Save and then Done.


