LabLynx KB:Receiving - 4.0 sample group receiving
|
|
This is an article specific to the Category:LabLynx knowledge base. Its context outside of LabLynx, Inc may not be apparent, thus why it appears inside the LabLynx KB namespace. |
Sample group management
A sample group is a group of samples that are related in some way, such as, the type of analysis that needs to be run, the submitter, the project, etc. A sample group can be made of one or more samples. The purpose of the sample group is to allow the laboratory a quick method to receive samples and to also group the samples together by requestor or required analyses. This provides the lab with the ability to create a report for all of the samples and analyses in a sample group.
Examples of a sample group include:
- a group of samples sent in by Customer ABC for analysis
- multiple samples sent in from the same project for a given day
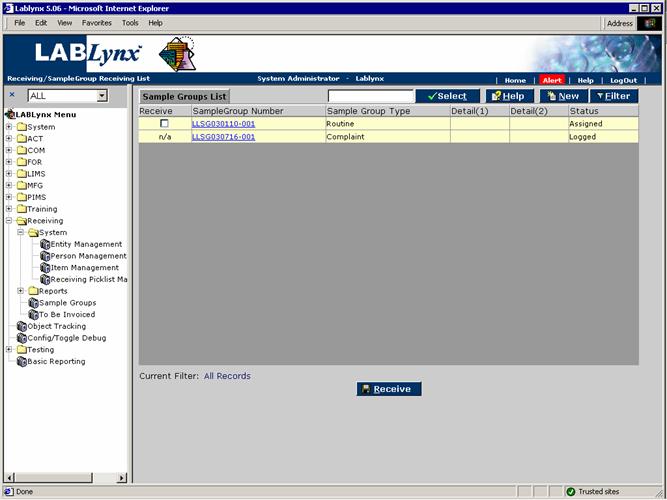
From the Sample Groups List the user is shown a list of currently defined sample groups (projects) of samples that have been manually logged into the system but have not been received by the laboratory:
On the far right of the screen, may exist …, indicating that additional information exists for the values. The information displayed to the user includes receive, sample group number, sample group type, details, and status.
Special Notes: The Receive column to the left of the sample group number will either display a check box or "n/a." When "n/a" is displayed, it signifies that the sample is logged in to the system for the sample group, but it has not had any tests assigned to it. If the check box is displayed, then the sample group and it's associated sample is ready to be received.
The user can click the check box of the sample(s) they wish to receive and then click the Receive button at the bottom of the list frame. Once the Receive button is clicked, all of the sample groups that were checked will disappear from the list. The samples associated with those sample groups will then show up on the analyst's work lists.
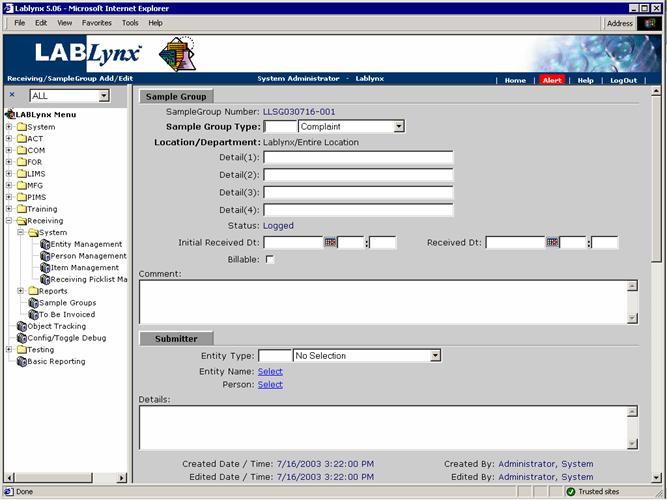
The user may edit an existing record simply by clicking the selected record, redirecting the user to the Sample Group Add/Edit screen. The user may also create a new record in this list by selecting the New button, which will also redirect to the Sample Group Add/Edit screen:
The Sample Group Add/Edit screen is divided into five different sections, explained below.
Sample Group and Submitter area
These two areas (shown above) contains the general information about the sample group. The user will need to choose the sample group type from the picklist and choose the location/department that the sample group is being logged into. Below the Location/Department field are four sample group Detail fields. The information entered into these fields is defined by the customer. The initial received date and received date can either be entered manually or selected from the pop-up calendar using the calendar icon.
The Submitter area allows the selection of the submitter, chosen from the entities that have been set up in the system. The user will first choose the entity type. Then they will choose from the filtered list of entities. Next, the user may choose a person from the list of contacts for that entity. The details field allows the user to enter any comments or additional information about the sample group.
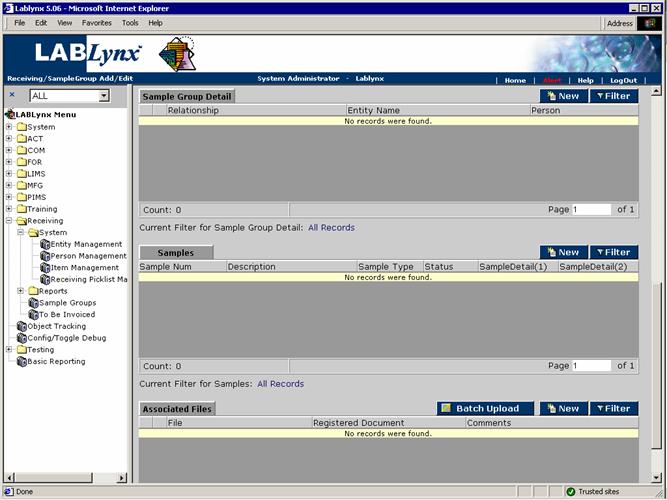
Sample Group Detail area
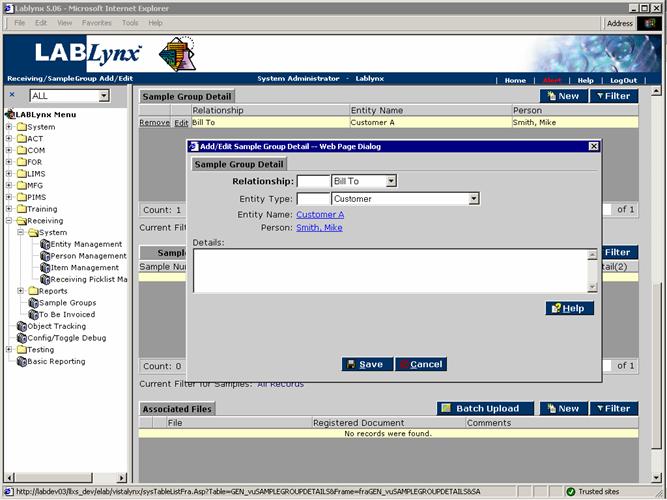
The sample group details frame lists the relationships of the entities and persons to the sample group. This is a supplement to the submitter information entered earlier. For example, the user may wish to define the "bill to" information for the sample group. The may also wish to define who delivered the sample group to the laboratory:
The user may edit an existing record simply by clicking the selected record, redirecting the user to the Add/Edit Sample Group Detail screen. The user may also create a new record in this list by selecting the New button, which will also redirect to the Add/Edit Sample Group Detail screen:
Samples and Associated Files area
The Samples area displays the samples that are associated with the sample group. The user may edit an existing record simply by clicking the selected record, redirecting the user to the Sample Details Add/Edit screen. The user may also create a new record in this list by selecting the New button, which will also redirect to the Sample Details Add/Edit screen. (See the Samples section below for more on this.)
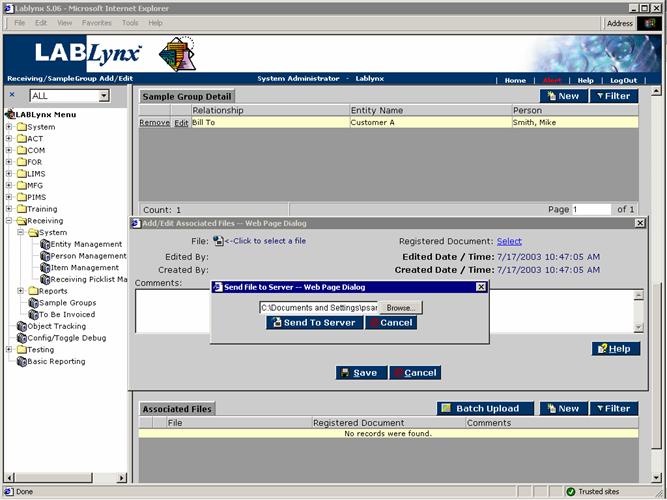
The Associated Files area lists the files that are related to the sample group. The user may edit an existing record simply by clicking the selected record, redirecting the user to the Add/Edit Associated Files screen. The user may also create a new record in this list by selecting the New button or the Batch Upload button, which will also redirect to the Add/Edit Associated Files screen:
The sample
By clicking on a sample number or clicking the New button from the Add/Edit Sample Group Detail screen, the user will be shown the specific details associated with a selected sample in the system or a series of data input values that are required for entry for a new sample record. This screen has three parts.
Sample area
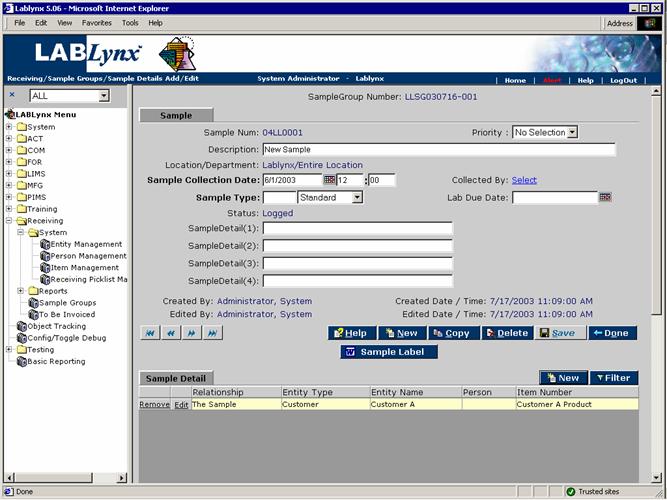
This area contains the general information about the sample that was set up previously in the system or a series of data input values that are required for entry for a new sample. At the top of the screen the user will enter the general information for the sample. The sample type and sample collection date are required fields. The user may also enter a sample description, priority, lab due date, and "collected by" information. As with the Add/Edit Sample Group Detail screen, the Sample area has four detail fields that can be filled in per the laboratory's requirements:
Sample Detail area
The next section of the screen is the Sample Detail area (see above image). As with the sample groups, the user is allowed to enter additional details concerning the sample. The user does this by defining relationships to the sample. A sample can have one or more relationships associated with it.
For example, the user could choose the relationship type of "The sample." This tells the system that the user is going to provide further information about the sample by choosing the item or entity item to associate to the sample. Any tests that were assigned to the chosen item will be automatically assigned to the sample.
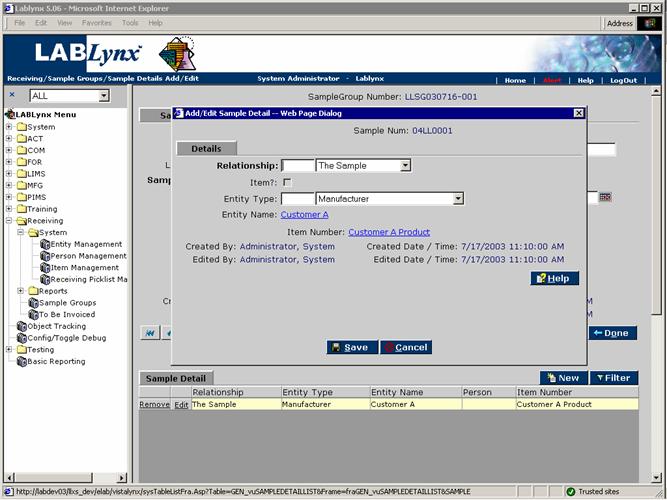
Another example would be if the user chose a relationship type of "Manufacturer." This would tell the system that the user is going to define another entity to associate with the sample besides the Submitter that was defined earlier at the sample group level:
Assign Sample Test Run area
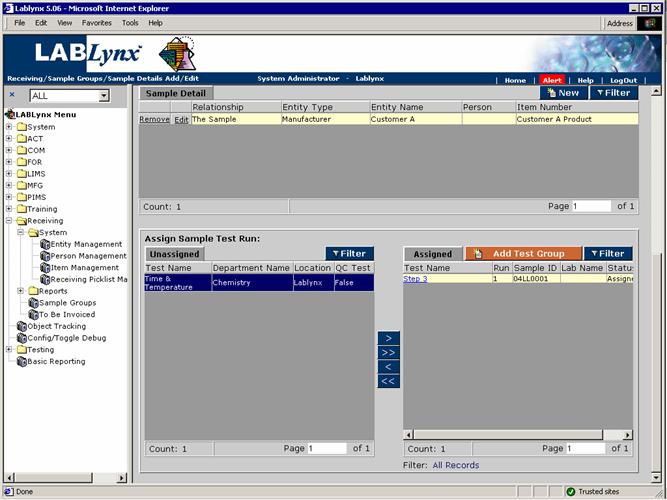
The last area of the screen is for test assignment. The user will see the unassigned/assigned frame. Any tests that have been automatically assigned will show up in the Assigned frame. Should it be necessary to add or remove test(s), the user would click on the appropriate test(s) and click on the > button to add them and the < button to remove them:
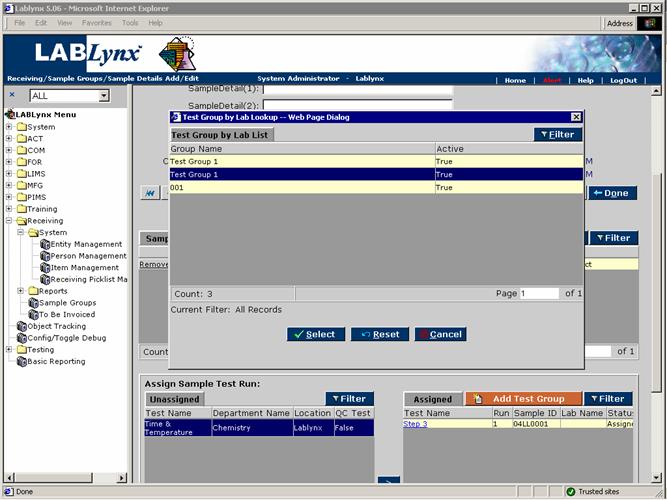
The user may also add a test group to the sample by clicking on the test group button and choosing the test group(s) to be added to the sample:
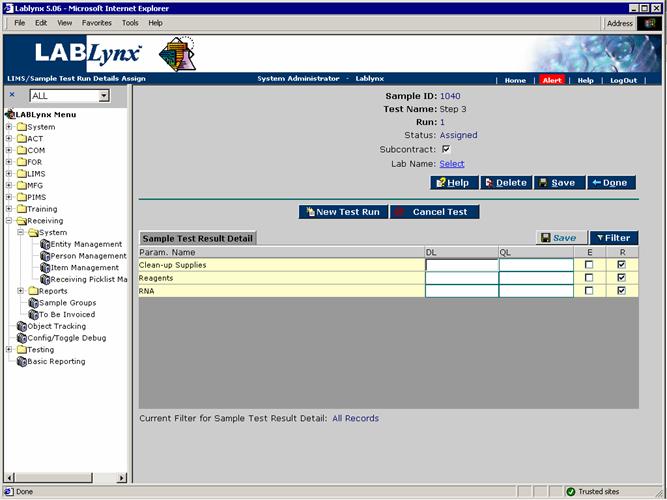
In the Assigned frame, the system will display the test name as a hyperlink. This link will take the user to an edit screen that allows the user to assign the sample/test to a subcontract laboratory, edit the detection limits for the test parameters for this sample, add a test run for this sample, or cancel the test run:
