LabLynx KB:Receiving - 7.0 MFG setup
|
|
This is an article specific to the Category:LabLynx knowledge base. Its context outside of LabLynx, Inc may not be apparent, thus why it appears inside the LabLynx KB namespace. |
Client management
In production terms, a client is a company that products are manufactured for. The system is then capable of tracking all client information, including any items that are made specifically for that client. The purpose for adding a client to the system is to track their demographic information, any items that are specifically made for a client, and unique testing specifications that are requested by that client. Client information also allows the system to create reports that contain the item and demographic information specific to that client
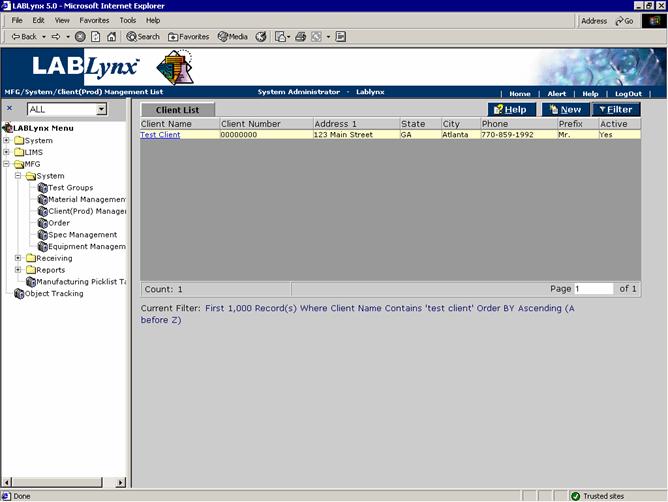
The Client List (from the Client (Prod) Management section) allows the user to browse a list of currently defined clients in the system. To the far right on the screen exists …, indicating that additional information exists for the values. The information includes client name, address, client number, city, state, phone, and whether the client is active in the system:
Special Notes: When the user first brings up the Client List, the system immediately displays the filter for that list. This is because of the potential for there to be thousands of client records in the system. By displaying the filter first, the system will be able to present the item information the user wishes to view much faster.
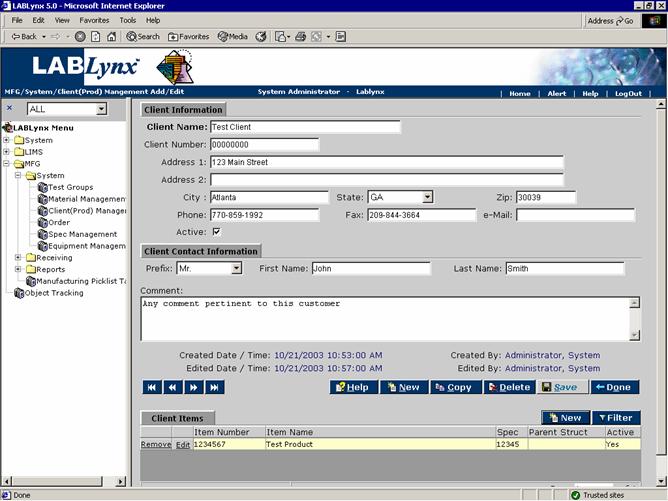
The user may edit an existing record simply by clicking the client name (shown as a blue hyperlink), redirecting the user to the Client (Prod) Management Add/Edit screen. The user may also create a new record in this list by selecting the New button, which will also redirect to the Client (Prod) Management Add/Edit screen:
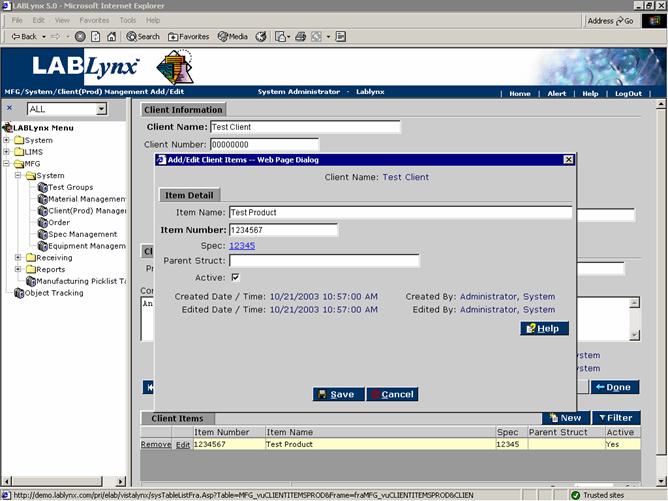
By default, the screen displays only active clients; however, a user may filter for inactive clients as well. This screen has two parts: the top part of the screen for general client information, and the bottom part of the screen for defining the items made specifically for a client. Authorized users will be allowed to create client items by clicking the New button to bring up the Add/Edit Client Items dialog (shown below). The user will then be able to enter an item name, item number, a spec that will be used for limit checking, and a parent structure. The only field that is necessary for this screen is the item number:
The user may edit the information for an assigned item by clicking on the Edit hyperlink to the left of the item number. This hyperlink will take the user to the dialog screen. Clicking on the Remove hyperlink will remove that item from the list and delete it from the system.
Material management
This area of the LIMS is a central repository of materials used in the manufacturing of products. These materials are assigned to the client item specifications discussed in the Spec Management section of this article.
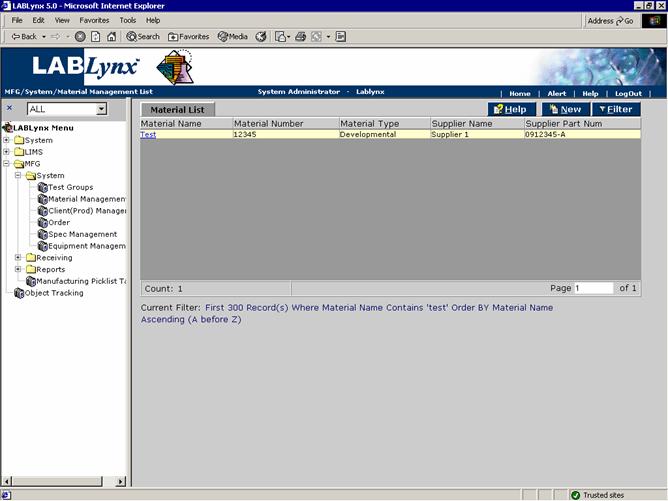
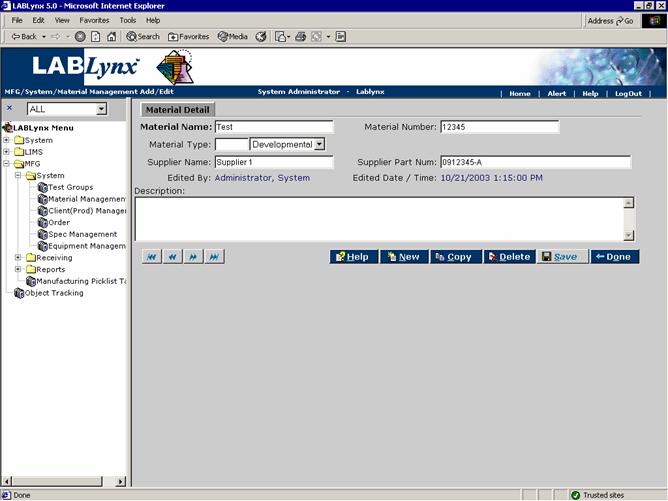
The Material List (from the Material Management section) allows the user to browse a list of currently defined material names, material numbers, material types, supplier names, and supplier part numbers for the materials used in the system:
The user may edit an existing record simply by clicking the client name (shown as a blue hyperlink), redirecting the user to the Material Management Add/Edit screen. The user may also create a new record in this list by selecting the New button, which will also redirect to the Material Management Add/Edit screen:
Only the Material Name field is required for creating a new material record. The material number is an internal number defined by the user for tracking and filtering purposes. The user should be familiar with the Material Type picklist prior to creating new material records. The material type defines whether a material is developmental, probationary, or qualified for use.
Spec management
A specification (spec) is a requirement for a manufactured product. The spec defines the materials that can be used in making the product, the tests that should be run against the sample of the product, and the limits for the test parameters assigned to that spec.
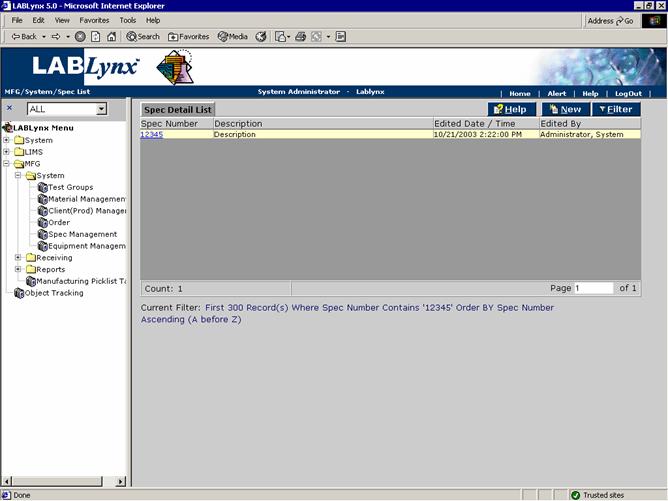
The Spec Detail List (from the Spec Management section) allows the user to browse a list of specs that have been created in the system. The screen displays the spec number, spec description, edited date/time, and "edited by" information:
The user may edit an existing record simply by clicking the client name (shown as a blue hyperlink), redirecting the user to the Spec Add/Edit screen. The user may also create a new record in this list by selecting the New button, which will also redirect to the Spec Add/Edit screen:
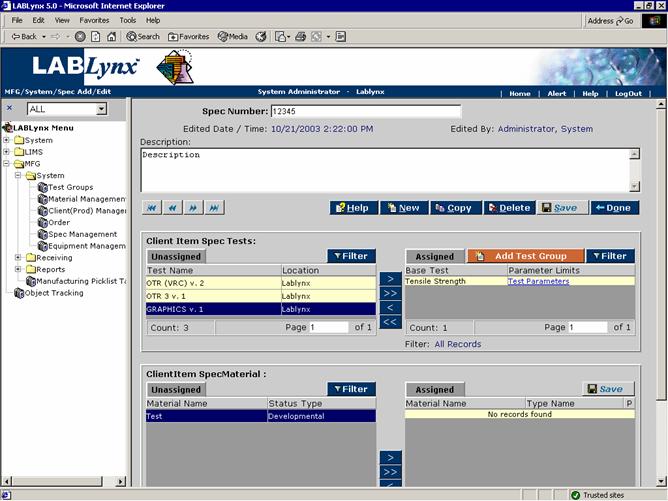
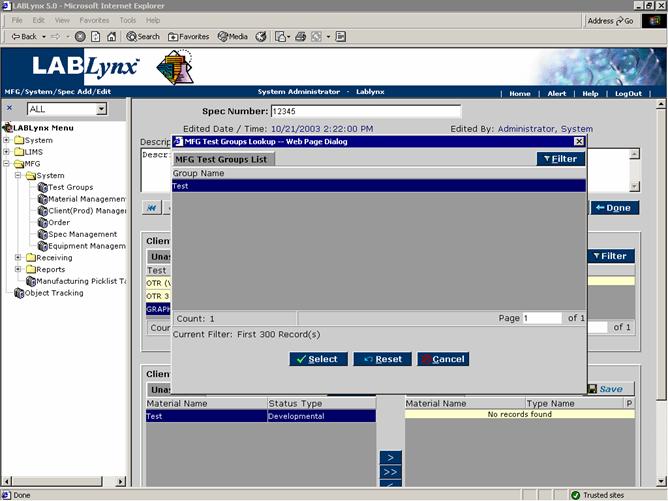
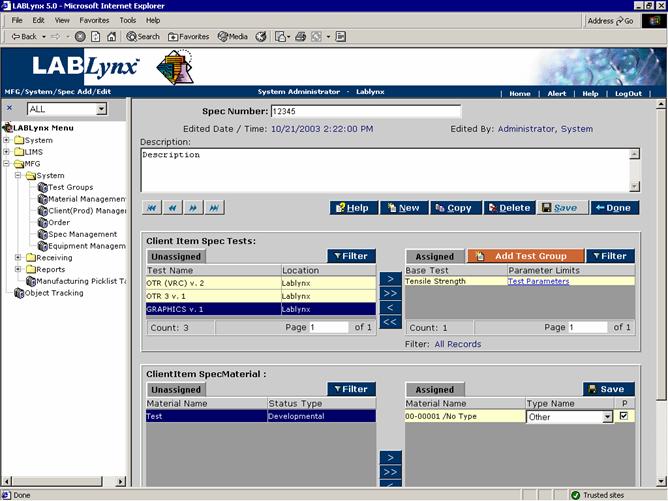
The Spec Add/Edit screen is divided into three sections. The top section allows for the entry of the spec number and a description. Only the spec number is required. The second section of the screen contains the unassigned/assigned frame for assigning tests to the spec which will be used to analyze the samples. The user may also add a test group to the spec by clicking on the Add Test Group button.
Special Notes: A test group is a single object that is used to assign groups of tests to a specification for assignment to a client item. The purpose of a test group is to allow the user to group appropriate tests together with limits predefined for parameters of those tests. This provides the user with a quick way of assigning multiple tests to specifications that all have the appropriate parameter limits.
The bottom section of the Spec Add/Edit' screen is where the user assigns the material that can be used to manufacture the product using the current spec. The user highlights the material that can be used on the left and clicks the > button to assign them to the spec. In the Assigned list to the right of the spec name is the Material Type picklist. The user is allowed to define the type of material for this spec by choosing the correct type from the picklist. An example is the case where a material may be used for lamination for one spec but may be a print film for another spec. The user is also allowed to define which of the materials is the primary material for that spec by clicking the check box under the column with the header P as shown below:
Test groups
A test group is a single object that is used to assign groups of tests to a specification for assignment to a client item. The purpose of a test group is to allow the user to group tests together and assign limits to the parameters of those tests. This provides the user with a quick way of assigning multiple tests to specifications that all have predefined parameter limits.
For example, a company may have a limited number of tests that they perform on their products. They also may have a number of specifications for each of the products they manufacture. Though the list of tests can be the same for different specifications, the limits for the test parameters may be different in certain circumstances. Users can create test groups that have the same tests assigned to them but different limits for the test parameters. As will be seen in spec management, they may also modify the test parameters for each individual spec as well.
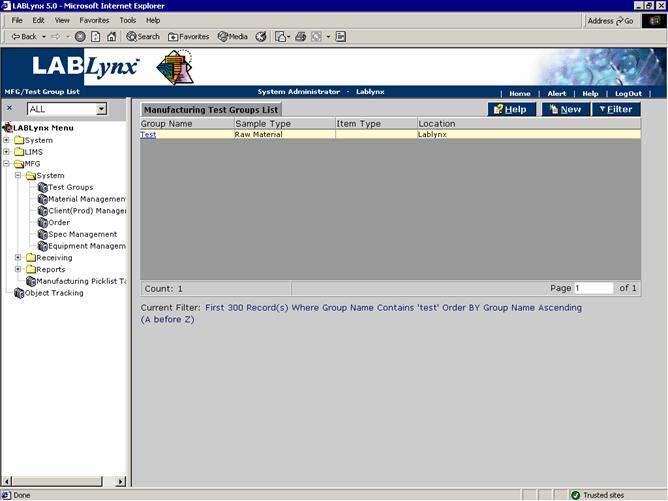
The Manufacturing Test Groups List (from the Test Groups section) allows the user to browse a list of all test groups that exist within the system. The information that is displayed to the user includes the test group name, type of sample, the product item type that the group is applicable to, and the location that the test group has been created for:
Special Notes: Users should be familiar with test definitions, sample types, item types, and system locations prior to editing or creating new test groups.
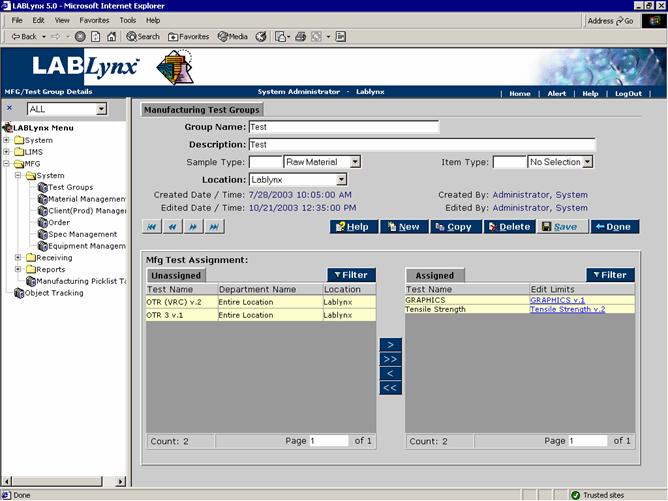
The user may edit an existing record simply by clicking the client name (shown as a blue hyperlink), redirecting the user to the Test Group Add/Edit screen. The user may also create a new record in this list by selecting the New button, which will also redirect to the Test Group Add/Edit screen:
The information that is captured within the system for each test group consists of the test group name, a description, the product "sample type" and "item type" combination that the group relates to, and the system level location that the group is relevant to. At the bottom of the screen the user will see (once the test group has been saved) a list of unassigned tests available to add and assigned tests that are already defined as applicable to the test group.
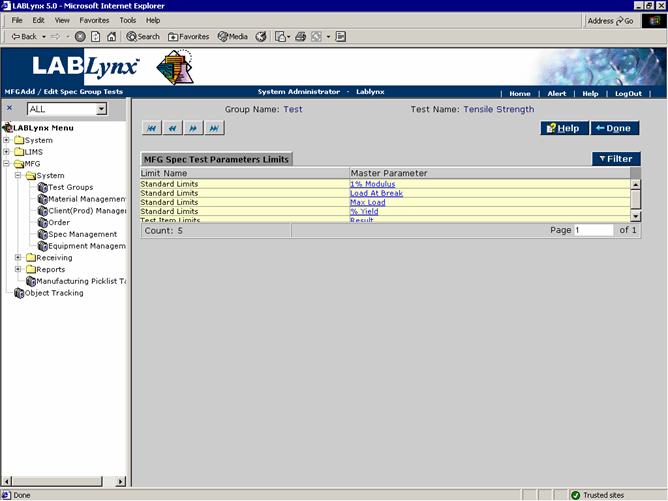
The user may edit the limit information for an assigned test by clicking on the Edit Limits hyperlink. The user will be shown a list of parameters for that test as well as its limit name. A test parameter is an entity that may require user supplied or system calculated results entry. Commonly, a parameter is a data capturing object required for reporting purposes. Additionally, a parameter can be used to collect information that is required by laboratory management for documentation purposes, etc.:
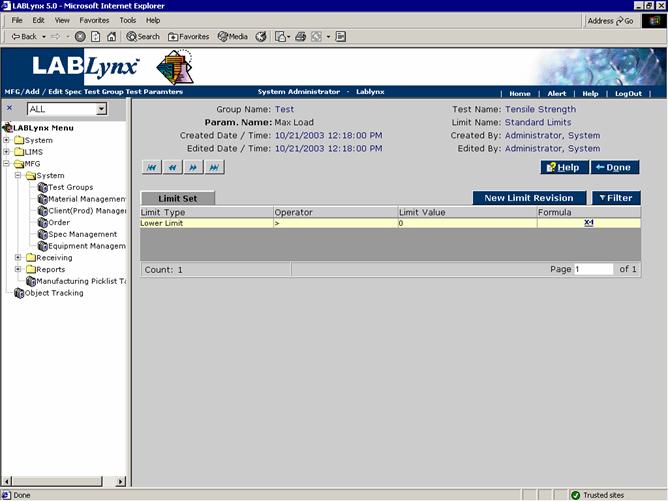
To edit the limits or create new limits for a parameter in the test, the user will click on the Parameter Name hyperlink. The user will be shown the current limit set that has been set up in the system for that test parameter:
A limit set is a group of limits for a test parameter that the LIMS uses to check against once results have been entered into the system for that parameter. The user may create a new set of limits "n" number of times for the test parameter, and each discrete set of limits is given an identifier which is used by the system during actual test assignment to a sample. The unique limit set identifier is always maintained and preserved by the system even as new limit sets are defined. This way past results that were entered into the system can always be related to the applicable limit set regardless of newer limits having been defined.
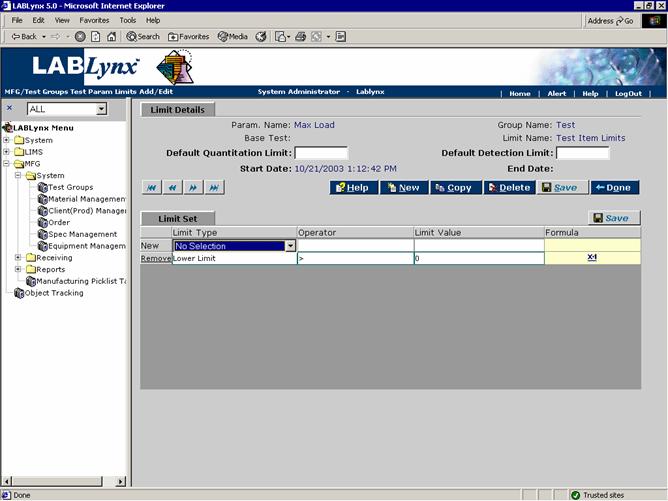
By clicking on the New Limit Revision button on the Test Group Test Parameter Limits screen, the user will be allowed to create a new limit set for that test group test parameter. The user may define "n" number of actual limit types for each client item test parameter. For example, a parameter can have an upper limit, lower limit, upper warning limit, etc.:
Order
The Order section captures the necessary information about an order that has been entered into another system and transferred into the LIMS for the laboratory to use during login. Orders may also be entered into the system manually. Orders are created in the system to make the receiving of samples into the system faster and to reduce data entry errors. The orders are used to define where the samples were taken from.
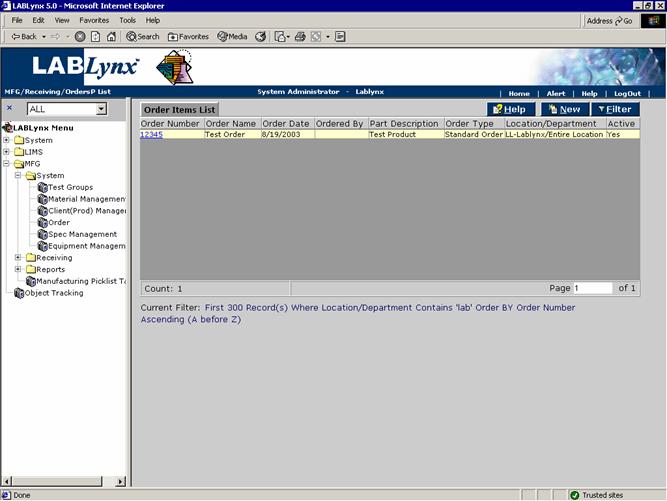
The Orders Items List (from the Order section) allows the user to browse a list of options, which includes the order number, order name, order date, "ordered by" information, part description, order type, location/department where the order will be tested, and whether or not the order is active:
The user may edit an existing record simply by clicking the client name (shown as a blue hyperlink), redirecting the user to the Orders Add/Edit screen. The user may also create a new record in this list by selecting the New button, which will also redirect to the Orders Add/Edit screen:
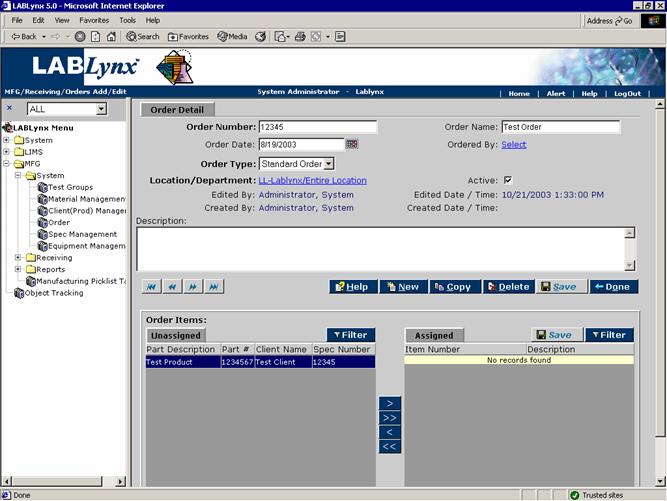
The Order Detail area of the screen tracks the information about an order. In the top part of the screen, the user will only be required to enter an order number, order type, and location/department where the order sample will be tested. The Order Items area of the screen consists of the unassigned/assigned frame, where the user will be allowed to choose the product that will be manufactured for that order. This is the main part of the order that is needed for sample receiving for the client item that is being tested. This provides the spec test parameter limit information for the sample.
The unassigned frame displays the client item description, part number, client name, and spec number assigned to that client item. The user will be allowed to highlight the part number to be assigned to the order on the left, and click the > button to add them to the order. A user may remove items from the order by highlighting the items they wish to remove and clicking on the < button.
Once the order has been saved and made active, it will be available to choose during sample receiving. The user should be familiar with the Order Type picklist before creating or editing orders.
