LabLynx KB:Receiving - 8.0 MFG receiving
|
|
This is an article specific to the Category:LabLynx knowledge base. Its context outside of LabLynx, Inc may not be apparent, thus why it appears inside the LabLynx KB namespace. |
Samples receiving
In production terms, a sample is an item/part that has been manufactured. The item/part is typically sent to the laboratory for the standard testing that is routinely performed. The purpose of this module is to allow the user to define the item/part number that is to be tested and its associated information, and have the system automatically assign the standard set of tests that have been defined for that item/part.
For example, Widget A is manufactured once a month. The facility that makes Widget A, pulls a sample of the Widget As that were produced that month and sends that sample to the laboratory for its routine testing.
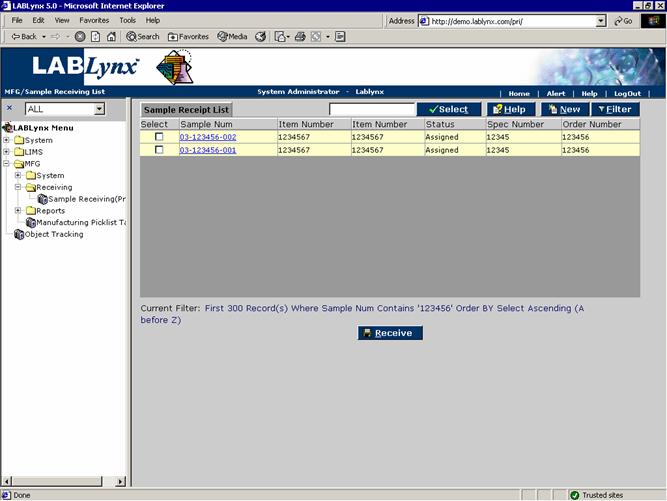
The Sample Receipt List (from the Sample Receiving (Prod) section) shows a list of currently defined samples that have been logged into the system but have not been received by the laboratory. To the far right on the screen exists …, indicating that additional information exists for the values. The information displayed to the user includes sample number, item number, status, spec number, and order number:
The column to the left of the sample number will either display a check box or "n/a". When the "n/a" is displayed, the sample is logged in to the system but has not had any tests assigned to it, or of the sample testing is complete. If the check box is displayed, then the sample is ready to be received. The user can click the check box of the sample they wish to receive and then click the Receive button at the bottom of the list frame. Once the Receive button is clicked, all of the samples that were checked will disappear from the list. Those samples will then show up on the analyst's work lists as ready for analysis.
The user may edit an existing record simply by clicking the client name (shown as a blue hyperlink), redirecting the user to the Receiving Information screen.
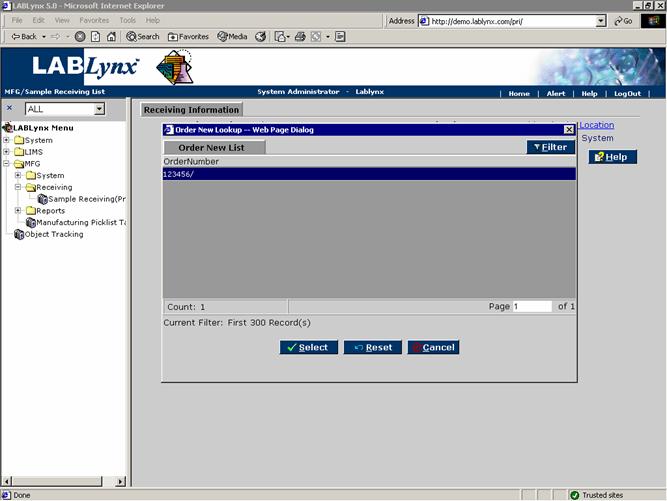
The user may also create a new record in this list by selecting the New button, which will pop up a dialog box with a list of active orders for the location that the user is logged into. The user will choose the order that the sample is for and click the Select button. Once the user has selected the order, the system will direct them to the Receiving Information screen:
This screen will present the user with the order number they selected and the location/department that they are logged into. Both fields are hyperlinks that will allow the user to change the information in those fields. This is allowed for in case the user has mistakenly chosen the wrong order number or if the sample is going to be analyzed at another location/department. Once the information is verified as correct, the user will click the Save button and be redirected to the Sample Receiving Add/Edit screen. This screen has three parts.
Sample Information area
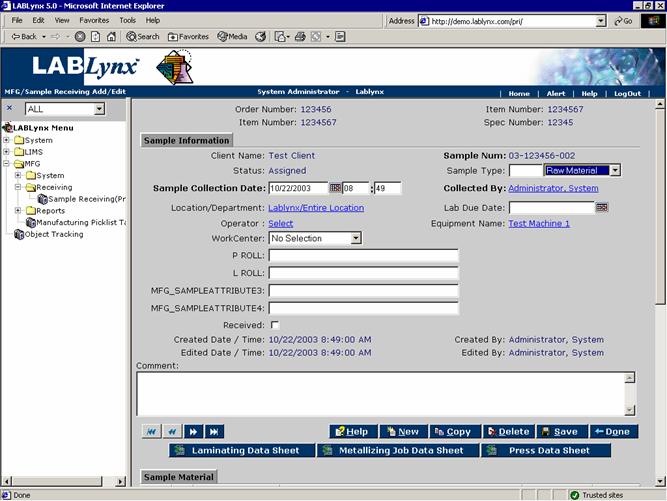
This is the Sample Receiving Add/Edit screen:
The Sample Information area of the screen has a variety of fields. At the very top of the screen the user will see the order number, item number, spec number, and the client name for the sample. These fields are populated by the system from the information entered into the Orders, Spec Management, and Client (Prod) Management modules in the system. The sample number is created by the system. The user cannot change these fields.
The sample collection date/time, location/department, and the "collected by" fields are also populated by the system. They are defaulted to the user logged into the system and the time that the Save button was clicked on the previous page. However, these fields may be changed by the user if needed.
The sample type, operator, equipment name, work center, and lab due date are all required fields that the user will need to enter before the record can be saved. The following are brief explanations of each of these fields:
- The Sample Type field is a picklist that further defines what type of sample is being received. This assists in filtering sample data for management type reports.
- The Operator field is a picklist that further defines who operates the manufacturing machinery for the product.
- The Equipment Name field is a listing of the equipment that can be used to manufacture the products. This field assists in tracking equipment problems from the sample result data.
- The Work Center field is a picklist of the process/sections of manufacturing that are responsible for the product being sampled. This field assists in tracking process/section problems from the sample result data
- The Lab Due Date field is used if the analysis for a particular sample needs to be completed by a certain date.
Below the Work Center field are four fields that are originally labeled Mfg_SAMPLEATTRIBUTE. The names for these fields are defined by the system administrators. They are used to collect other pertinent information about the samples.
The Received check box can be used instead of using the samples list to receive the samples into the system.
Sample Material area
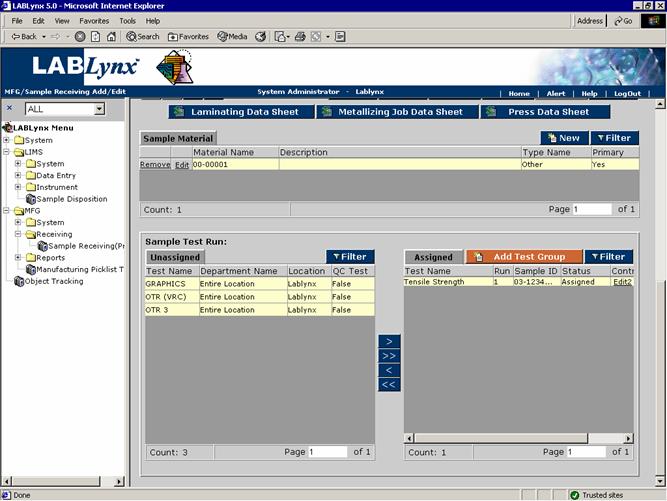
The Sample Material area of the screen contains the list of the primary materials assigned to the spec, which were previously assigned to the item of the order:
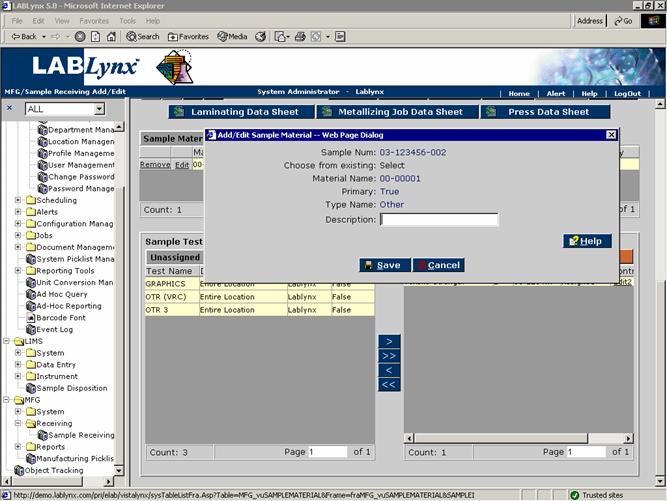
If the information that accompanied the sample states that an additional material or an alternate material was used to manufacture the product, the user will be allowed to edit the sample material information by clicking the Edit hyperlink to the left of the material name or add new sample information by clicking the New Button. They may also remove a material from the list by clicking the Remove hyperlink to the left of the Edit link:
By clicking on the Edit link or New button, the system will bring up the Add Sample Material dialog. In the case of adding a new material, the user will click the Select link next to the material name to choose a new material from the list of Materials available for the spec assigned to the sample. The only editing the user may do for the material information is to add a description or comment in the field provided or remove that material from the list.
Sample Test Run area
The Sample Test Run area of the screen is the final area. This unassigned/assigned frame displays the available tests that can be assigned on the left and the tests that have already been assigned on the right. Certain tests are preassigned from the spec that was preassigned to the order item that the sample was taken from. The user may add additional tests to the assigned list or remove tests that were preassigned:
If a test has been defined by the system administrator to allow data entry without batching, the sample number will become a hyperlink in the Assigned frame. This will allow the user to go directly to the data entry by sample screen to enter the data for all of the appropriate tests assigned to that sample.
Special Notes: It is very important that the user receives the sample from this screen prior to clicking on the hyperlink to enter data from this screen. Otherwise, the sample may move to a status of complete and not allow a user to receive the sample from the Samples List screen.
