LabLynx KB:Sample point management
|
|
This is an article specific to the Category:LabLynx knowledge base. Its context outside of LabLynx, Inc may not be apparent, thus why it appears inside the LabLynx KB namespace. |
Introduction
LabLynx enables you to add and edit sample point information.
You can also:
- add and edit schedule information
- add and edit containers
- add and edit district category definitions
- add and edit flow data details
System administrators use LabLynx ELab to manage sample point information, including:
- sample point tab
- sample point details
- schedule tab
- sample point schedule information
- containers
- district category definitions (DCDs) tab
- district category definition details
- available district category definition limits
- selected district category definition limits
- flow data tab
- flow data details
Adding or editing sample point information
The Sample Points List screen displays sample point information currently defined in the system:
After selecting a sample point description or clicking New, this screen will show four tabs to work with:
- 1. Sample Point
- 2. Schedule
- 3. DCDs
- 4. Flow Data
Sample point tab
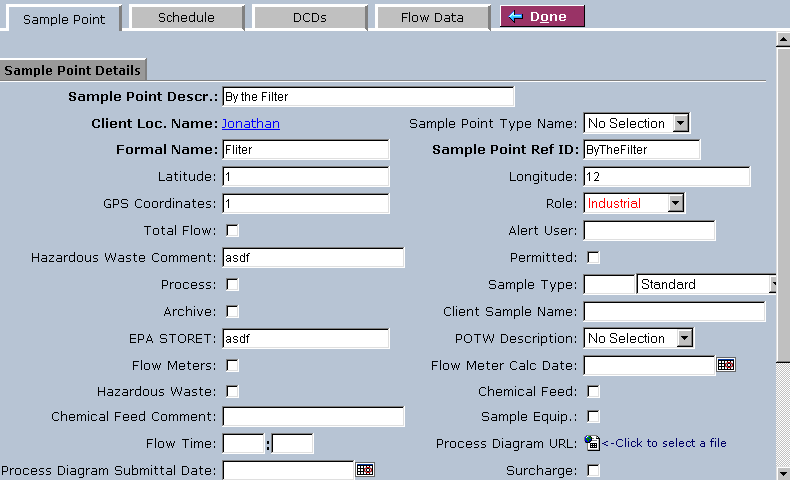
1. Click the Sample Point tab. The system will display the Sample Point Details screen:
2. Complete the fields of the Sample Point Details area. Fields in bold are required. The various fields are explained below:
| Field | Description |
|---|---|
| Sample Point Descr. | Type a description of the sample point. |
| Client Loc. Name | Click the link to select the client location name from the Client Location List. |
| Sample Point Type Name | Select the type from the drop-down list. |
| Formal Name | Type the formal name for the sample point. |
| Sample Point Ref ID | Type the reference ID. |
| Latitude | Enter the latitude. |
| Longitude | Enter the longitude. |
| GPS Coordinates | Enter the GPS coordinates. |
| Role | Select the role from the drop-down list. |
| Total Flow | Select this check box if the flow reported is the total flow for the sample point. |
| Alert User | Type a user to alert. |
| Hazardous Waste Comment | Type a hazardous waste comment. |
| Permitted | Select the check box if the sample is from a permitted sample point. |
| Process | Select the check box to process. |
| Sample Type | Select the type from the drop-down list. Type the first letter(s) of the type in the field to the left for faster selection from the drop-down list. |
| Archive | Select the check box to archive the entry. |
| Client Sample Name | Type the client sample name. |
| EPA STORET | Type the EPA STORET identifier. |
| POTW Description | Select the description from the drop-down list. |
| Flow Meters | Select the check box if flow meters are to be used. |
| Flow Meter Calc Date | Click the calendar icon to select a date. |
| Hazardous Waste | Select the check box if the waste is hazardous. |
| Chemical Feed | Select the check box if the sample point has a chemical feed pump as part of its pre-treatment system. |
| Chemical Feed Comment | Type a chemical feed comment. |
| Sample Equip. | Select the check box if the client has their own sampling equipment for this sample point. |
| Flow Time | Type the time in hours and minutes. |
| Process Diagram URL | Click the icon to select and send a process diagram URL file to the server. |
| Process Diagram Submittal Date | Click the calendar icon to select a date. |
| Surcharge | Select the check box to apply a surcharge. |
| % of Total Process Flow | Type a percentage. |
3. When you are finished, click Save and then Done.
Schedule tab
Click the Schedule tab. The system will display the Assigned Sample Points List:
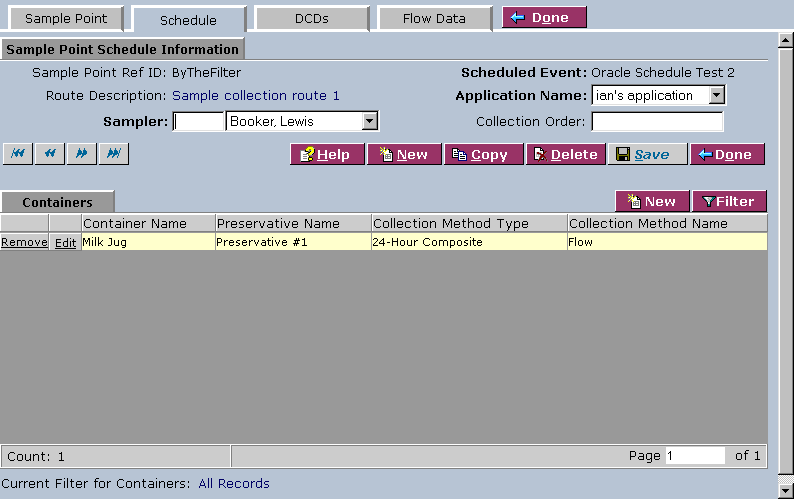
1. From the Assigned Sample Points List, select a sample point ref ID or click New. The system displays the Sample Point Schedule Information screen:
2. Complete the fields of the Sample Point Schedule Information area. Fields in bold are required. The various fields are explained below:
| Field | Description |
|---|---|
| Application Name | Select the name from the drop-down list. |
| Sampler | Select the sampler from the drop-down list. Type the first letter(s) of the name in the field to the left for faster selection from the drop-down list. |
| Collection Order | Type the collection order. |
3. When you are finished, click Save and then Done.
Adding or editing containers
Making sure you're on the Schedule tab, select the Remove or Edit links, or select the New button in the Containers area.
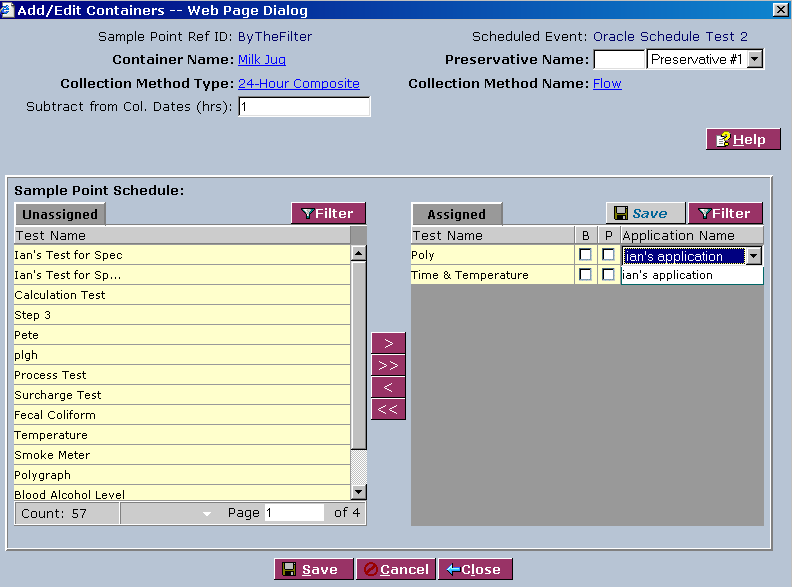
If Edit or New are selected, the system will display the Add/Edit Containers Web page dialog:
1. Complete the fields. Fields in bold are required. The various fields are explained below:
| Field | Description |
|---|---|
| Container Name | Click the link to select a container name from the Container List on the Container Lookup screen. |
| Preservative Name | Select the name from the drop-down list. Type the first letter(s) of the name in the field to the left for faster selection from the drop-down list. |
| Collection Method Type | Clink the link to select a collection method type from the Collection Method Types List on the Collection Method Types Lookup screen. |
| Collection Method Name | Click the link to select a collection method name from the Collection Methods List on the Collection Methods Lookup screen. |
| Subtract from Col. Dates (hrs) | Type the number of hours to subtract from the collection dates. |
2. In the Sample Point Schedule area, select tests to assign or unassign. The various buttons are explained below:
| Button | Description |
|---|---|
| Add | Adds the selected test to the assigned list. |
| All | Adds all tests to the assigned list. |
| Remove | Removes the selected test from the assigned list. |
| Clear | Removes all tests from the assigned list. |
3. When you are finished, click Save, Close, and then Done.
DCDs tab
Click the district category definition (DCDs) tab. The system will display the District Category Definitions List:
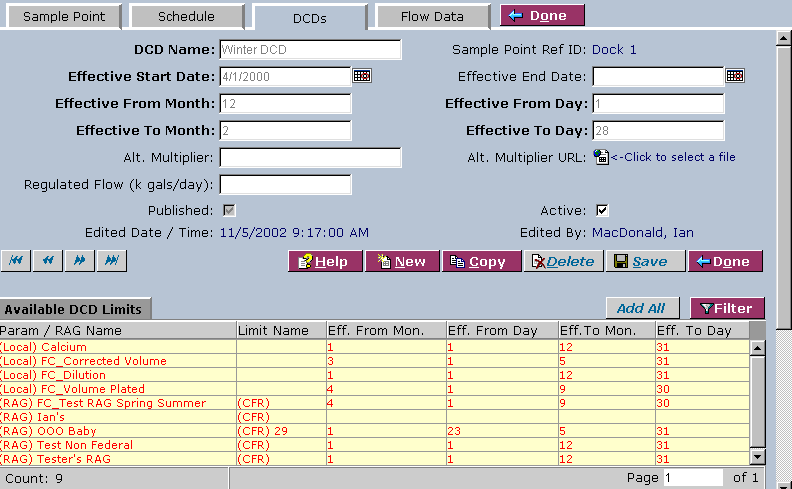
1. From the District Category Definitions List, select a DCD name or click New:
2. Complete the fields on the screen. Fields in bold are required. The various fields are explained below:
| Field | Description |
|---|---|
| DCD Name | Type the DCD name. |
| Effective Start Date | Click the calendar icon to select a date. |
| Effective End Date | Click the calendar icon to select a date. |
| Effective From Month | Type a month. |
| Effective From Day | Type a date. |
| Effective To Month | Type a month. |
| Effective To Day | Type a date. |
| Alt. Multiplier | Type the alternate multiplier. |
| Alt. Multiplier URL | Click the icon to select and send an alternate multiplier URL file to the server. |
| Regulated Flow (k gals/day) | Type an amount. |
| Published | Select the check box to publish the DCD. |
| Active | Select the check box to activate the DCD. |
3. In the Available DCD Limits area, select a parameyer/RAG name and click Add All. The system will refresh the Available DCD Limits area and add the selected parameter/RAG name to the Selected DCD Limits area.
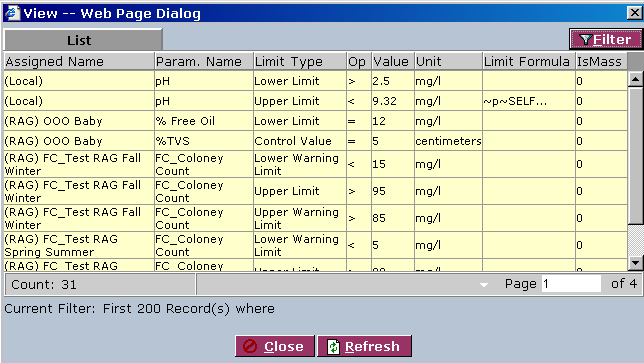
4. To view limit values for the Selected DCD Limits area, click the View Limit Values button. The system will display the View web page dialog:
5. When you are finished, click Save and then Done.
Flow data tab
Click the Flow Data tab. The system will display the Flow Data Details List:
1. From the Flow Data Details List, select a start date or click New. The system will display the Flow Data Details screen:
2. Complete the fields on the Flow Data Details screen. Fields in bold are required. The various buttons are explained below:
| Field | Description |
|---|---|
| Flow Type | Select the flow type from the drop-down list. |
| Flow Amount (mcf) | Type the amount. |
| Start Date | Click the calendar icon to select a date. |
| End Date | Click the calendar icon to select a date. |
3. When you are finished, click Save and then Done.

