LabLynx KB:Peripheral module - 3.0 object tracking
|
|
This is an article specific to the Category:LabLynx knowledge base. Its context outside of LabLynx, Inc may not be apparent, thus why it appears inside the LabLynx KB namespace. |
Introduction
As stated in the previous article, a process group or batch is a single entity under which one or many sample tests may be grouped for data entry purposes. A process group may have sample tests added to/deleted from it up until results entry has been completed and approved for the respective process. Once the approval has occurred, the batch number will no longer be displayed, and further editing may only take place in future process groups containing the sample test results of interest. The process of following what an object is doing, up until completion, is referred to as object tracking.
Object selection
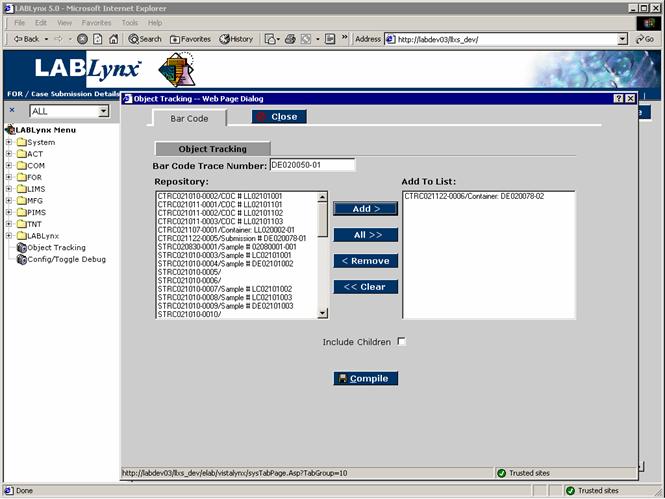
When the user selects Object Tracking from the main menu, the system displays a dialogue box with three main areas:
- 1. The first area is labeled Bar Code Trace Number. This input area allows the user to scan the system-generated trace ID from a label using a bar code reader (or the user may manually type the trace ID). Once entered, the user may press the carriage return to have that value moved into the Add To List.
- 2. The second area that the user sees is the Repository. There may or may not be values in this list. The contents of the list are based on all tracked objects that the logged-in user has possession of. The actual possession of these objects would be indicated to the system using this area as well. This area is very helpful in not requiring the user to rescan items that they are already in possession of.
- 3. The last area of the screen is the Add To List. This is the list of objects that the user has selected either from the Repository or through the use of the Bar Code Trace Number field. It is from this user-defined list that the user may commit actions to processing either one-by-one or in bulk:
Also displayed to the user is a check box labeled Include Children. The purpose for this check box is to allow a user to select a parent object (such as a shipping container that has its own trace number) and have the system also perform the selected action on the shipping containers contents, which would presumably be samples (with their own respective trace numbers).
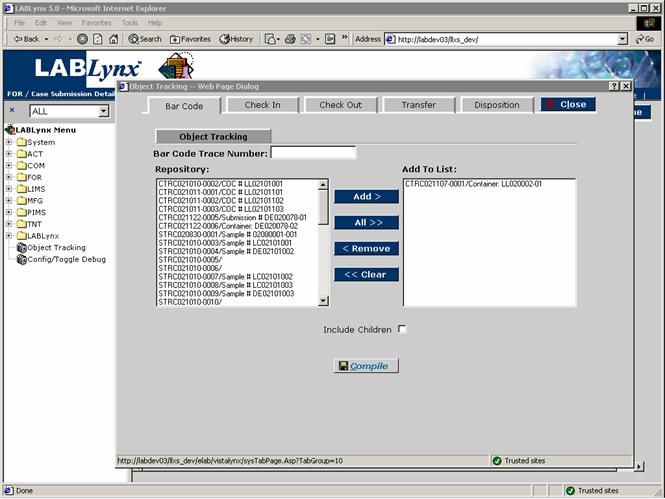
In using this area, the user defines objects they wish to perform an action on (either through scanning the bar codes, typing them in, or simply selecting objects already in their possession) in the Add To List and selects the Compile button. When the button is clicked, the system will check on the status of all of the objects in the Add To List. Once the current status of these objects is determined, four additional tabs will be displayed to the user, each tab indicating an action: check-in, check-out, transfer, or disposition:
The user may then select a tab corresponding to their desired action. The system will carry over the objects they had previously selected and allow the action to be completed. It should be noted that the system will carry over the initial list to the selected tab area; however, the user may select a subset of that list to perform that action on if they wish.
Check-In tab
The Check-In screen is the area where users may place tracked objects into predefined storage locations. The purpose for this screen is to allow the laboratory to manage custody for any tracked item.
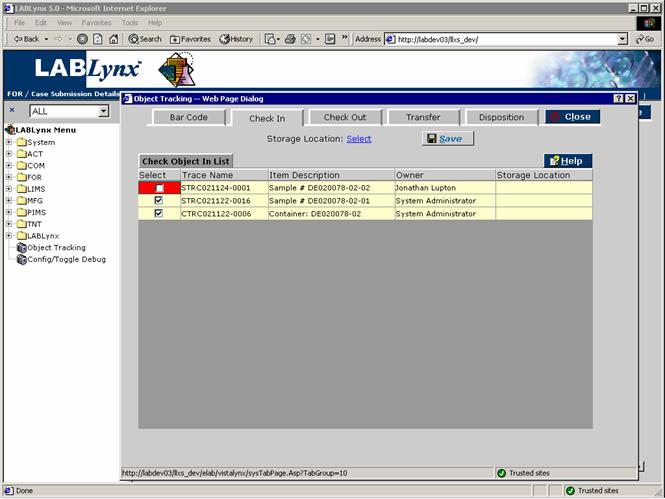
The user is shown the Check Object In List, which contains the objects (samples, inventory items, etc.) that were selected from the previous compilation screen. To the far left is a selectable check box column. The contents of this check box are dependent on the current status of the object.
If the object were in the logged-in user's possession, the background color of the check box would be beige, and the box itself would be automatically checked. However, if the object were already checked in, the background would be yellow (indicating caution) and the box would not be checked because of the potential conflict. The user is also displayed the trace name, item description, current user owner (if any), and current storage location (if any). The user may then select the desired location where the object(s) will be stored from the list of storage locations previously defined in the system and save the selections:
For example, if the user has a group of samples that needs to be checked back into a storage area, the user may have a list built using the bar code tracking IDs or by manually selecting the objects from the list of objects that the system knows as being in their possession. By entering this screen, the user can check in all of those selected items.
Special Note: The background color for the Select check box may be yellow (indicating caution) or red (indicating problem). In either case the system will allow the user to override and continue their actions. This is done because a prior user may not have used the object tracking area for past activities, and the current user simply needs to complete their task.
Check-Out tab
The Check-Out screen is the area where users select the objects that they wish to transfer custody from storage location to their possession. The purpose for this screen is to allow the laboratory to manage custody for any tracked item.
For example, the user has gone to a storage location and selected a group of samples (or other tracked object) and wishes to transfer custody to their possession from the storage area. The user would select the samples by scanning the bar coded trace ID or manually selecting the samples from the compilation screen. By entering this screen the user may simply select the Save button to commit the action to the LIMS.
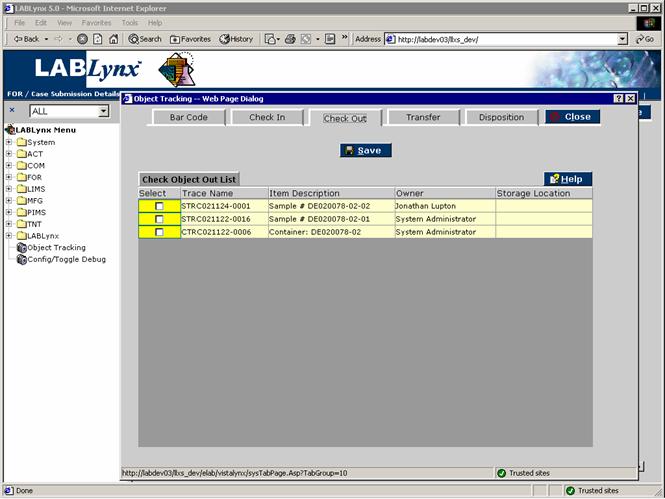
The user is shown the Check Object Out List, which contains the objects (samples, inventory items, etc.) that were selected from the previous compilation screen. To the fat left is a selectable check box column. The contents of this check box are dependent on the current status of the object.
If the object were in the storage location, the background color of the check box would be beige and the box itself would be automatically checked. However, if the object were already checked out, the background would be yellow (indicating caution) and the box would not be checked because of the potential conflict. The user is also shown the trace name, item description, current user owner (if any), and current storage location (if any). The user may then select the tracked objects and save the selections to there possession:
Special Note: The background color for the Select check box may be yellow (indicating caution) or red (indicating problem). In either case the system will allow the user to override and continue their actions. This is done because a prior user may not have used the object tracking area for past activities and the current user simply needs to complete their task.
Transfer tab
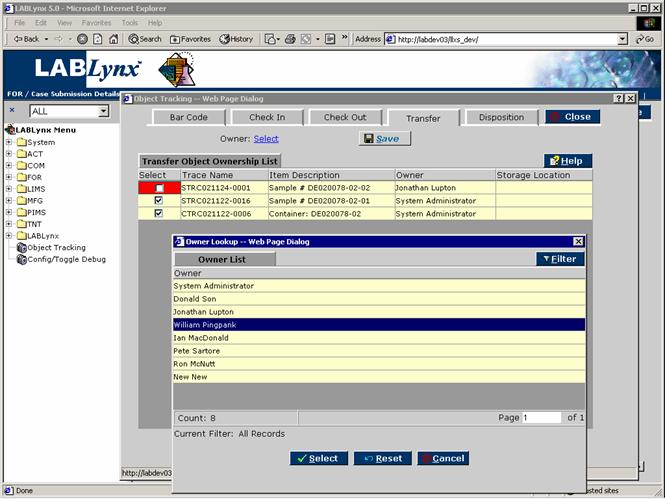
The Transfer screen is the area where users select the objects that they wish to transfer custody from their possession to another user. The purpose of this screen is to allow the laboratory to manage custody for any tracked item.
The user is shown the Transfer Object Ownership List, which contains the objects (samples, inventory items, etc.) that were selected from the previous compilation screen. To the far left is a selectable check box column. The contents of this check box are dependent on the current status of the object.
If the object were in the users possession, the background color of the check box would be beige and the box itself would be automatically checked. However, if the object were already in another user's possession, the background would be red (indicating conflict) and the box would not be checked because of the potential conflict. Note that the other background color is yellow (indicating caution), and the box would not be checked, in this case because the object is not in the possession of another user but in a storage location. The user is also shown the trace name, item description, current user owner (if any), and current storage location (if any). The user may then select the tracked objects and click Save, which will transfer the selected objects to the selected user:
For example, the user has in their possession a group of samples that they have completed working with. They are not going to be placing these objects back into a storage location. Instead the user will be transferring them to a co-worker. The user in possession would enter the compilation screen (where the samples would already be in the list because the system knows who is in possession of the objects) and then accesses the Transfer tab. The user would select the individual they wish to transfer custody to and, once selected, click on the Save button to complete the transaction.
Special Note: The background color for the Select check box may be yellow (indicating caution) or red (indicating problem). In either case the system will allow the user to override and continue their actions. This is done because a prior user may not have used the object tracking area for past activities and the current user simply needs to complete their task.
Disposition tab
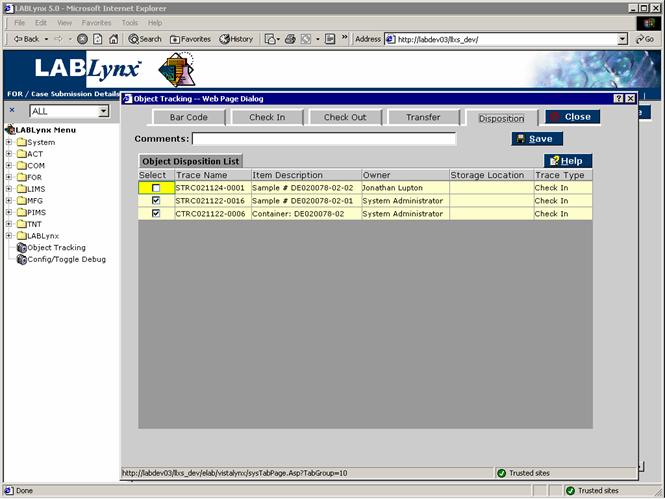
The Disposition area allows a user to bypass the standard disposal area within the LIMS, if required, for the purposes of defining the final disposition of the object(s). The purpose for this screen is to allow the laboratory to manage custody for any tracked item.
The user is shown the Object Disposition List, which contains the objects (samples, inventory items, etc.) that were selected from the previous compilation screen. To the far left is a selectable check box column. The user is also shown the trace name, the item description, the current user owner (if any), the current storage location (if any), and the trace type. The user may then select the tracked objects and click Save, which will move the selected objects to the selected user:
For example, the user has in their possession a group of samples that they have completed working with and wish to dispose. The user would enter any disposal comments in the respective area and click on the Save button, completing the transaction.
Special Note: The background color for the Select check box may be yellow (indicating caution) or red (indicating problem). In either case the system will allow the user to override and continue their actions. This is done because a prior user may not have used the object tracking area for past activities and the current user simply needs to complete their task.
