LabLynx KB:Client location management
|
|
This is an article specific to the Category:LabLynx knowledge base. Its context outside of LabLynx, Inc may not be apparent, thus why it appears inside the LabLynx KB namespace. |
Introduction
LabLynx enables you to add and edit client location information. That information is categorized under the following tabs:
- Client Loc: client location details
- Sample Pt: client location sample point list
- Contacts: contact details
- Limits: client location limits list
- Equipment: client location limits list
- Accounts: client location accounts list
- Operations: operations list
- SIC/CSO
- Other (communications, flow data, waste tracking, hazardous chemical storage, doc tracking, pictures & documents, and permits)
System administrators use LabLynx ELab to manage client location information, including:
- Client Location tab
- client location details
- client location custom fields
- client location programs
- Sample Pt tab
- client location sample point list
- Contacts tab
- client location contacts list
- contact details
- Limits tab
- client location limits list
- available client location limits
- Equipment tab
- client location equipment list
- equipment details
- Accounts tab
- client location accounts list
- accounts details
- Operations tab
- operations details
- operations list
- SIC/CSO tab
- SIC codes and client location CSO
- Other tab
- communication details
- communication custom Fields
- flow data details
- manifest details
- hazardous chemicals
- document tracking
- pictures & document files
- permit details
Adding or editing client location information
The Clients Locations List screen displays client location information currently defined in the system:
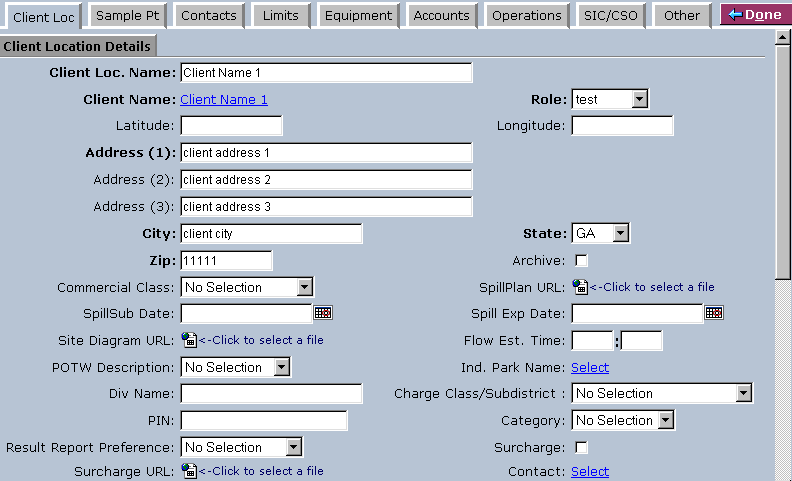
From the Clients Locations List, select a client location name or click New. The system will display the Client Location Details screen:
Client location tab
1. Complete the fields of the Client Location Details area. Fields in bold are required. The various fields are explained below:
| Field | Description |
|---|---|
| Client Loc. Name | Type the name of the client location. |
| Client Name | Select the link to view the client look up list and select a client name. |
| Role | Select a role from the drop-down list. |
| Latitude | Type the latitude. |
| Longitude | Type the longitude. |
| Address (1) | Type the first line of the address. |
| Address (2) | Type the second line of the address. |
| Address (3) | Type the third line of the address. |
| City | Type the city name. |
| State | Select the state from the drop-down list. |
| Zip | Type the zip code. |
| Archive | Select the check box to archive the entry. |
| Commercial Class | Select the client location's commercial class from the drop-down menu. |
| SpillPlan URL | Click the icon to select and send a SpillPlan URL file to the server. |
| SpillSub Date | Click the calendar icon to select a date. |
| Spill Exp Date | Click the calendar icon to select a date. |
| Site Diagram URL | Click the icon to select and send a site diagram file to the server. |
| Flow Est. Time | Type a time in hours and minutes. |
| POTW Description | Select from the drop-down list. |
| Ind. Park Name | Click the link to select an industrial park name for the client's location from the industrial park list. |
| Div Name | Type the client location's division name. |
| Charge Class/Subdistrict | Select from the drop-down list. |
| PIN | Type the PIN (personal identification number). |
| Category | Select the category from the drop-down list. |
| Result Report Preference | Select the preference from the drop-down list. |
| Surcharge | Select the check box to apply a surcharge. |
| Surcharge URL | Click the icon to select and send a surcharge URL file to the server. |
| Contact | Click the link to select a contact for the client's location from the client location contacts list. |
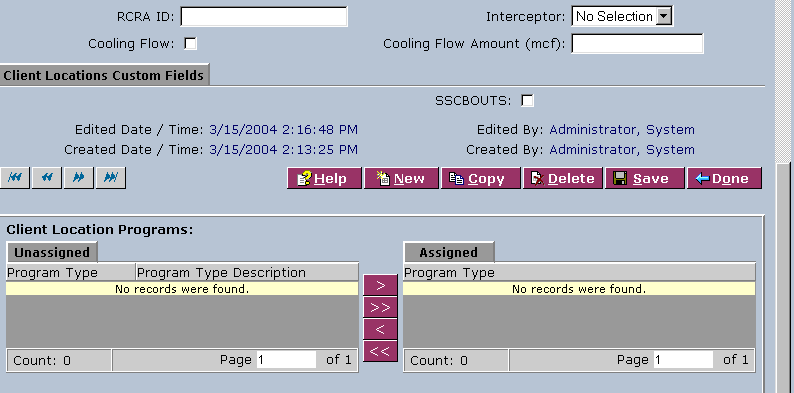
| RCRA ID | Type the RCRA ID. |
| Interceptor | Select an interceptor from the drop-down list. |
| Cooling Flow | Select the check box if there is a cooling flow. |
| Cooling Flow Amount (mcf) | Type the amount. |
2. In the Client Locations Custom Fields area, click the SSCBOUTS check box to indicate that an amount of water will be subtracted from the total flow.
3. In the Client Location Programs area, select program types to assign/unassign. The various buttons are explained below:
| Button | Description |
|---|---|
| Add | Adds the selected program type to the assigned list. |
| All | Adds all program types to the assigned list. |
| Remove | Removes the selected program type from the assigned list. |
| Clear | Removes all program types from the assigned list. |
4. When you are finished, click Save and then Done.
Sample point tab
For how to edit this tab, please refer to the sample point management article.
Contacts tab
1. Select the Contacts tab to open the Client Location Contacts List:
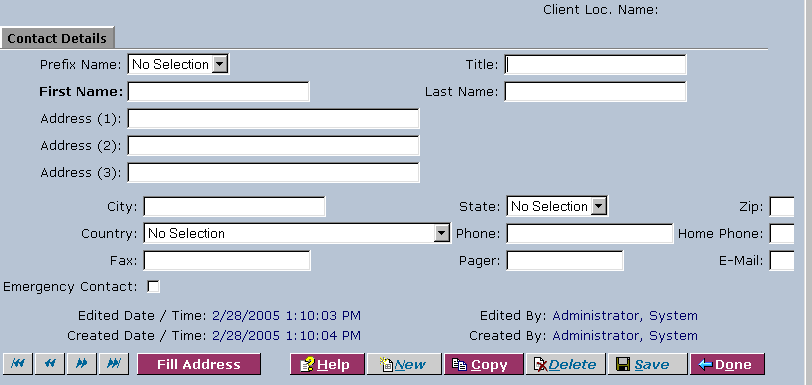
2. From the Client Location Contacts List, select a last name or click New. The system will display the Contact Details screen:
3. Complete the fields of the Contact Details area. Fields in bold are required. (To fill the address text fields with information already in the system [only available when editing an existing record], click the Fill Address button.) The various fields are explained below:
| Field | Description |
|---|---|
| Prefix Name | Select a prefix from the drop-down list. |
| Title | Type the title of the primary contact. |
| First Name | Type the given name of the primary contact. |
| Last Name | Type the surname of the primary contact. |
| Address (1) | Type the first line of the address. |
| Address (2) | Type the second line of the address. |
| Address (3) | Type the third line of the address. |
| City | Type the city name. |
| State | Select the state from the drop-down list. |
| Zip | Type the zip code. |
| Country | Select the country from the drop-down list. |
| Phone | Type the business phone number of the primary contact. |
| Home Phone | Type the home phone number of the primary contact. |
| Fax | Type the fax number of the primary contact. |
| Pager | Type the pager number of the primary contact. |
| Type the e-mail address of the primary contact. | |
| Emergency Contact | Select the check box if this is an emergency contact. |
4. When you are finished, click Save and then Done.
Limits tab
1. Select the Limits tab to open the Client Location Limits List:
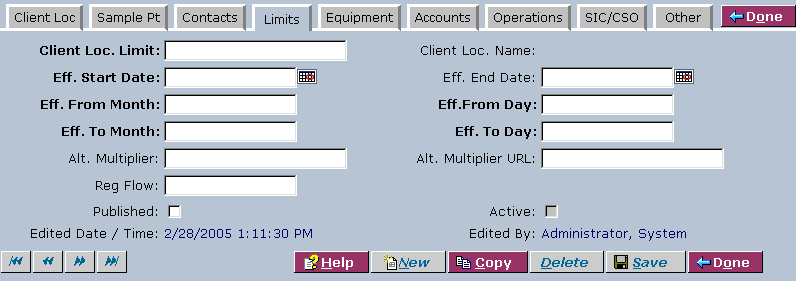
2. From the Client Location Limits List, select a client location limit or click New:
3. Complete the fields of the top area. Fields in bold are required. The various fields are explained below:
| Field | Description |
|---|---|
| Client Loc. Limit | Type the client location limit. |
| Eff. Start Date | Click the calendar icon to select a date. |
| Eff. End Date | Click the calendar icon to select a date. |
| Eff. From Month | Enter a month. |
| Eff. From Day | Enter a date. |
| Eff. To Month | Enter a month. |
| Eff. To Day | Enter a date. |
| Alt. Multiplier | Type the alternate multiplier. |
| Alt. Multiplier URL | Type the alternate multiplier's URL. |
| Reg Flow | Type the regulated flow. |
| Published | Select the check box to publish the limit. |
| Active | Select the check box to activate the limit. |
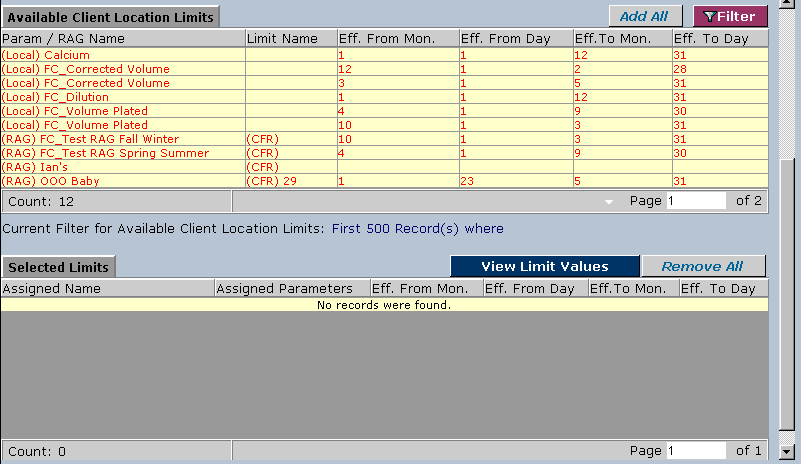
4. For existing records, the Available Client Location Limits area displays at the bottom of the screen. In this area select a Param/RAG name and click Add Sel., or click Add All. The system will refresh the Available Client Location Limits area and add the selected Param/RAG name to the Selected Limits area:
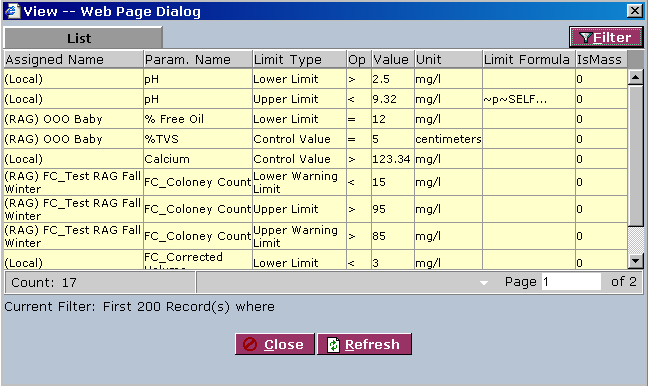
5. To view limit values for the Selected Limits area, click the View Limit Values button. The system will display the View Web page dialog:
6. When you are finished, click Save and then Done.
Equipment tab
1. Select the Equipment tab to open the Client Location Equipment List:
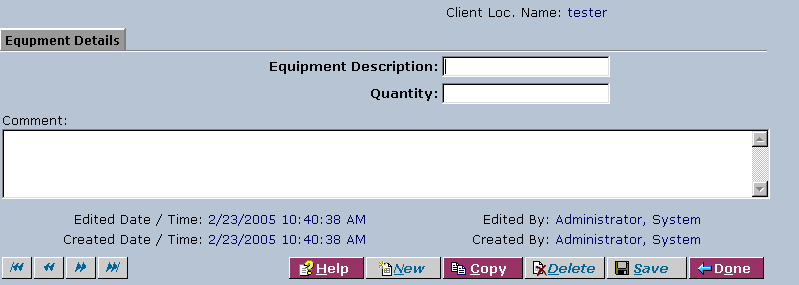
2. From the Client Location Equipment List, select an equipment description or click New. The system will display the Equipment Details screen:
3. Complete the fields of the Equipment Details area. Fields in bold are required. The various fields are explained below:
| Field | Description |
|---|---|
| Equipment Description | Enter an appropriate description for the equipment. |
| Quantity | Enter the quantity. |
| Comment | Type a comment containing additional details. |
4. When you are finished, click Save and then Done.
Accounts tab
1. Select the Accounts tab to open the Client Location Accounts List:
2. From the Client Location Accounts List, select an account number or click New. The system will display the Accounts Details screen:
3. Complete the fields of the Accounts Details area. Fields in bold are required. The various fields are explained below:
| Field | Description |
|---|---|
| Account Number | Type the account number. |
| Account Type | Select the account type from the drop-down list. |
4. When you are finished, click Save and then Done.
Operations tab
1. Select the Operations tab to open the Operations List:
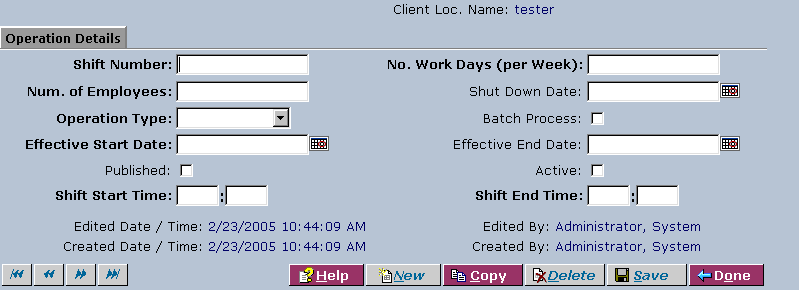
2. From the Operations List, select a shift number or click New. The system will display the Operation Details screen:
3. Complete the fields of the Operation Details area. Fields in bold are required. The various fields are explained below:
| Field | Description |
|---|---|
| Shift Number | Type a shift number. |
| No. Work Days (per Week) | Type a number of work days. |
| Num. of Employees | Type a number of employees. |
| Shut Down Date | Click the calendar icon to select a date. |
| Operation Type | Select an operation type from the drop-down list. |
| Batch Process | Select the check box to batch process. |
| Effective Start Date | Click the calendar icon to select a date. |
| Effective End Date | Click the calendar icon to select a date. |
| Published | Select the check box to publish the operation. |
| Active | Select the check box to activate the operation. |
| Shift Start Time | Type a time in hours and minutes. |
| Shift End Time | Type a time in hours and minutes. |
4. When you are finished, click Save and then Done.
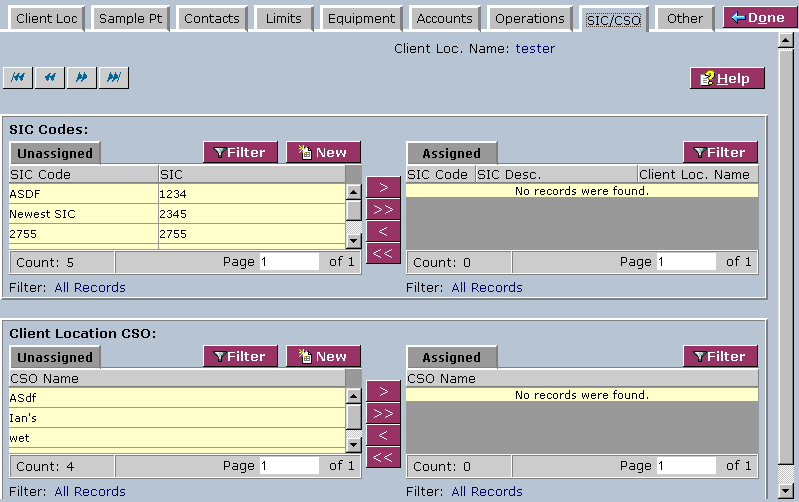
SIC/CSO tab
1. Select the SIC/CSO tab to open the SIC Codes and Client Location CSO areas:
2. In the SIC Codes area, select SIC codes to assign or unassign. The various buttons are explained below:
| Button | Description |
|---|---|
| Add | Adds the selected SIC code(s) to the assigned list. |
| All | Adds all SIC codes to the assigned list. |
| Remove | Removes the selected SIC code(s) from the assigned list. |
| Clear | Removes all SIC codes from the assigned list. |
3. In the Client Location CSO area, select CSO names to assign or unassign. The various buttons are explained below:
| Button | Description |
|---|---|
| Add | Adds the selected CSO name(s) to the assigned list. |
| All | Adds all CSO names to the assigned list. |
| Remove | Removes the selected CSO name(s) from the assigned list. |
| Clear | Removes all CSO names from the assigned list. |
4. When you are finished, click Save and then Done.
Other tab
Client location information that is not categorized under the previous tabs is available for editing in the Other tab.
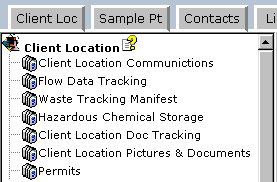
Click the Other tab. The system will display a menu on the left side of the screen, opening up seven more options:
Client location communications
1. Click the Client Locations Communications link. The system will display the Communications List:
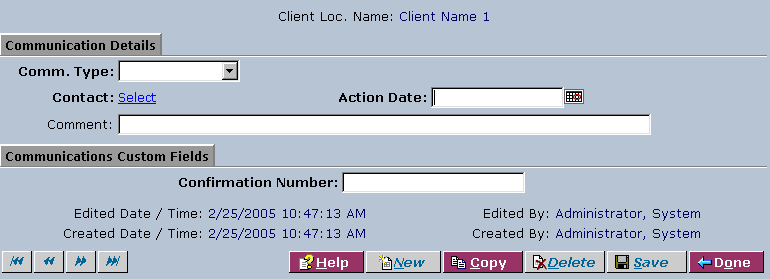
2. Select a communication type or click New. The system will display the Communication Details screen:
3. Complete the fields of the Communication Details area. Fields in bold are required. The various fields are explained below:
| Field | Description |
|---|---|
| Comm. Type | Select a type from the drop-down list. |
| Contact | Click the link to select a Contact from the client locations contacts List. |
| Action Date | Click the calendar icon to select a date. |
| Comment | Type a comment. |
4. Complete the fields of the Communications Custom Fields area. Fields in bold are required. The various fields are explained below:
| Field | Description |
|---|---|
| Confirmation Number | Type the confirmation number. |
5. When you are finished, click Save and then Done.
Flow data tracking
1. Click the Flow Data Tracking link. The system will display the Flow Data List:
2. Select a start date or click New. The system will display the Flow Data Details screen:
3. Complete the fields of the Flow Data Details area. Fields in bold are required. The various fields are explained below:
| Field | Description |
|---|---|
| Flow Type | Select the flow type from the drop-down list. |
| Flow Amount (mcf) | Type the amount. |
| Start Date | Click the calendar icon to select a date. Type a time in hours and minutes. |
| End Date | Click the calendar icon to select a date. Type a time in hours and minutes. |
4. When you are finished, click Save and then Done.
Waste tracking manifest
1. Click the Waste Tracking Manifest link. The system will display the Waste Tracking Manifest List:
2. Select a manifest number or click New. The system will display the Manifest Detail screen:
3. Complete the fields of the top area of the screen. The various fields are explained below:
| Field | Description |
|---|---|
| POTW Description | Select a description from the drop-down list. |
| Haul Date | Click the calendar icon to select a date. |
| Truck Identifier | Type an identifier. |
| Quantity | Type a quantity. |
| Unit Name | Select a name from the drop-down list. |
4. In the area at the bottom of the screen (for existing records), select a waste code or click New:
5. Complete the fields in the ManifestDetail area. Fields in bold are required. The various fields are explained below:
| Field | Description |
|---|---|
| Waste Code | Click the link to select a hazardous waste code from the hazardous waste code list. |
| Quantity | Type a quantity. |
| Unit Name | Select from the drop-down list. |
| Generator Name | Type a generator name. |
| Pickup Date | Click the calendar icon to select a date. Type a time in hours and minutes. |
6. When you are finished, click Save and then Done.
Hazardous chemical storage
1. Click the Hazardous Chemical Storage link. The system displays the Haz Chemicals List:
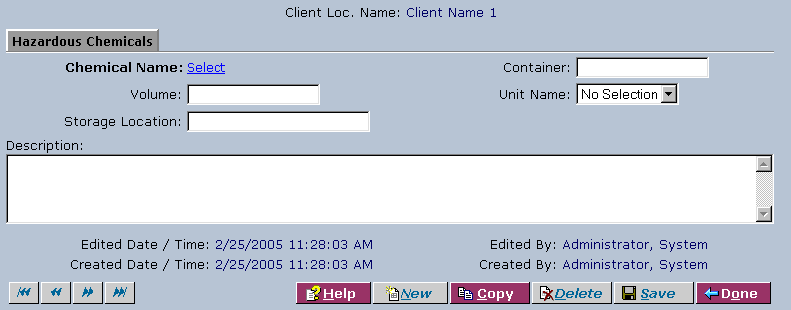
2. Select a chemical name or click New. The system will display the Hazardous Chemicals screen:
3. Complete the fields of the Hazardous Chemicals screen. Fields in bold are required. The various fields are explained below:
| Field | Description |
|---|---|
| Chemical Name | Click the link to select a Chemical Name from the Chemical Storage List. |
| Container | Type the container. |
| Volume | Type the volume. |
| Unit Name | Select a Unit Name from the drop-down list. |
| Storage Location | Type the storage location. |
| Description | Type a description. |
4. When you are finished, click Save and then Done.
Client location doc tracking
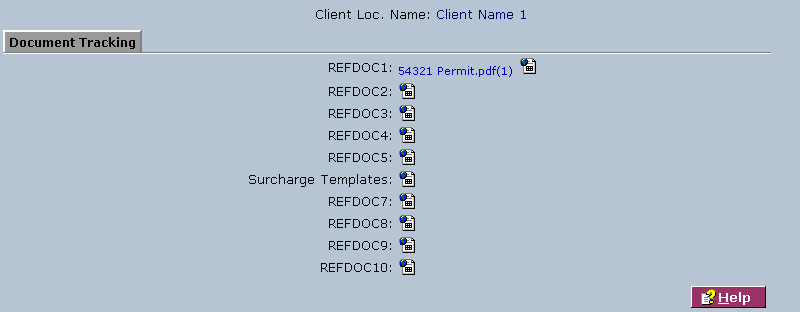
1. Click the Client Location Doc Tracking link. The system will display the Document Tracking screen:
2. Click a document icon to select a file. The system will display the Document screen:
3. Complete the fields of the Document screen. Fields in bold are required. The various fields are explained below:
| Field | Description |
|---|---|
| File | Click to select a file through the Send File to Server Web page dialog. |
| Published | Select the check box to publish the document. |
| Active | Select the check box to activate the document. |
4. When you are finished, click Save and then Done.
Client location pictures & documents
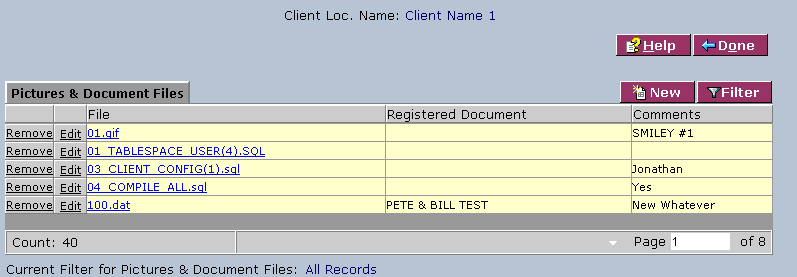
1. Click the Client Location Pictures & Documents link. The system will display the Pictures & Document Files screen:
2. Click a file link to see the file, or click Remove to delete the file, if desired.
3. To add or edit information, click Edit in the row for the desired item, or click New. The system eill display the Add/Edit Pictures & Document Files Web page dialog:
4. Complete the fields of the Add/Edit Pictures & Document Files Web page dialog. The various fields are explained below:
| Field | Description |
|---|---|
| File | Click to select a file through the Send File to Server Web page dialog. |
| Registered Document | Click to select a document from the documents list. |
| Comments | Enter any relevant comments. |
5. When you are finished, click Save and then Done.
Permits
1. Click the Permits link. The system will display the Permits List:
2. Select a permit number or click New. The system will display the Permit Number screen:
3. Complete the fields. Fields in bold are required. The various fields are explained below:
| Field | Description |
|---|---|
| Permit Number | Type the permit number. |
| File | Click to select a file through the Send File to Server Web page dialog. |
| Issued Date | Click the calendar icon to select a date. |
| Expiration Date | Click the calendar icon to select a date. |
| Effective Date | Click the calendar icon to select a date. |
| Archived Date | Click the calendar icon to select a date. |
| Published | Select the check box to publish the permit. |
| Active | Select the check box to activate the permit. |
4. Click the Reports button to view Access Reports. The system displays the Report Parameter Dialog Web page dialog:
5. Select the desired extension option. Click View Report to view reports. The system will display data in the Report Parameter Management area:
6. Click Select to select a process group number from the Batch Number Lookup List.
7. Select the check box marked View As Draft or the Preview button, if desired.
8. Click Exit.
9. When you are finished, click Save and then Done.

