LabLynx KB:Receiving - 6.1 forensic receiving
|
|
This is an article specific to the Category:LabLynx knowledge base. Its context outside of LabLynx, Inc may not be apparent, thus why it appears inside the LabLynx KB namespace. |
Case management
A case is the entity under which submissions, containers, and evidence are assigned. A case is opened immediately at the time of log in. It's complete when all evidence testing is complete and the respective analysts have indicated to the system that their work is done.
Cases allow for the logging in, and relating to, of submitted evidence for testing purposes. As these submissions, containers, and evidence are logged into the system, tests may be assigned to evidence for processing through the LIMS. The objective for tying the evidence test results and submission container information to the case allows for a single entity for the central accessing of data for management and reporting purposes.
This article continues from here, discussing containers, evidence, and case files.
Container
Containers are an optional area that allows users to define the packaging and/or storage containers for evidence. If used, this allows the laboratory to define in great detail how the actual evidence was received and stored at the laboratory. The purpose for managing containers is to allow the laboratory management the ability to track and relate case submissions, their associated containers (if any), and finally the actual evidence received in the container.
For example, a new group of evidence is received at the laboratory. The receipt person determines whether or not the group is part of an existing case or a new one. This user then either selects an existing case or creates the new case and has the ability to define the container(s) that were received as part of the submission. The versatility of the container section allows for capturing general information for objects such as boxes, weapons, vehicles, etc.
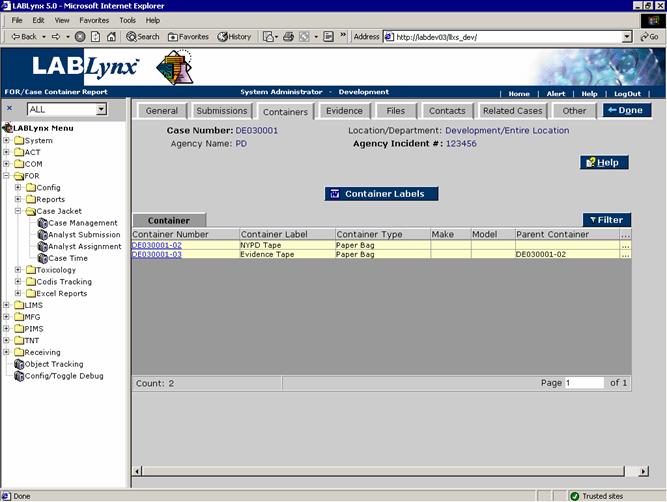
From the Case Container Report (the Containers tab) the user is shown a list of all containers assigned to the selected case. The actual containers are listed in the Container list at the bottom of the screen. The information displayed about each container in the list includes the container number, the container label, the container type, make and model of the container, and the parent container number if it's a sub-container:
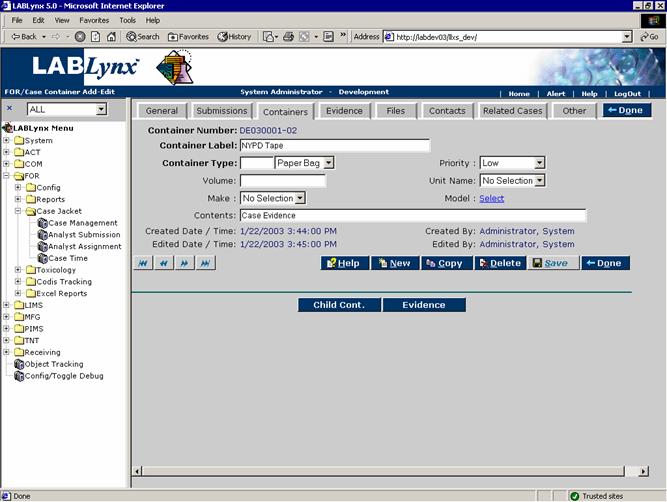
The user is then shown either the details of an already existing container or entry areas for the definition of the newly created container. The information that is captured within the system for each container consists of the container label, the type of container, volume and units, make and model, priority, and contents comments:
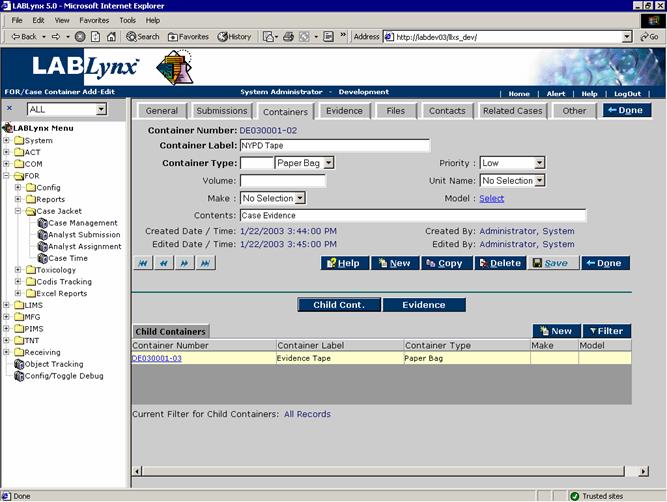
The user may edit an existing record simply by clicking the selected record, redirecting the user to the Case Container Add-Edit' screen. The user may also create a new record in this list by selecting the New button, which will also redirect to the Case Container Add-Edit screen. At the bottom of the screen the user may select either of two buttons in order to provide or associate additional details with the container. Specifically, the user may select the Child Cont. button in order to see the list of existing containers that are children of the selected container (or add a new one):
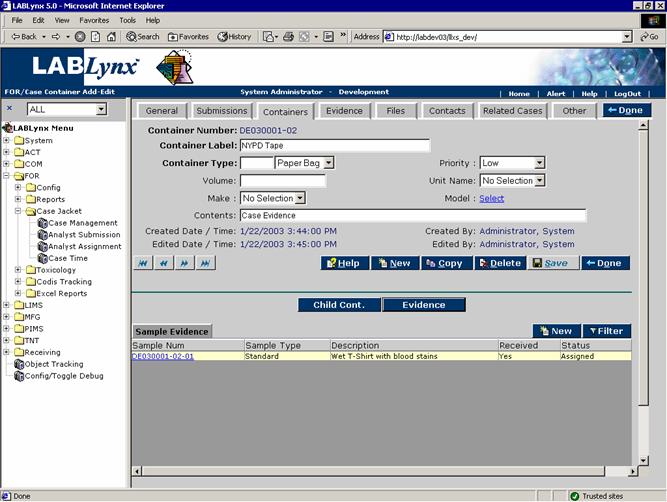
The user may also select the Evidence button in order to view the list of evidence contained within the respective container (or add a new one):
Special Notes: It is not necessary to create a container prior to entering in the evidence into the system. It is an option that is available to the user in order to provide a tool to define the actual relationship of evidence to container and container to submission. It is possible for the user to log in all pieces of evidence prior to ever creating a container and at a later time define the container(s) and place the evidence within them.
This action may be performed by selecting the Other tab, expanding the Submissions value, and dragging evidence from one container or submission to another container or submission.
Evidence
An evidence item is an entity that may be logged into the system for tracking purposes and assigned tests in order to capture data for reporting. Evidence items must exist in order to perform laboratory testing. It is to these entities that tests are assigned. For example, a bloody glove is submitted to the laboratory for examination. The user responsible for the log-in of this item will decide whether to create a new case or assign it to a new one. Once the case decision has been made, the user then determines if it a part of an existing submission or a new one. The user may then optionally create a container to indicate the origination of the evidence and finally, the user may log in the evidence and assign any required tests (DNA would be a good example in this case).
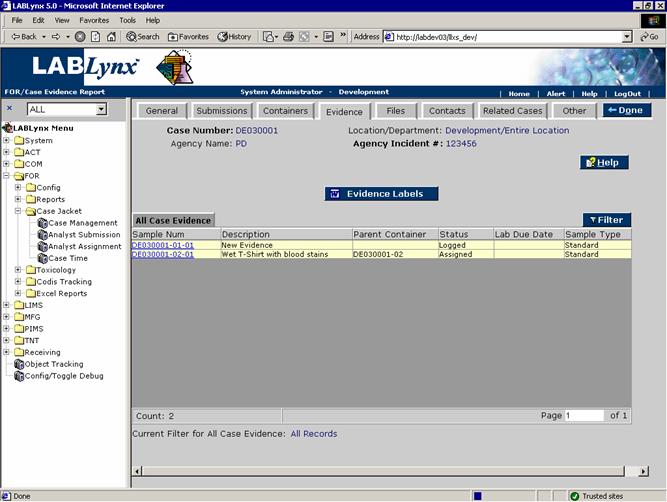
From the Case Evidence Report (the Evidence tab) the user is shown a list of all evidence assigned to the selected case. The actual pieces of evidence are listed in the All Case Evidence list at the bottom of the screen. The information displayed about each evidence item in the list includes the sample/evidence number, the description, the container/submission from which the evidence originated, status, due date, and sample type:
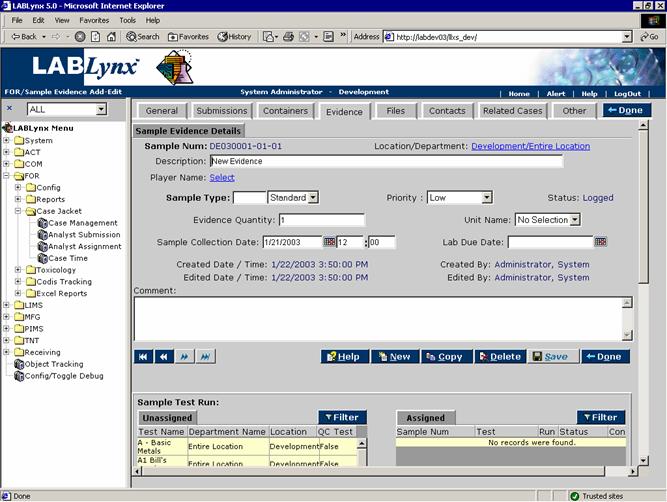
The user may edit an existing record simply by clicking the selected record, redirecting the user to the Sample Evidence Add-Edit' screen. The user may also create a new record in this list by selecting the New button, which will also redirect to the Sample Evidence Add-Edit screen. The information that is captured within the system for each evidence item consists of the description, a player assignment (optional – and the list is derived from the player list defined for the general information at the case level), type of evidence, priority, quantity, collection and expected due date information, and a general comment area:
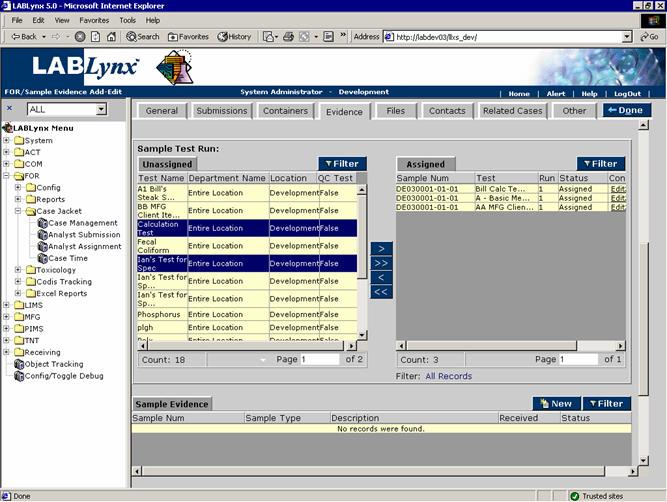
In the middle of the screen the user may select any number of tests from the Unassigned list and select an action to move the selected test(s) to the Assigned list. At the bottom of the screen, the user will see another list called Sample Evidence. This list allows the user to view evidence derived from the main piece of evidence (defined at the top of the screen) or create a new piece of evidence that is to be considered a child (derivative, fraction, split, etc.) of the parent evidence. Clicking on the New button brings the user to the same screens as defined for the Sample Evidence Add-Edit screen as described above:
Case file
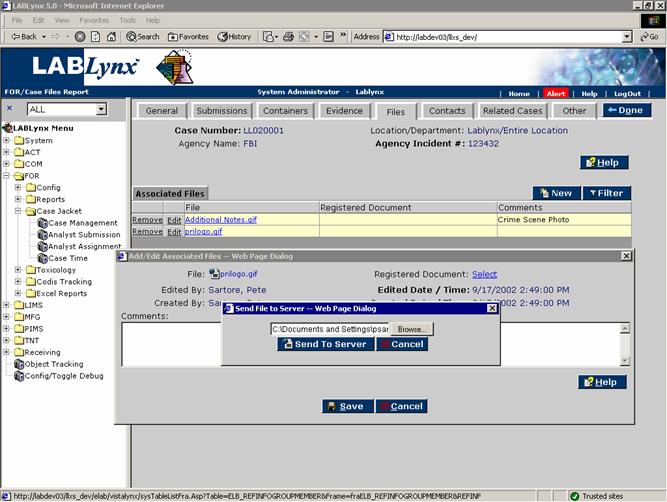
Associated case files are electronic files derived from one of two places. The primary origination area for the file is directly from the user's PC. The system allows the user to select a file and upload it to the server for later retrieval. Alternatively, the user may select a file from a list of documents that are already defined and managed through the Document Management area of the system.
The ability to associate electronic files (documents, images, etc.) allows a user to centrally store these files on the server and associate them with their respective cases. Once stored, this functionality allows for the retrieval of these files from any browser that can gain access to the LIMS. With Web site access and user access granted through logging into the LIMS, the user may download and view these files without concern for the PC the user is logged into.
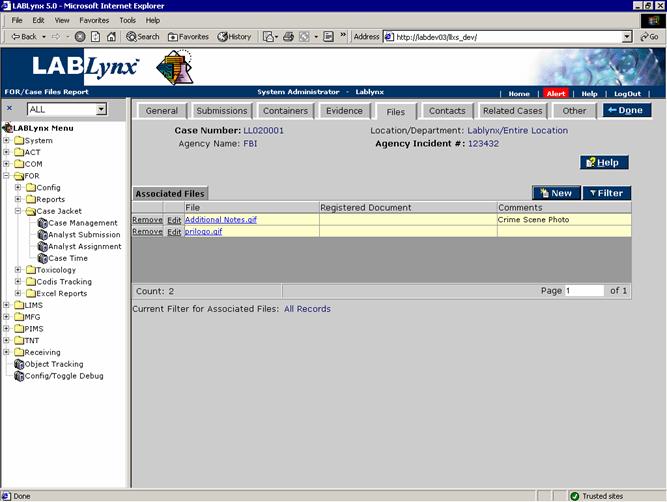
From the Case Files Report (the Files tab) the user is shown a list of all files that have been associated to the respective case. The information being displayed to the user includes the hyperlinked file name (clicking it allows the user to download and view the file contents), the registered document name (only displays a value if the document being assigned to the case is derived from the document tracking area), and an abbreviated user-entered comment:
In addition to viewing the previously assigned document(s) by clicking on the hyperlinked file name, the user may select the New button to assign a new file to the case:
Alternatively, documents previously assigned to the case may be deleted by selecting the Remove button to the left of the file name or edited by selecting the Edit button.
Special Notes: Users may select either a local file to upload to the system or a registered file (already uploaded via the Document Management area). In either case, the hyperlinked file name will allow the user to view and download the file. In the case of registered documents, users are not allowed to upload new files over the existing ones being managed. The user is really only granted the ability to upload files by selecting the file and uploading, but they are distinct operations.
Article topic continues here: LabLynx KB:Receiving - 6.2 forensic receiving
